Cashless Campus - Parent Guide
Welcome to the Parent guide for Cashless Campus. This guide will assist you with a clear step-by-step process of how to make use of our Cashless Campus System. Should anything in the Cashless Campus System, or in this guide be unclear, or should you have any questions which are not covered herein, please get in touch with our support desk by emailing us at support@eezipay.com, and we will gladly assist you in person.
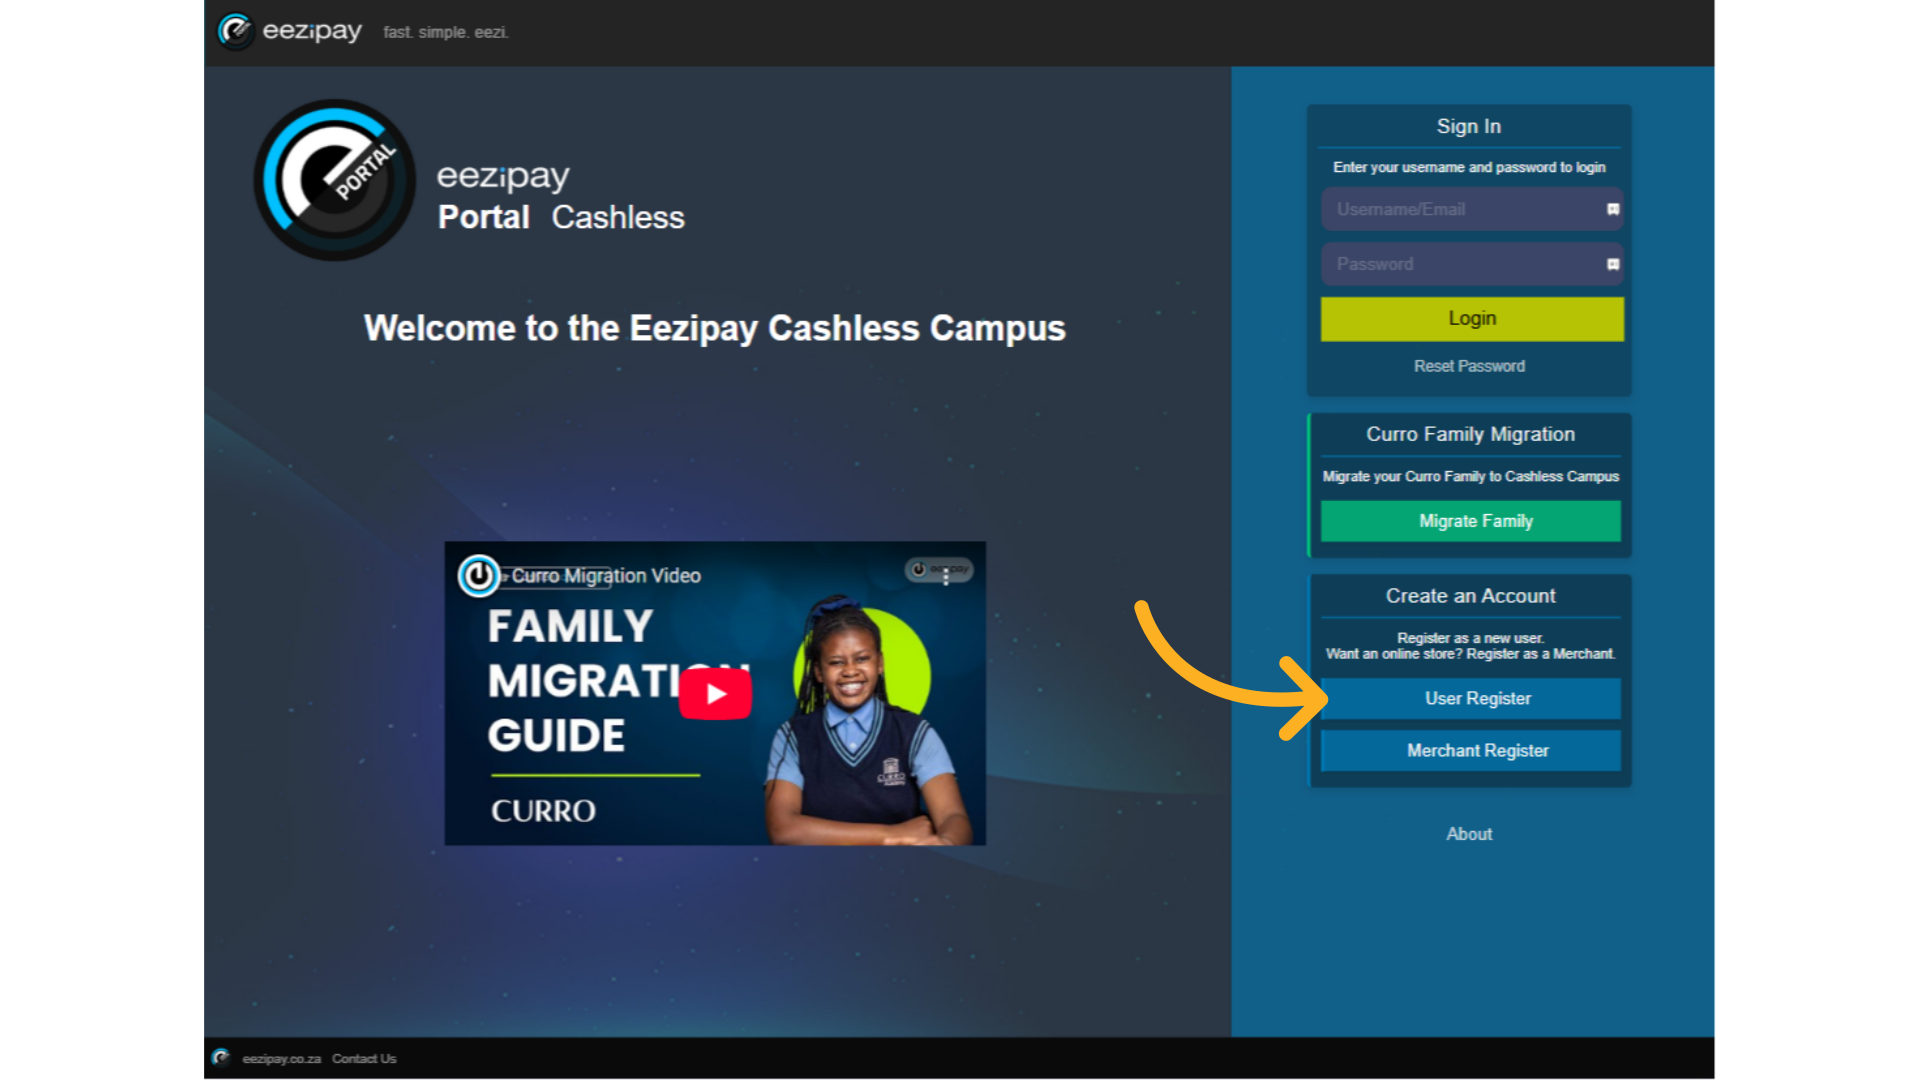
1. live.eezipay.co.za
How to Register A Parent on the Cashless Campus Solution. Users can simply follow the following link, live.eezipay.co.za followed by clicking on the User Register button.
2. Registration vs Migration Popup
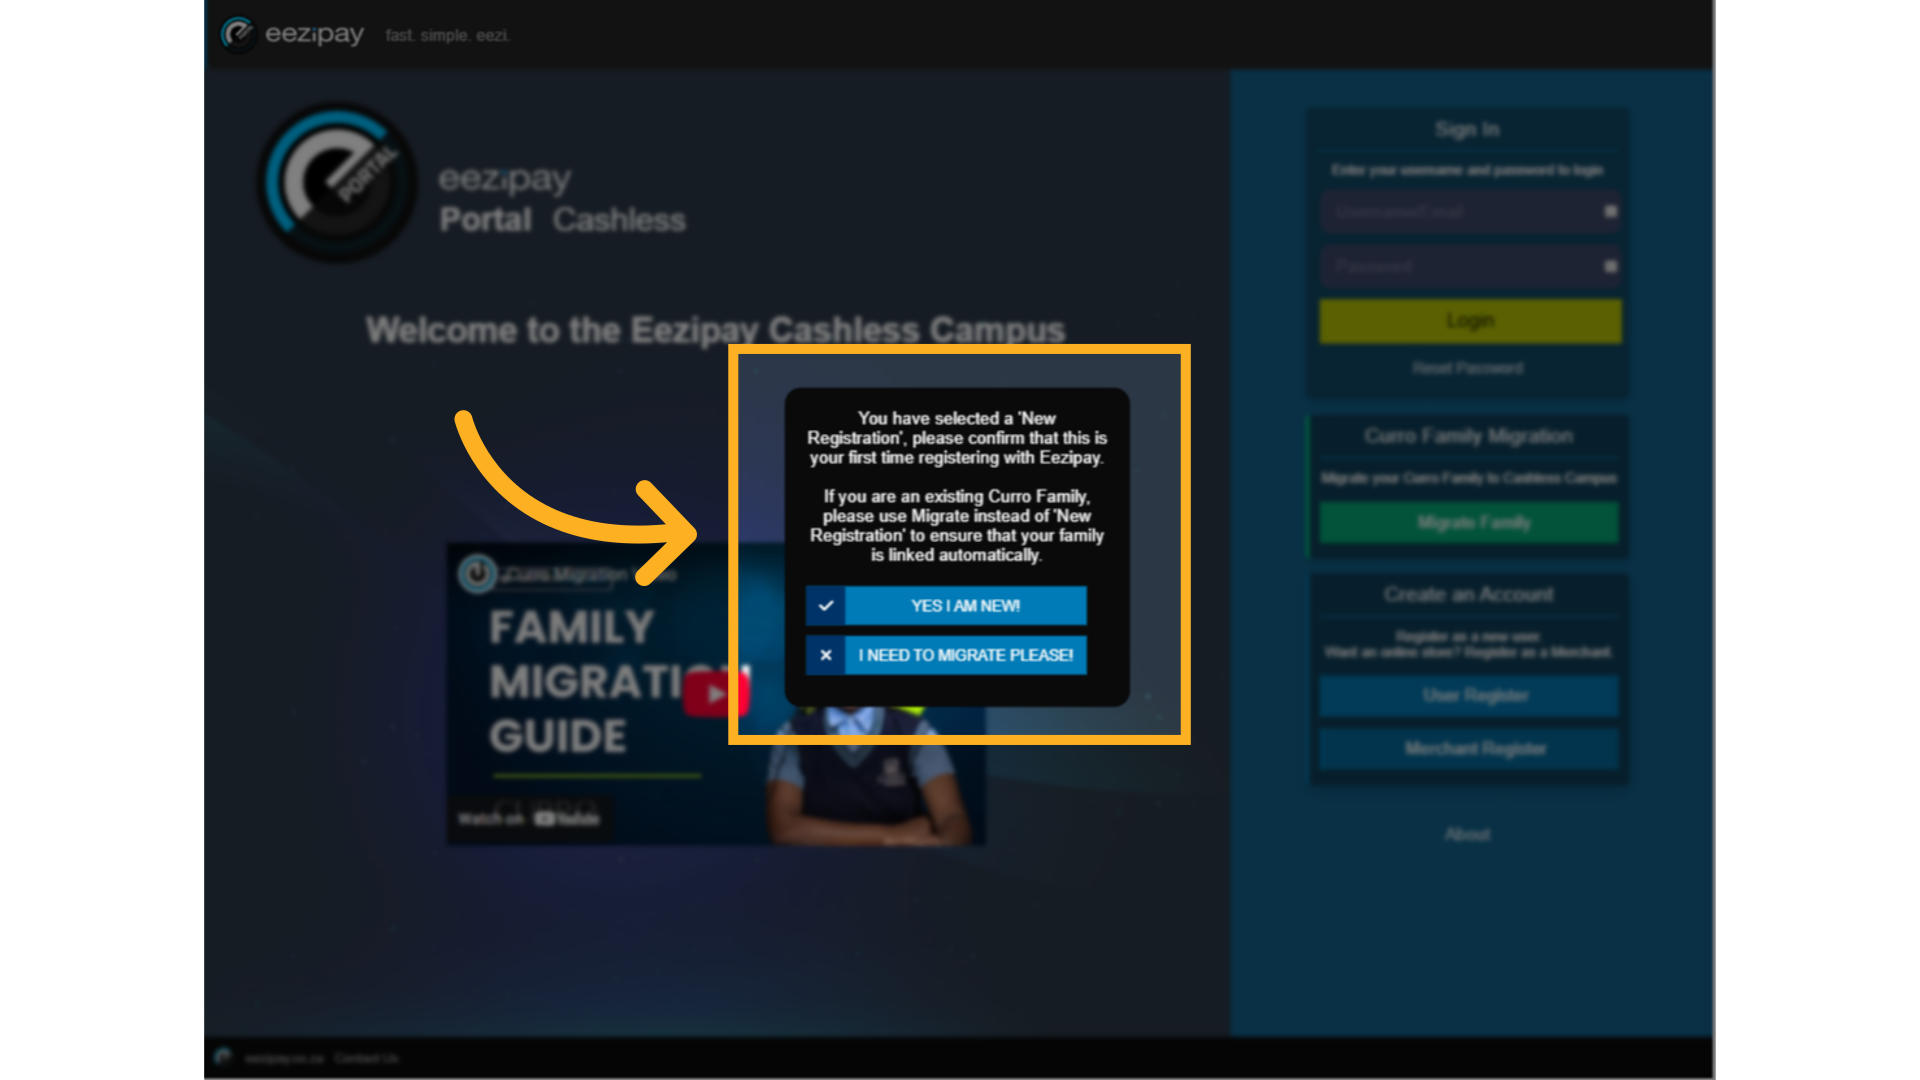
Upon clicking, the system will provide a pop-up message to double check whether you would like to register for the first time, or migrate from MyHub. Click on the "Yes I Am New" button to start the parent registration process
3. Parents Details
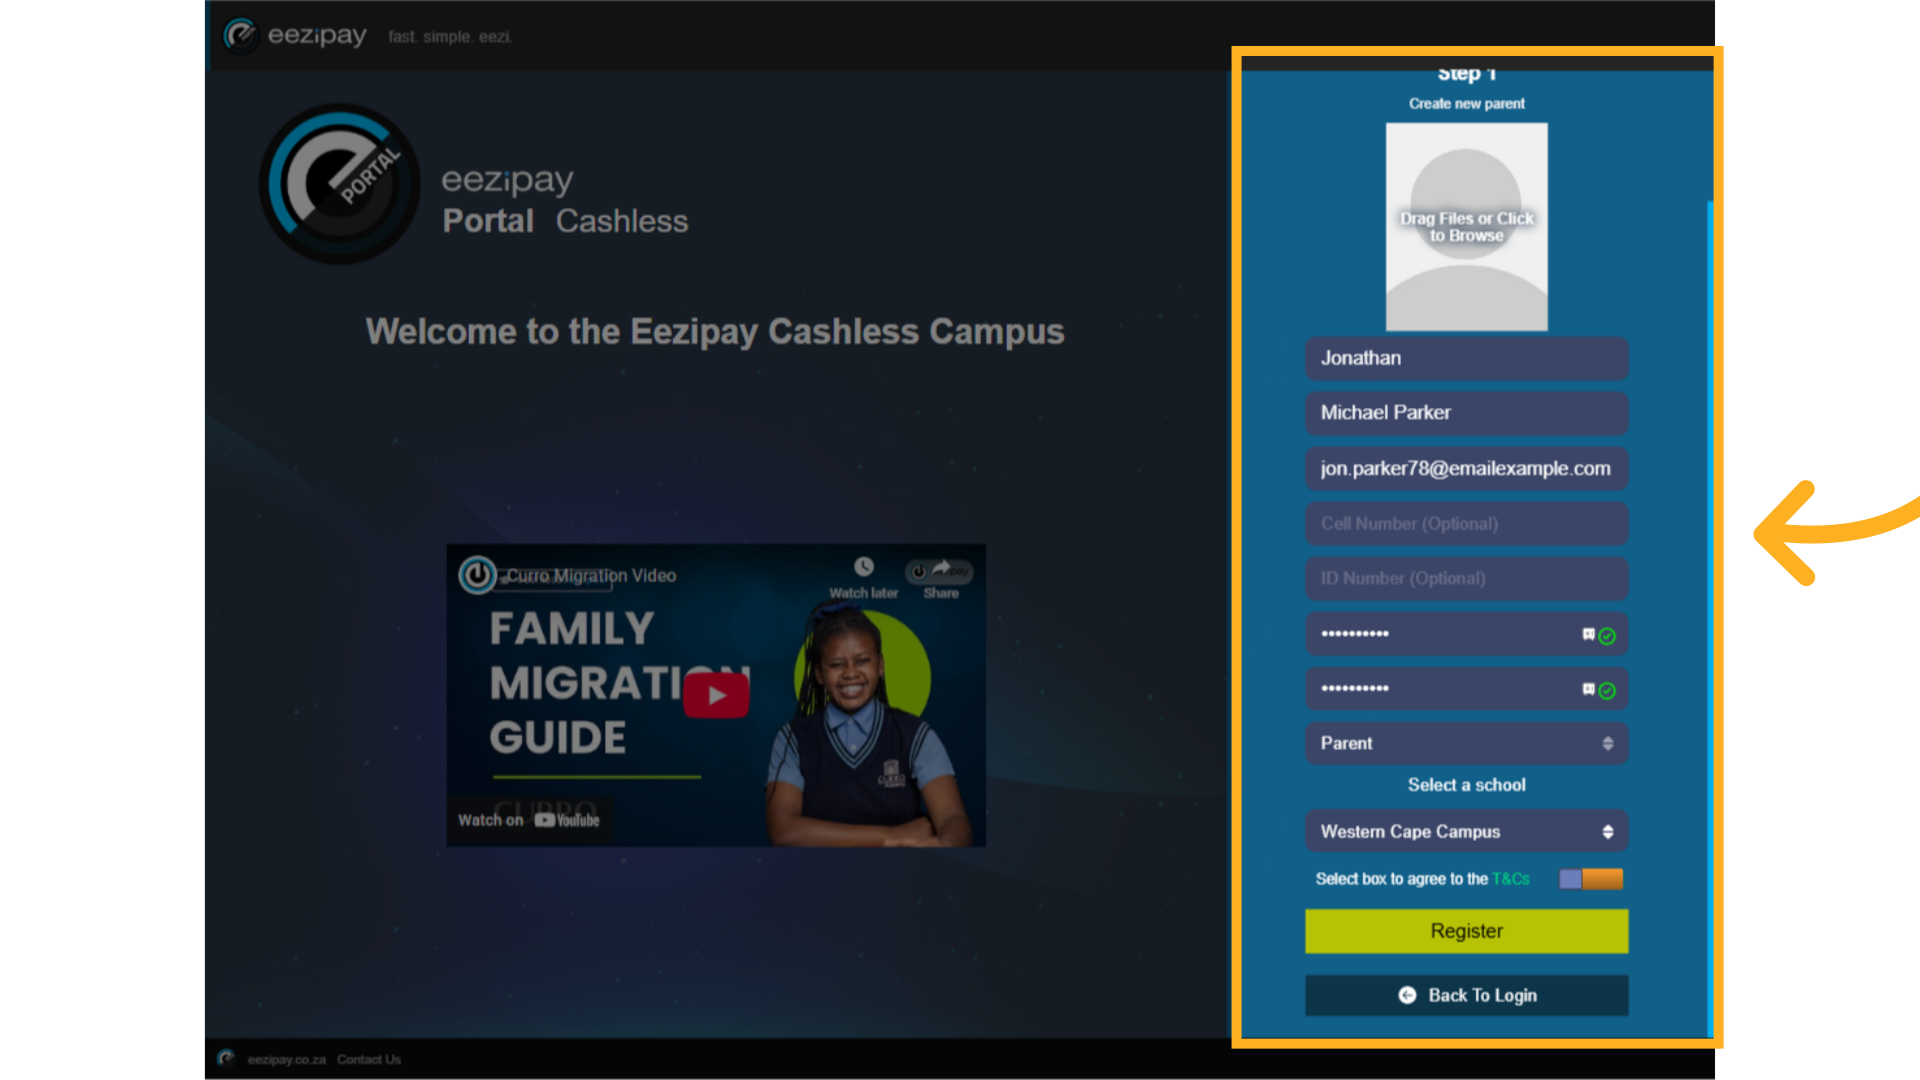
Enter your details, including name, surname, email, ID number, password, user type (in this case choose "Parent," and select the school.
4. Ts&Cs
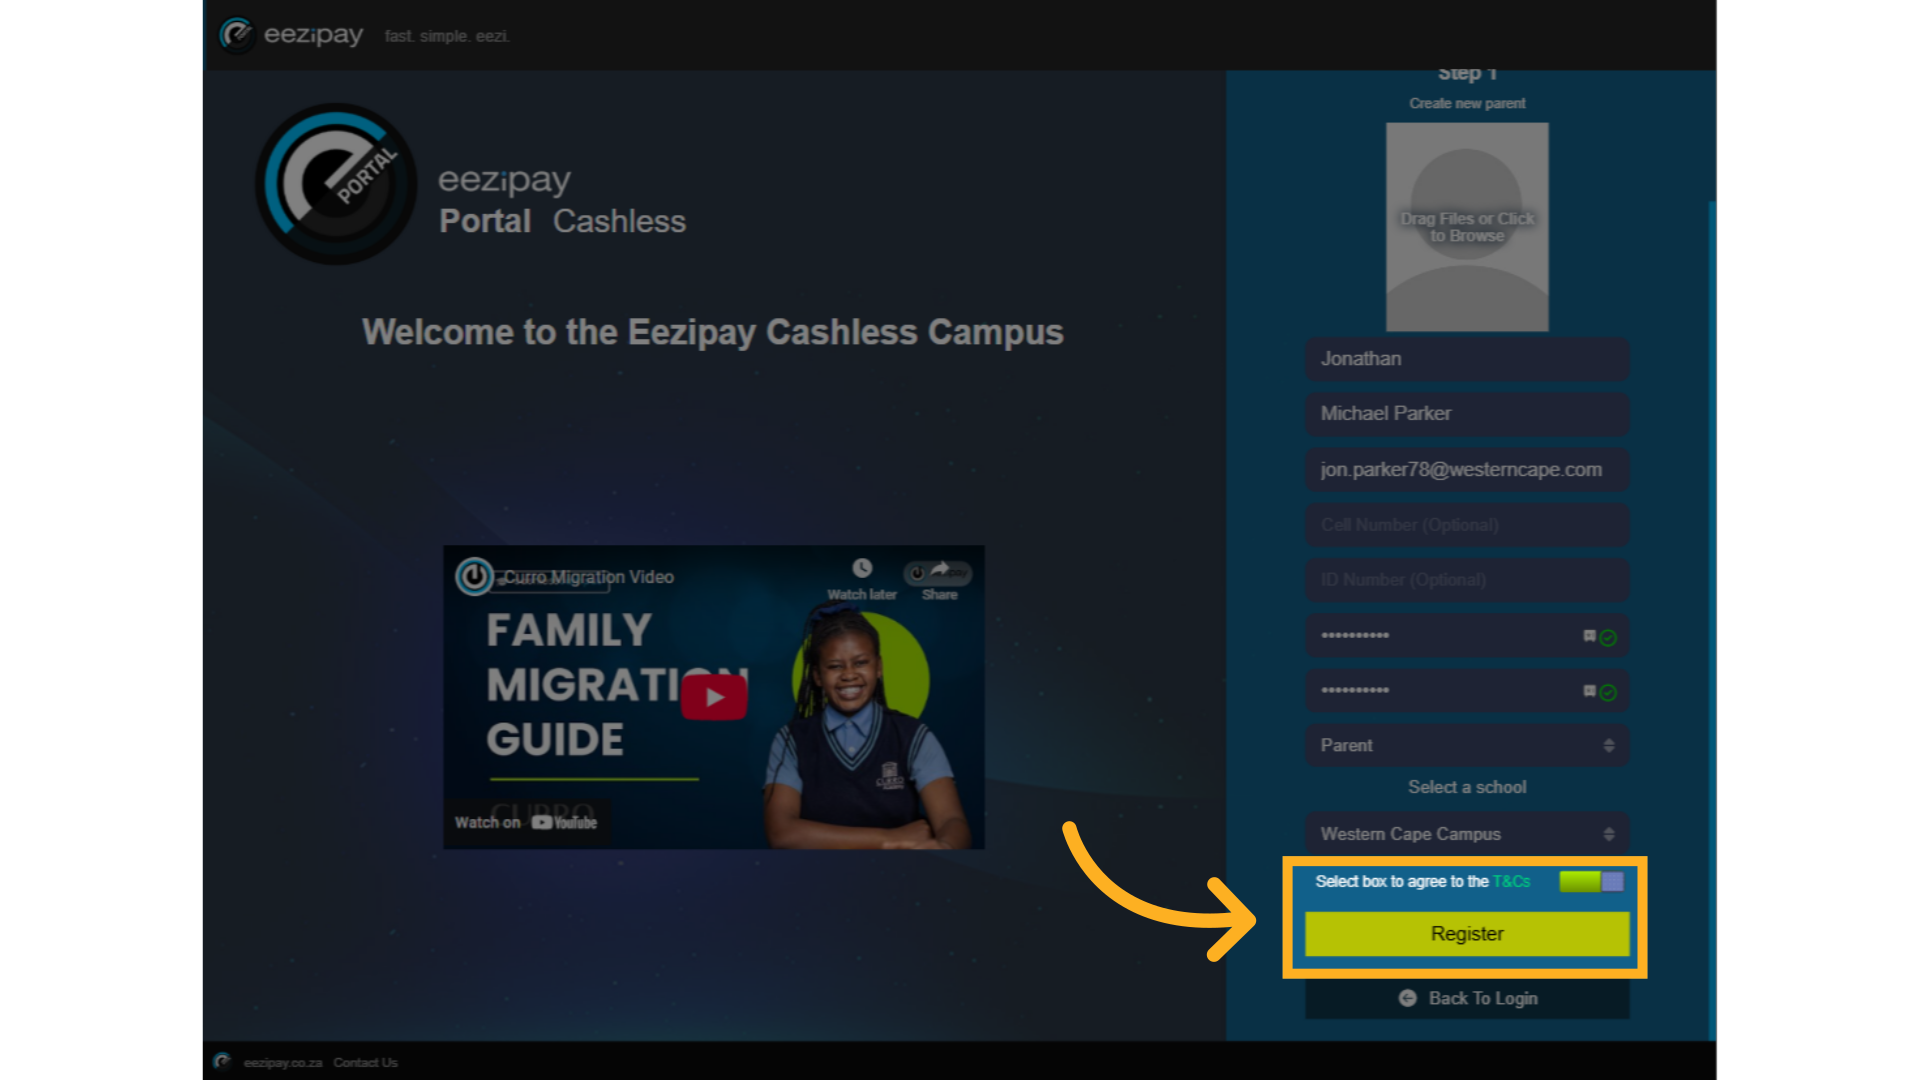
Click on the T's&C’s toggle followed by the Register button.
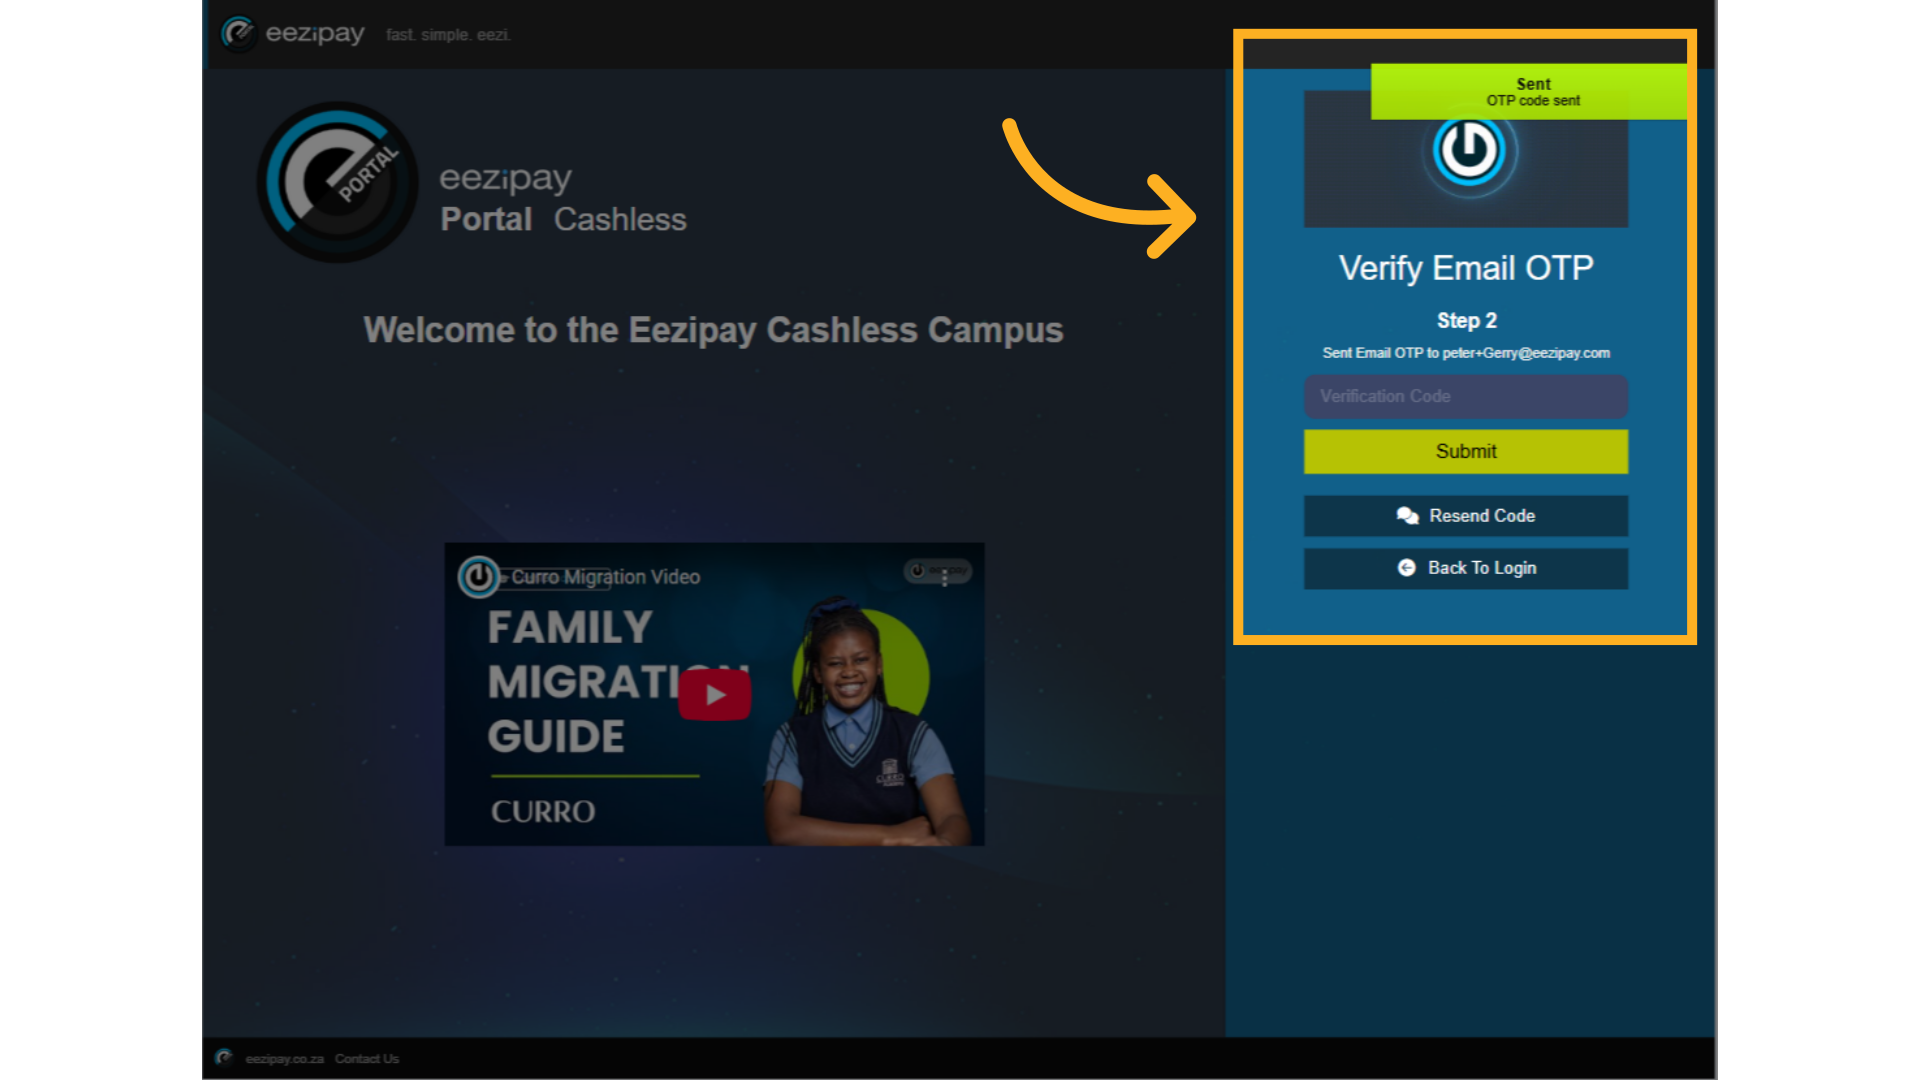
5. Send OTP
The system will send you an OTP to your Email address, which is required for Parent registration.
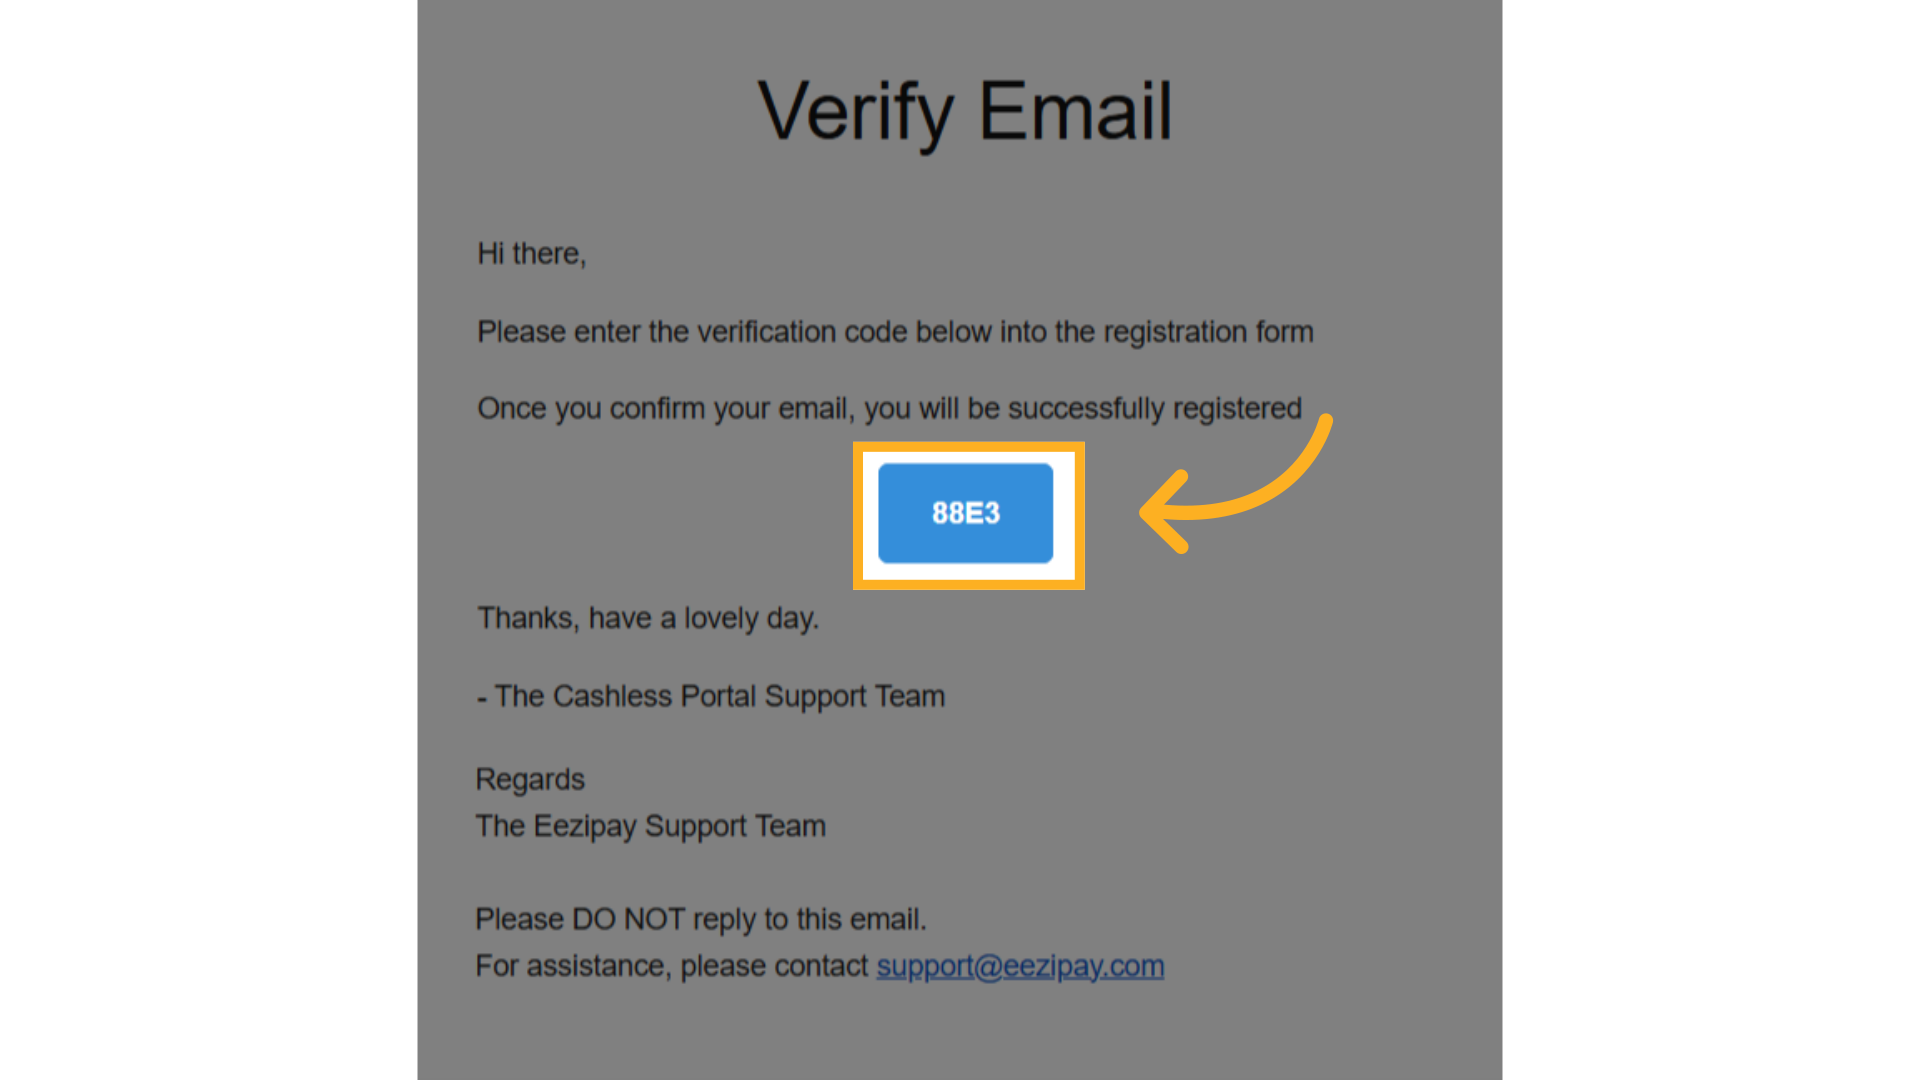
6. OTP email
Users will receive a verification code via email. Copy this code.
7. Paste Code
Paste the Verification Code received, and click on the submit button.

8. Create Family
The system will prompt you to create or join a family. Select an option. If you are the first parent to register, click the Create New Family radio button, then click proceed.

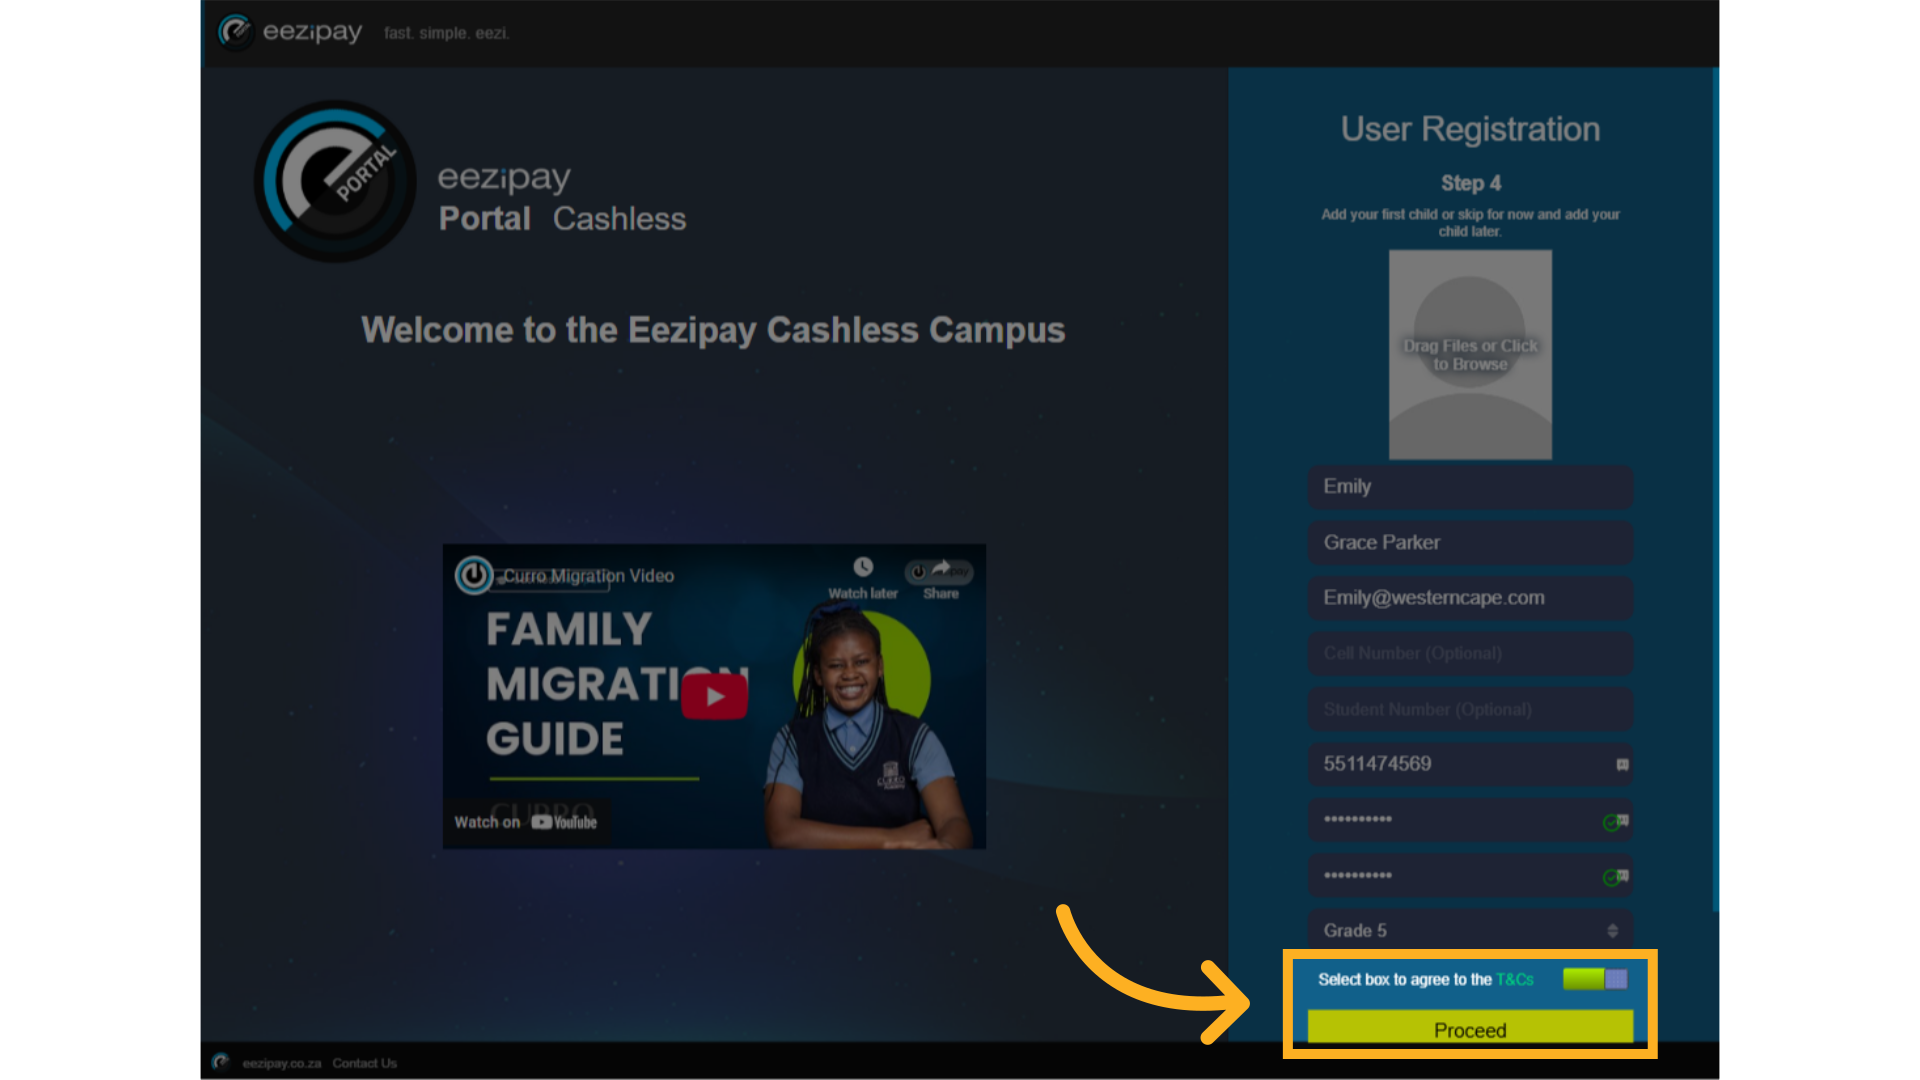
9. Note: email addresses must be unique for each user.
While creating a new account, you can add your child's info, set and confirm a password, and select the grade.

10. Ts&Cs Child
Click on the T's&C’s toggle followed by the Proceed button.
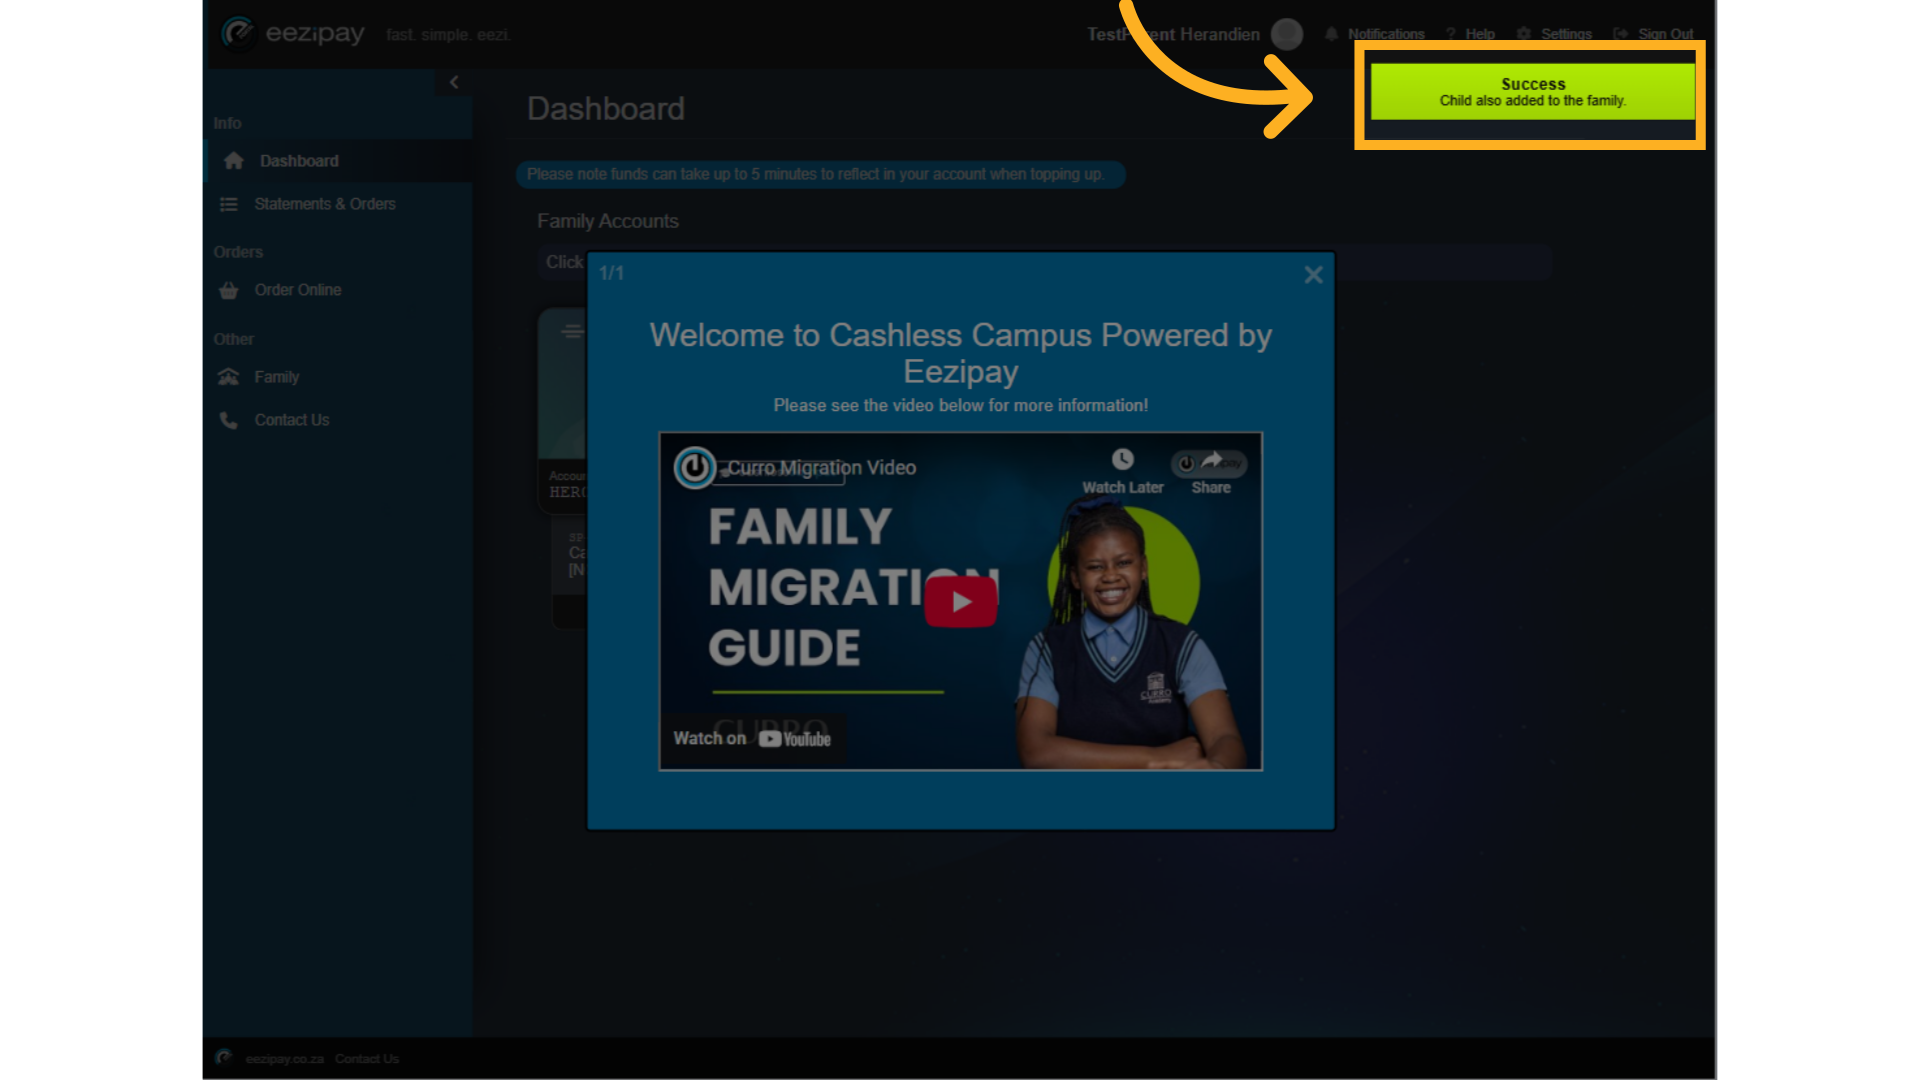
11. Child Added Successfully
The system will indicate that your child has been successfully added to the family.
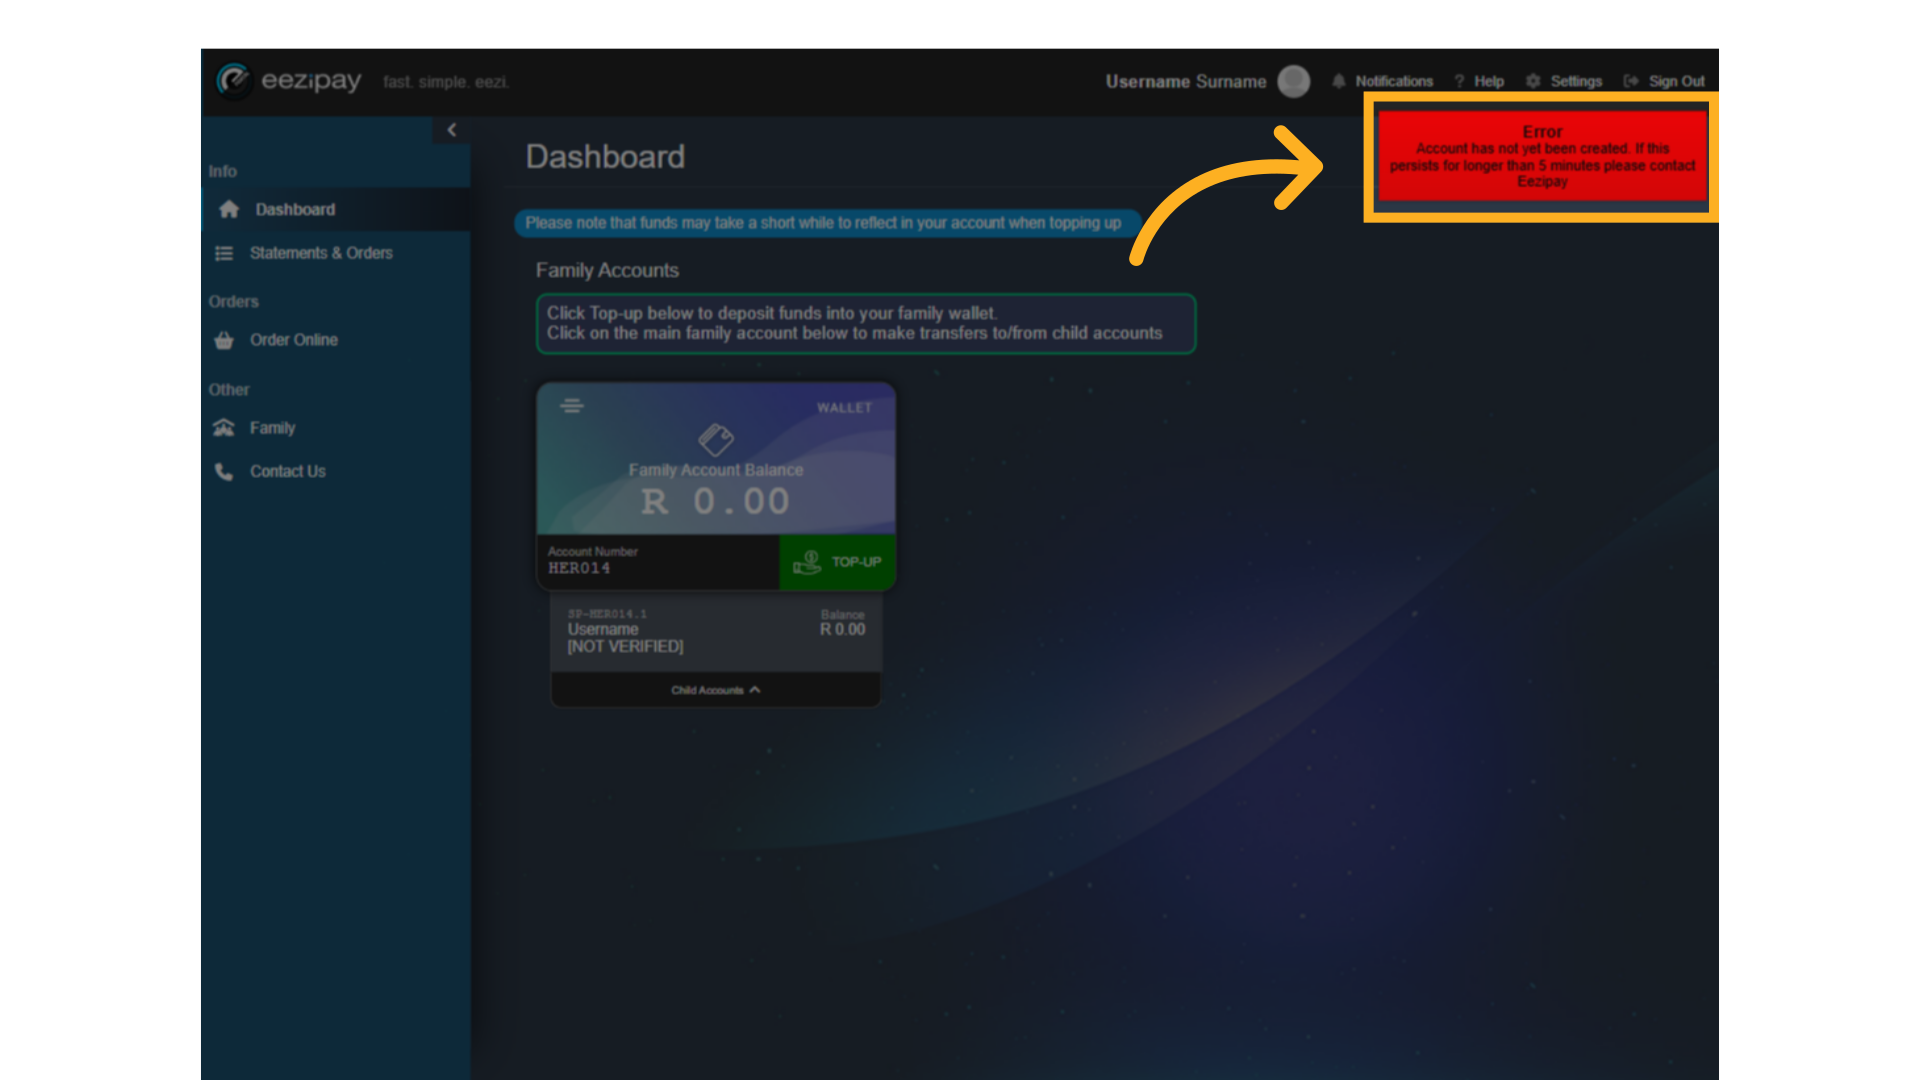
12. error after registration
Immediately after registering, the system will require about 5 mins for account creation. If you try to perform a top-up during this time, you will receive the following error.
13. How to Join An Existing Family on Registration
How to Join An Existing Family on Registration

14. Join existing family.
To join an existing family, follow the same registration process, but when you get to step 3, simply select the "Join Existing Family" toggle, and click proceed.

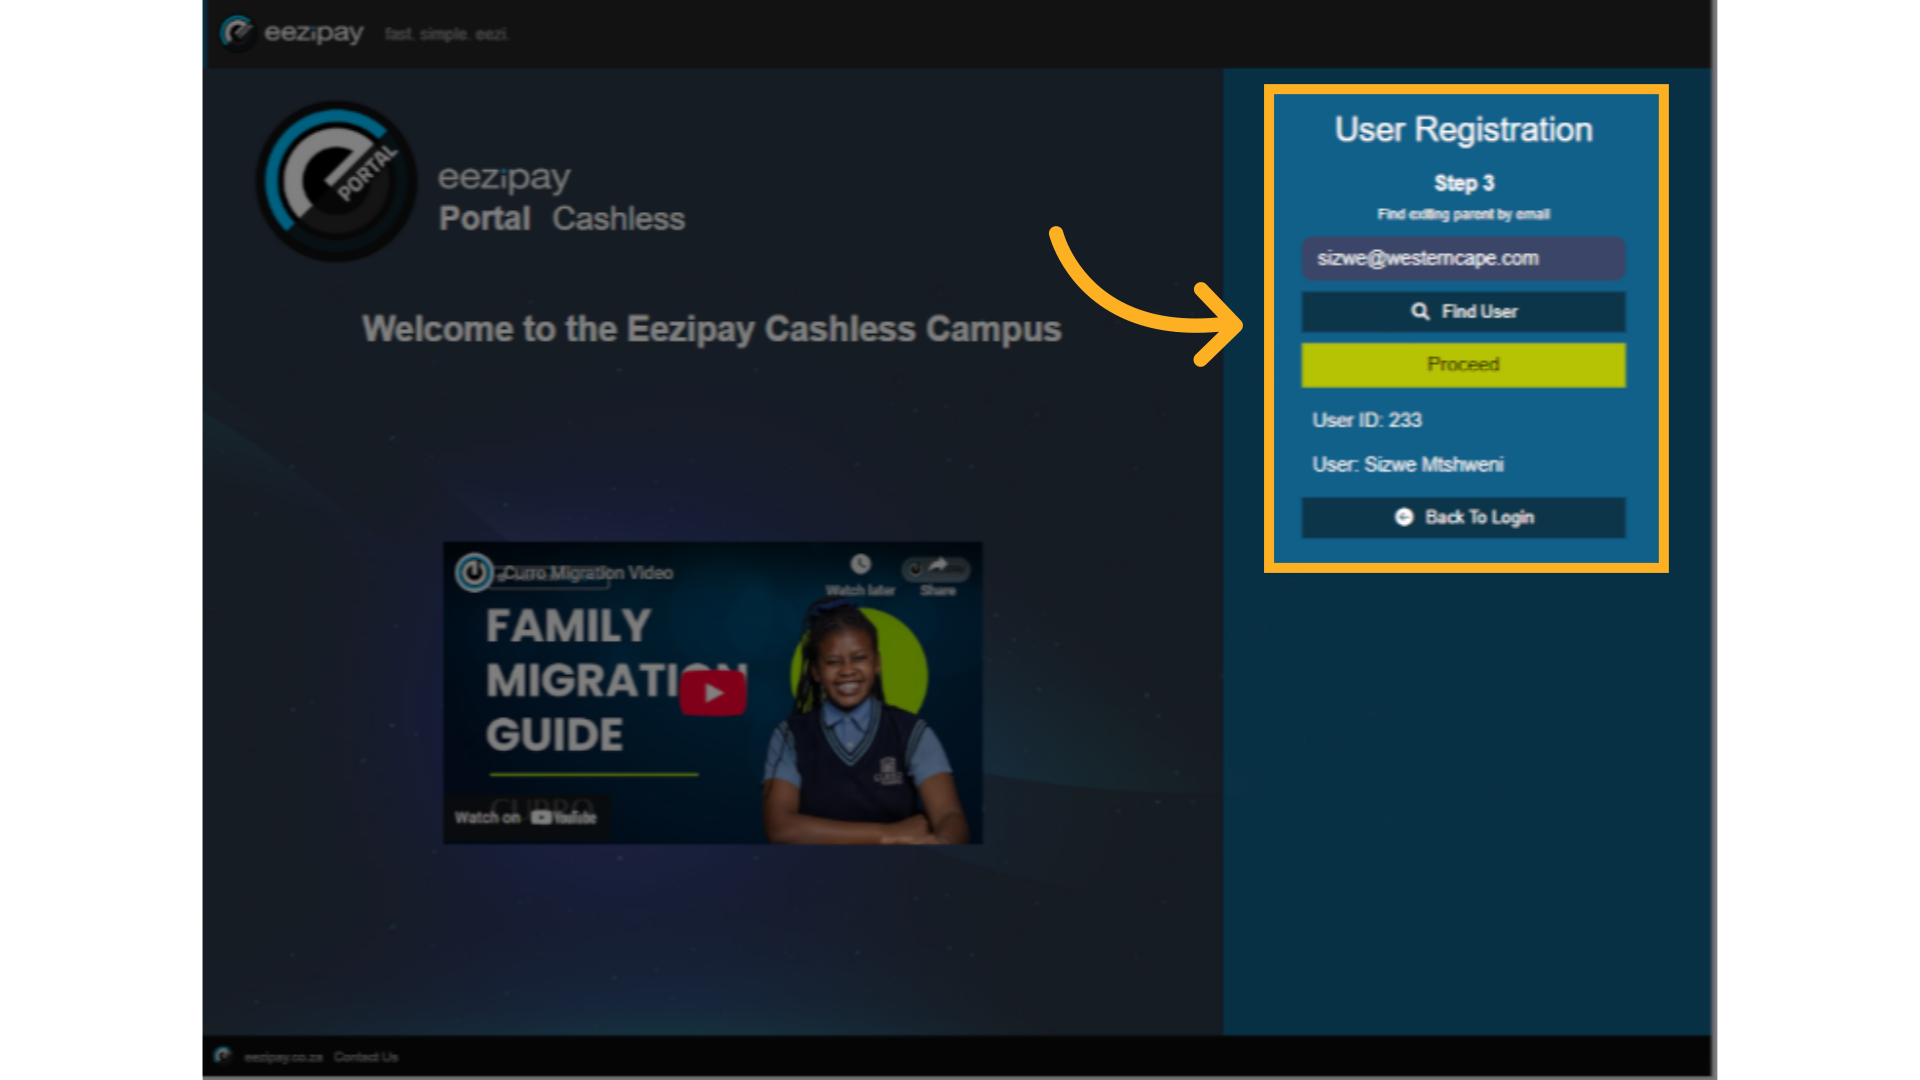
15. Find family via email
Then find the existing parent by searching for them with their email address. Once found, click proceed to join their family.
16. Join request notification
The system will register you and send a join request to the main family member for approval via email.

17. Accept Co-Parent Request
Existing parents can view co-parent requests by doing the following. 1. Click on Family in the main menu on the left. 2. Click on Requests in the top menu. 3. Click on the Accept Co-Parent button.

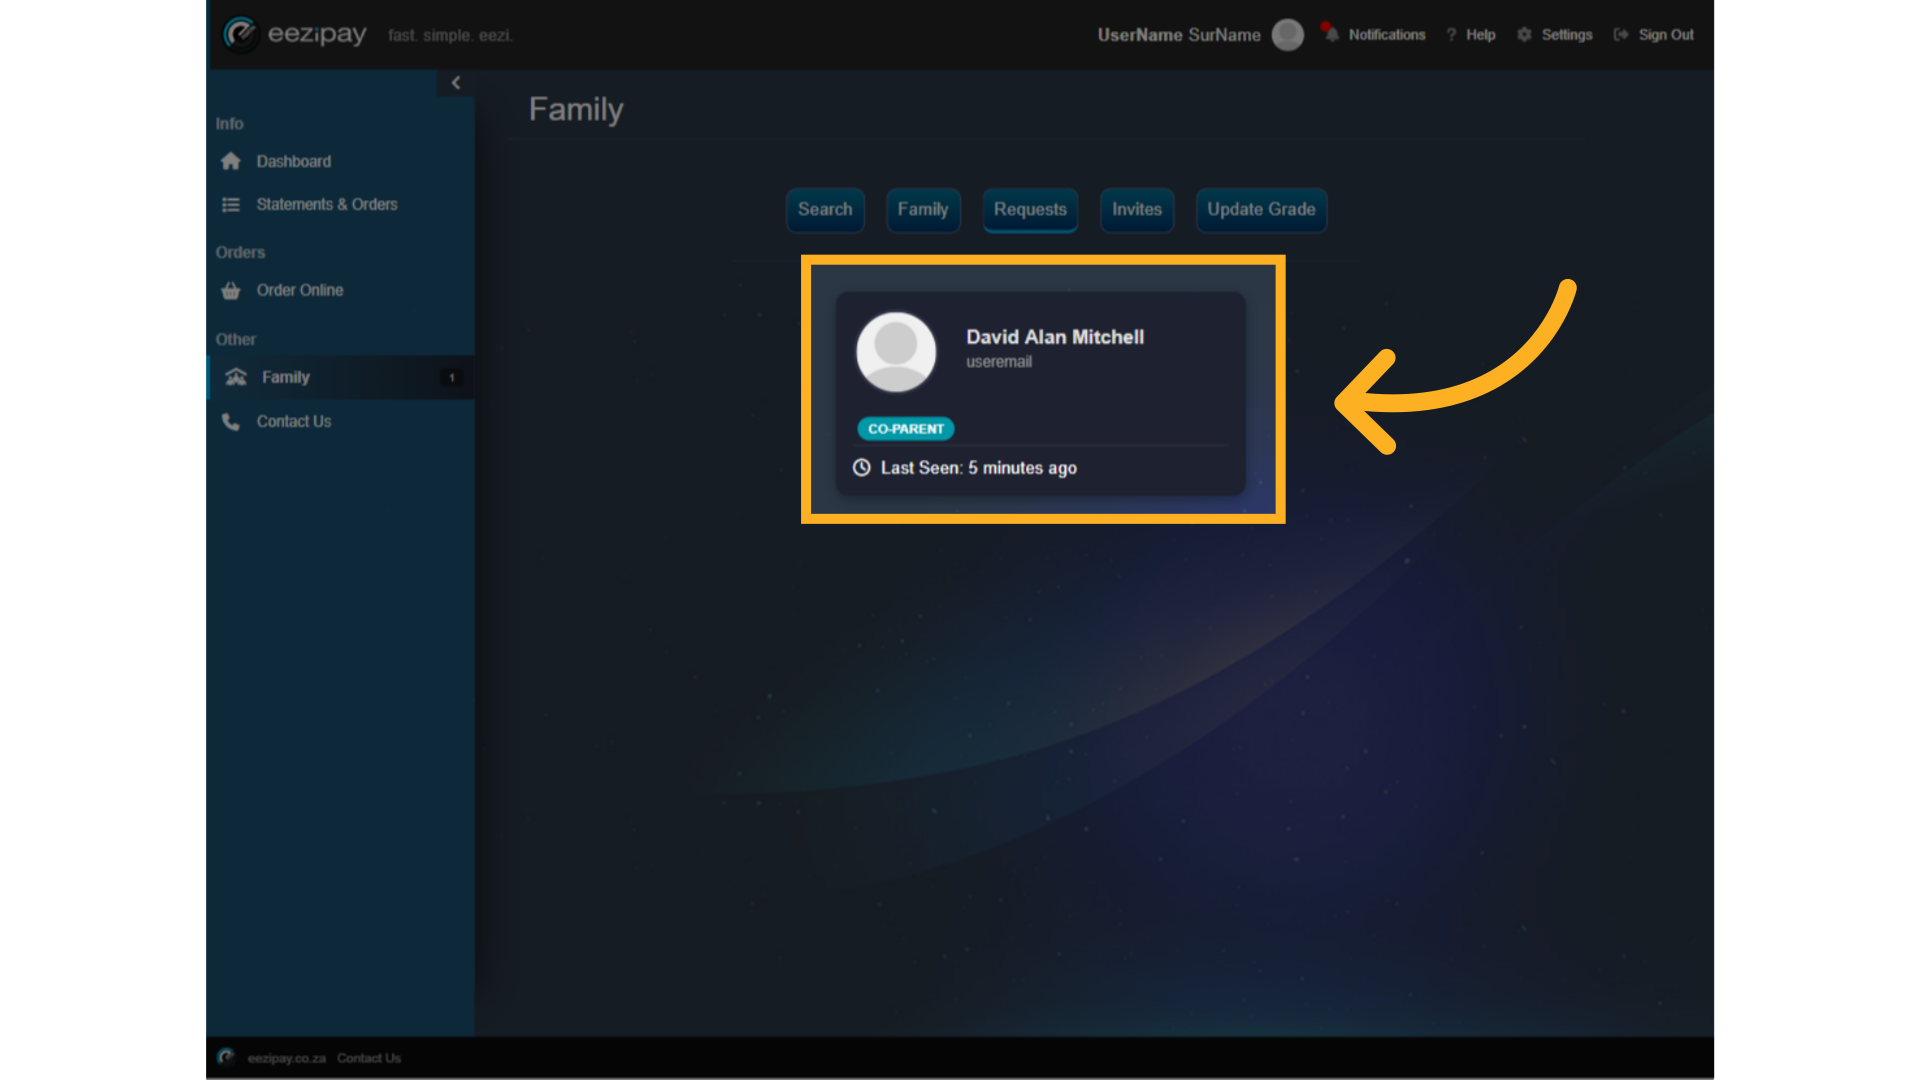
18. Co-parent accepted
The family member will be accepted as a co-parent and can now log in.
19. How to Register a Child to a family
How to Register a Child to a family
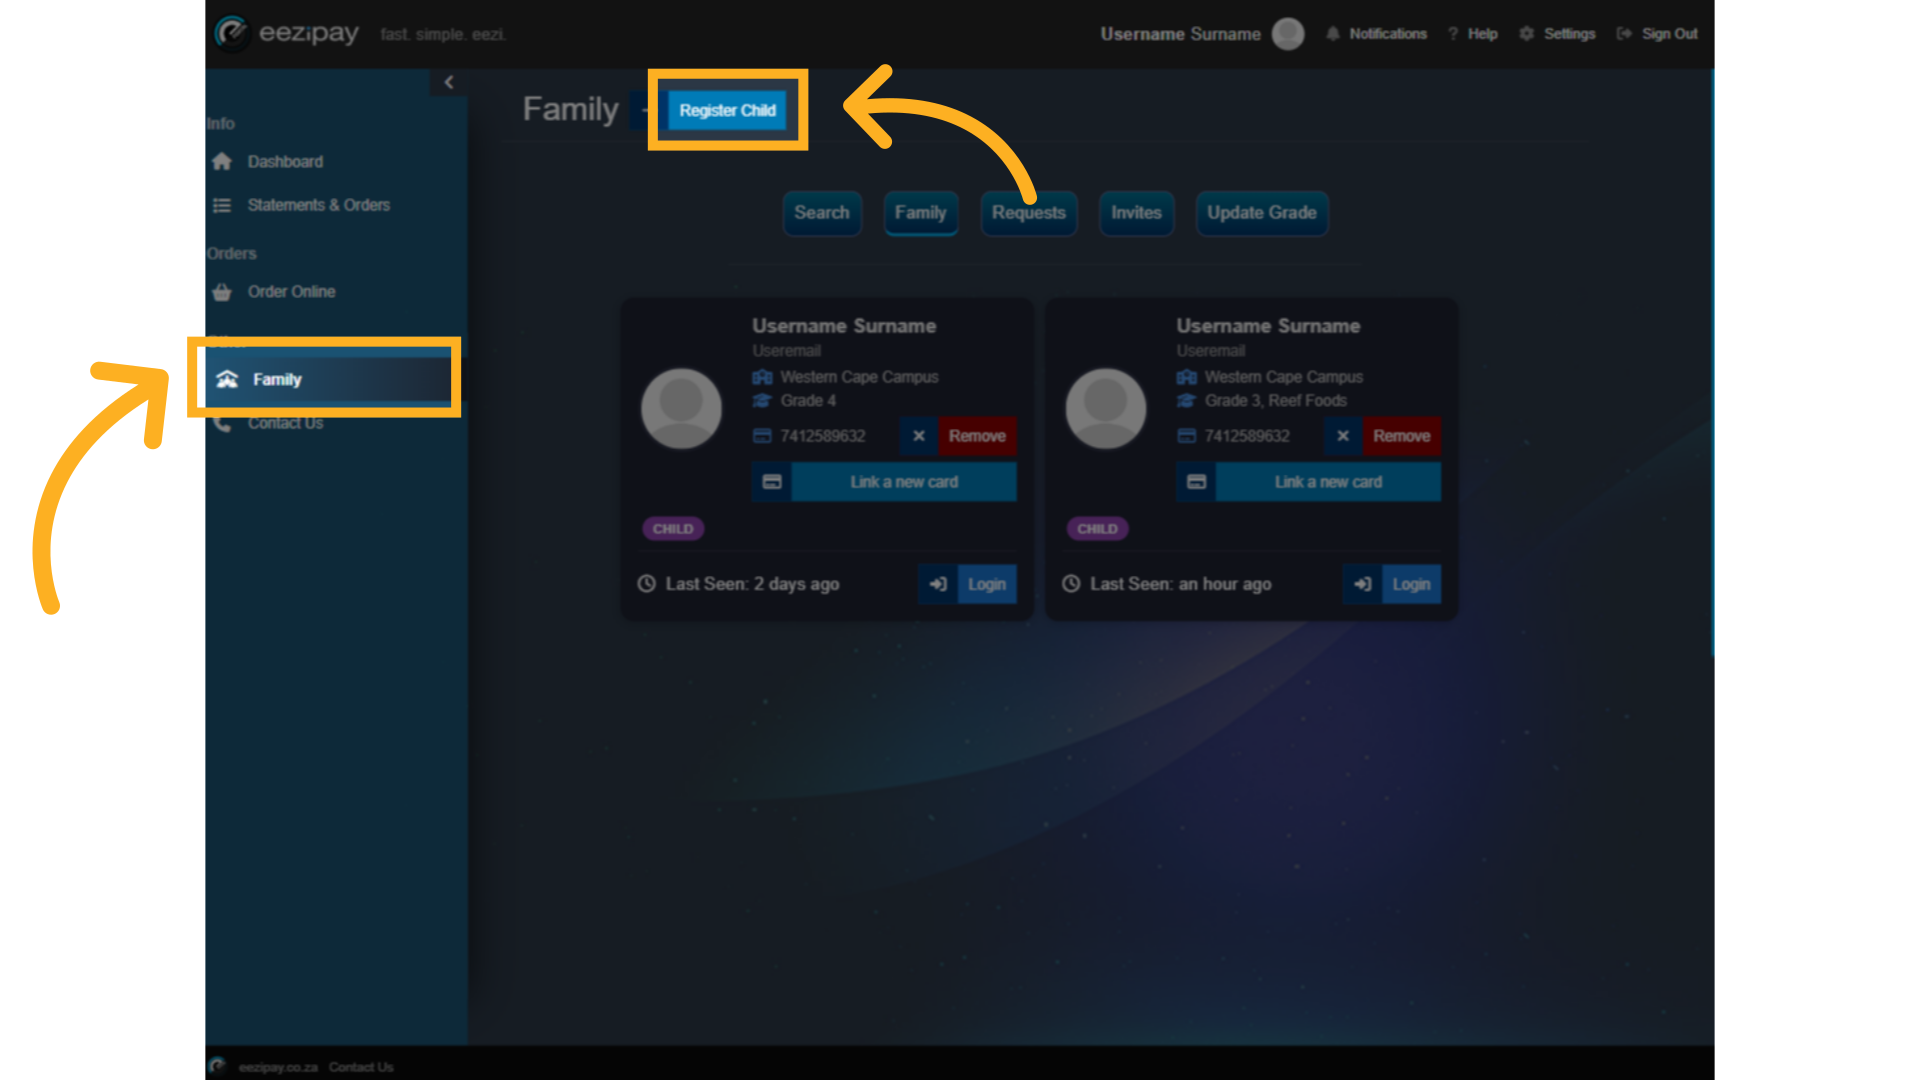
20. Register Child
Click the Family button on the left side of the portal. Then click on the Register Child button at the top.
21. Note: email addresses must be unique for each user.
Simply enter the Child’s information such as Name, Surname, Email, Cellphone Number (optional), Student Number, Card Number, Password, School, and Grade. Finally, select the toggle that indicates that all the information is correct, and select submit.

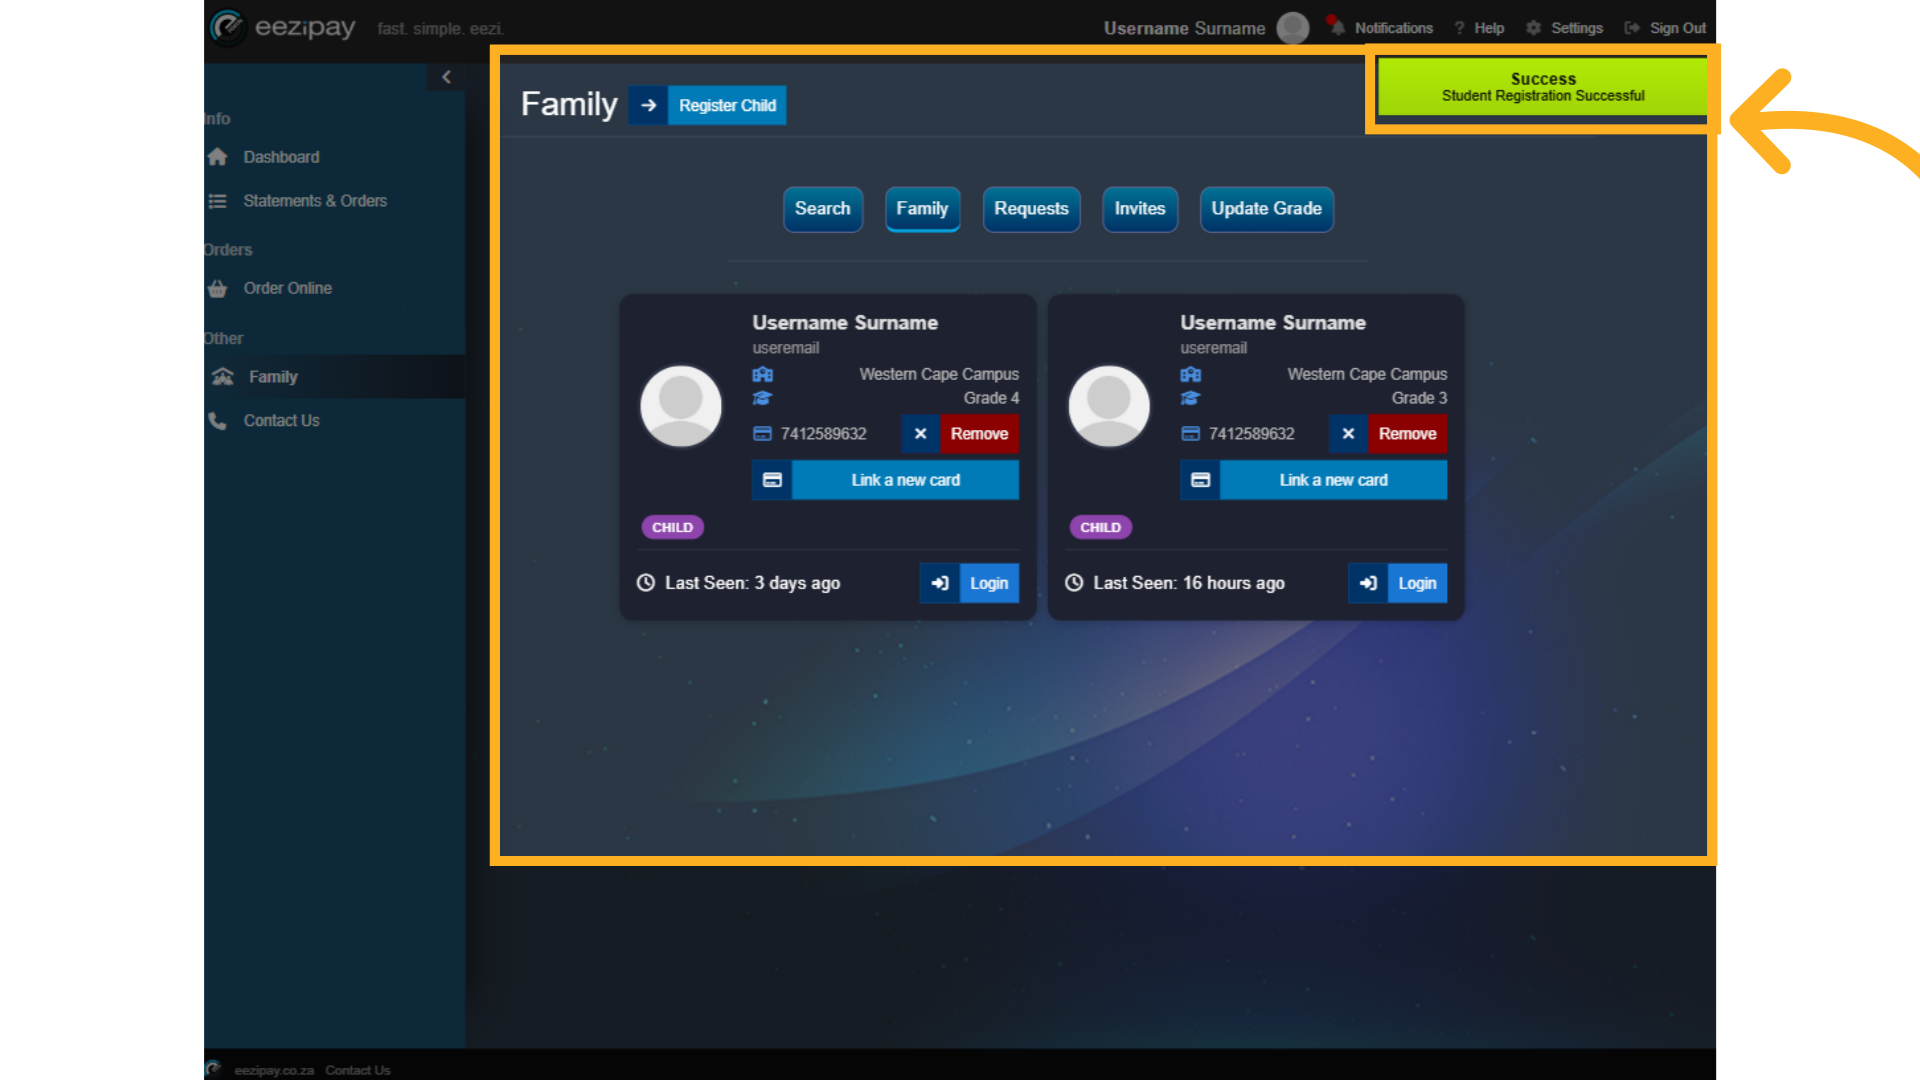
22. Child Registration Success
You will then see a success message indicating that the child was registered and linked to your family profile. And you will see the new child profile added to your family.
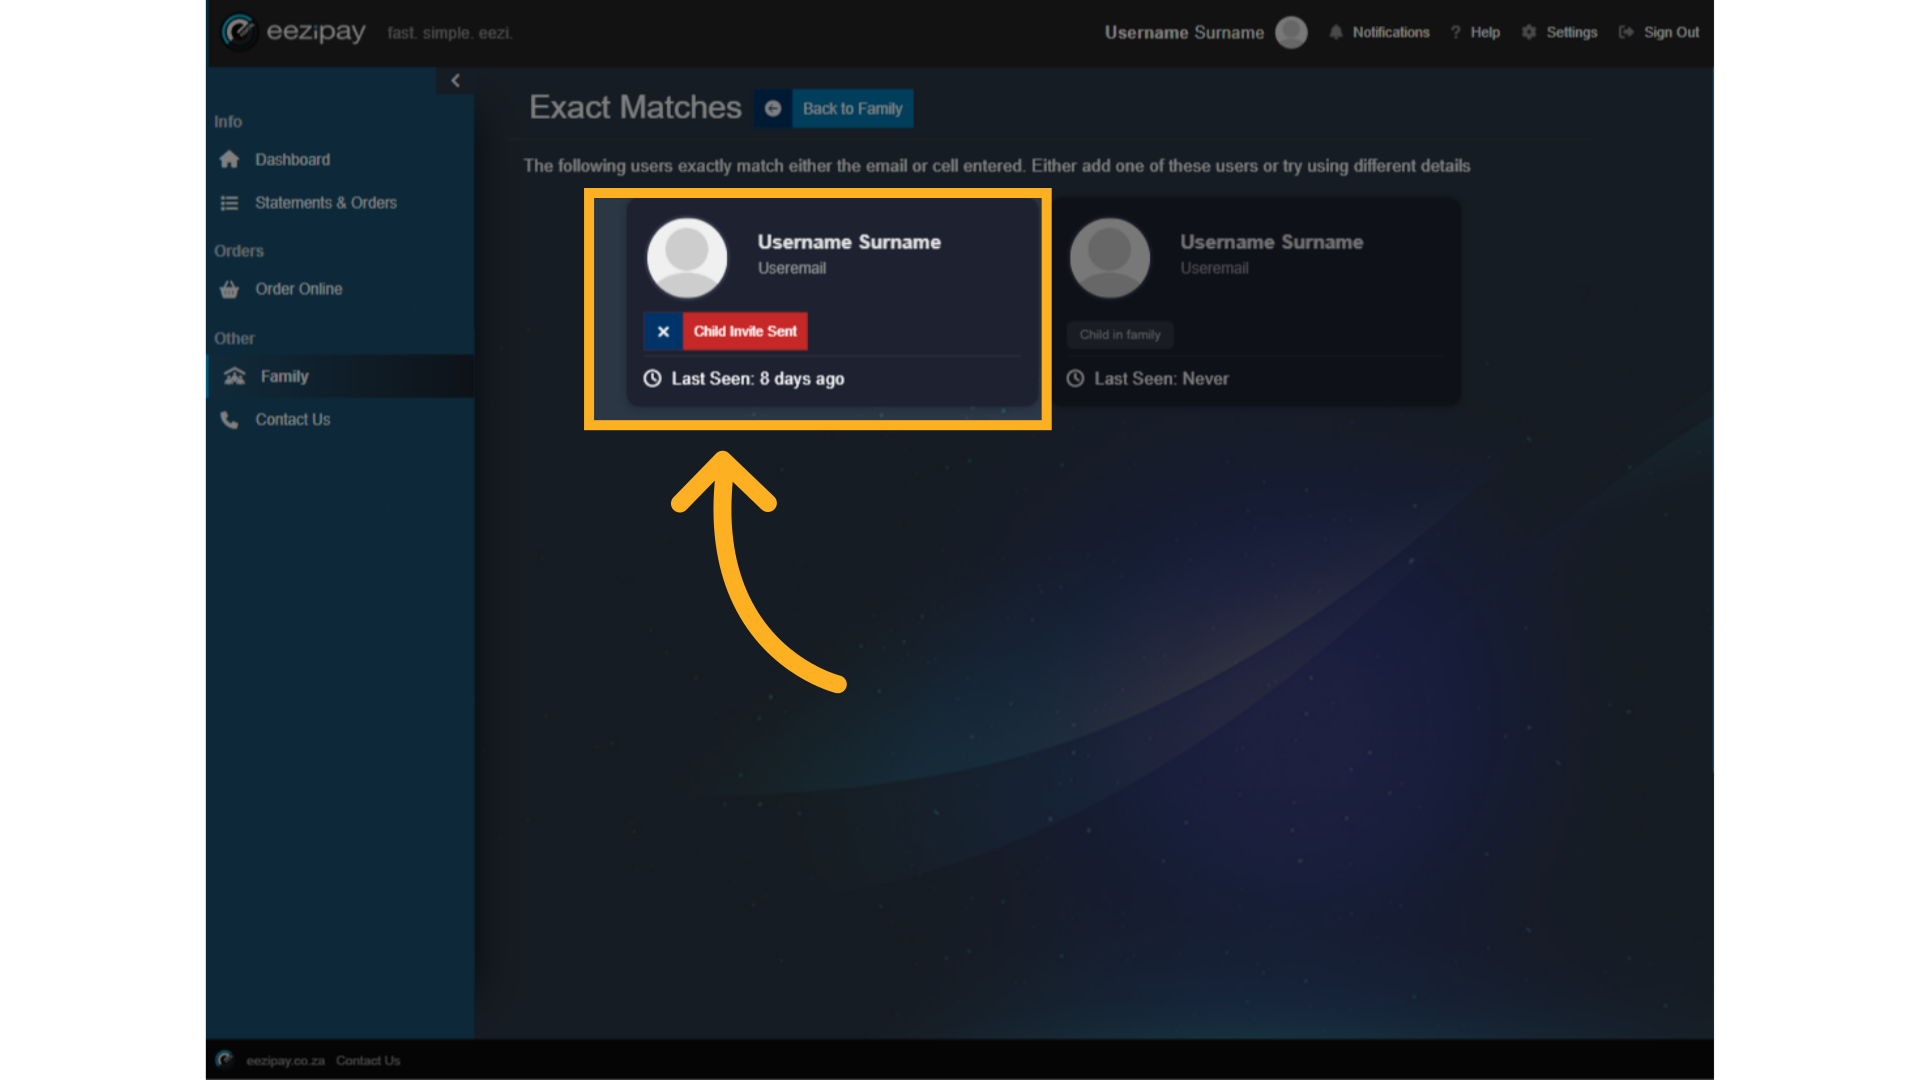
23. Child already registered
If the child is already registered, the system will indicate this by showing the child's profile. To add an already registered child to your family, simply click on the Add Child button.

24. Child Invitation sent
The system will then indicate that the Child invite was sent.
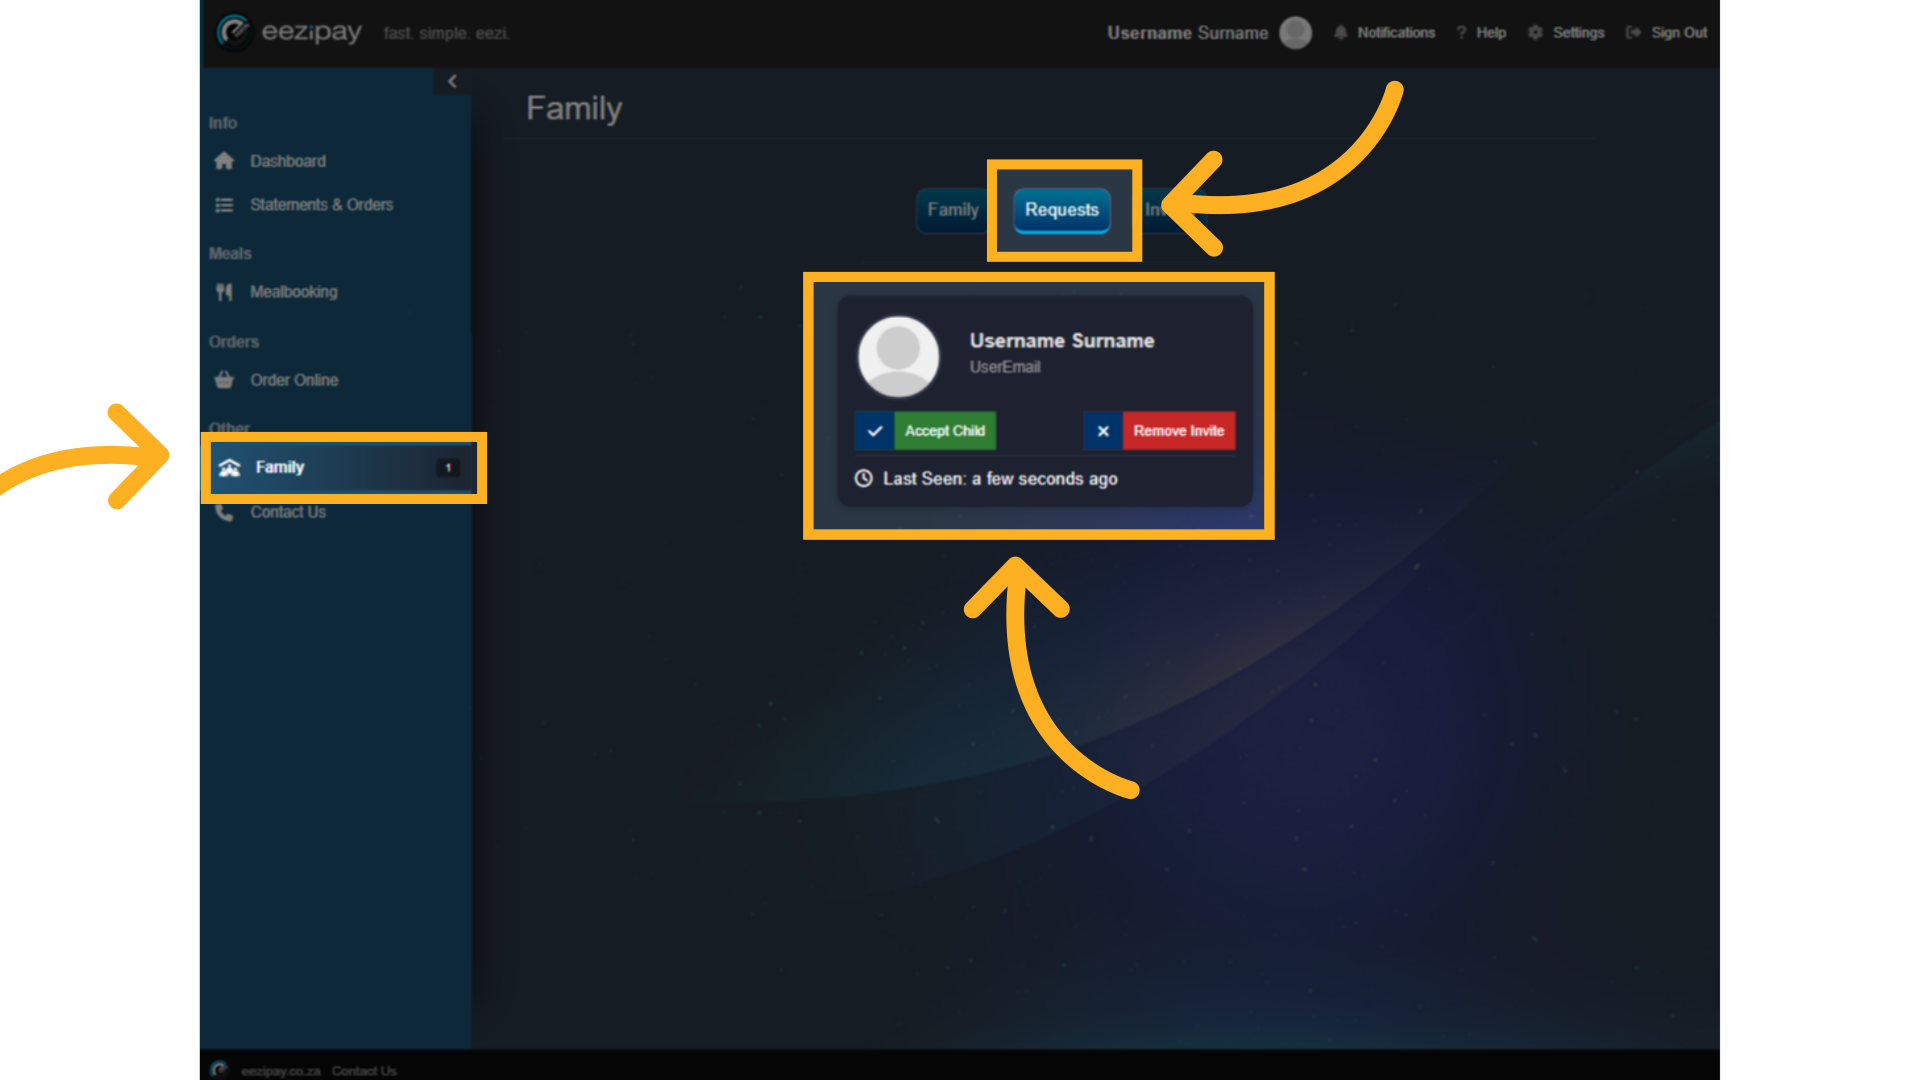
25. Accept Child
To accept a Child's invitation, Parents can log into the portal and complete the following steps. 1. Click on the family button in the main menu. 2. Click on the search button in the top menu. 3. Check who the request is from, and click the "Accept Child" button. Once accepted, parents will receive an email notification indicating that their child has accepted the invite.
26. How to Top-Up
How to Top-Up your account.

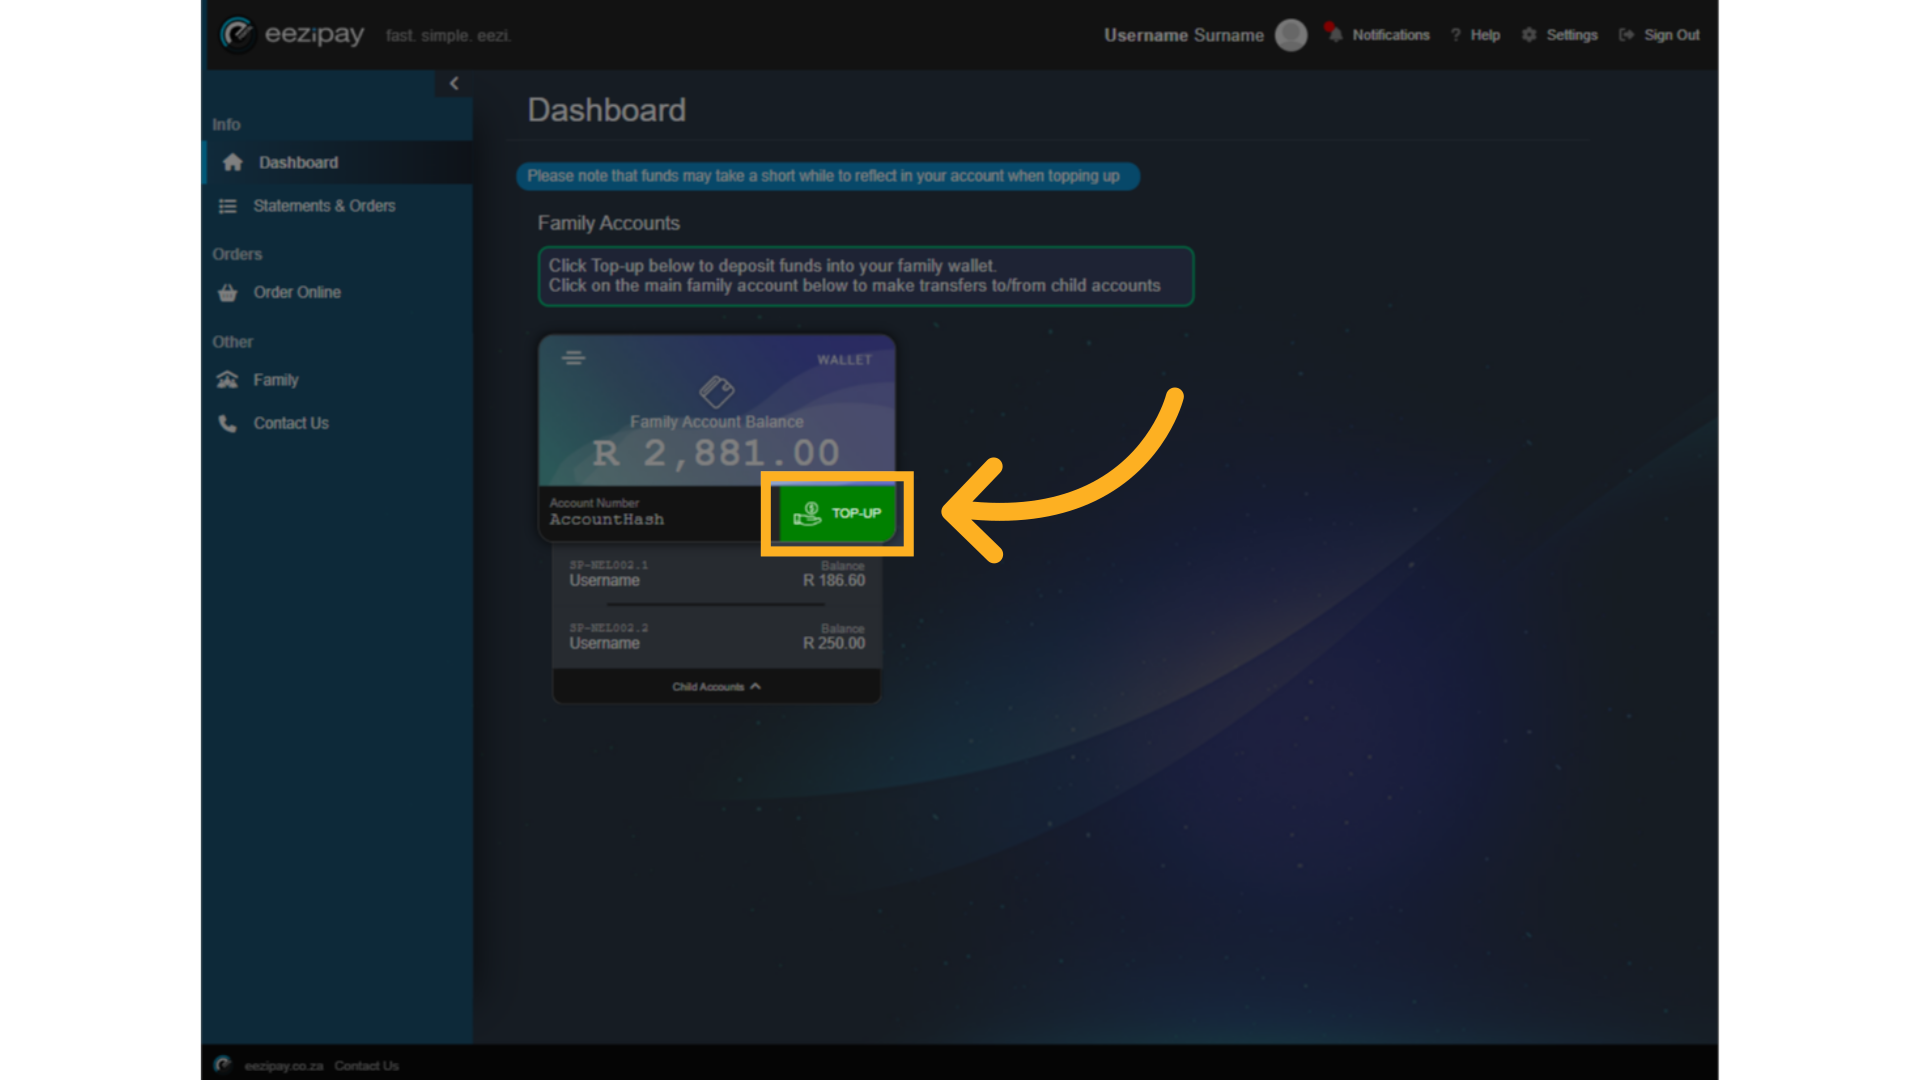
27. Deposit Top-Up Via Adumo
To initiate a top-up to your family account, via the Adumo Payment Gateway click on the Top-up button
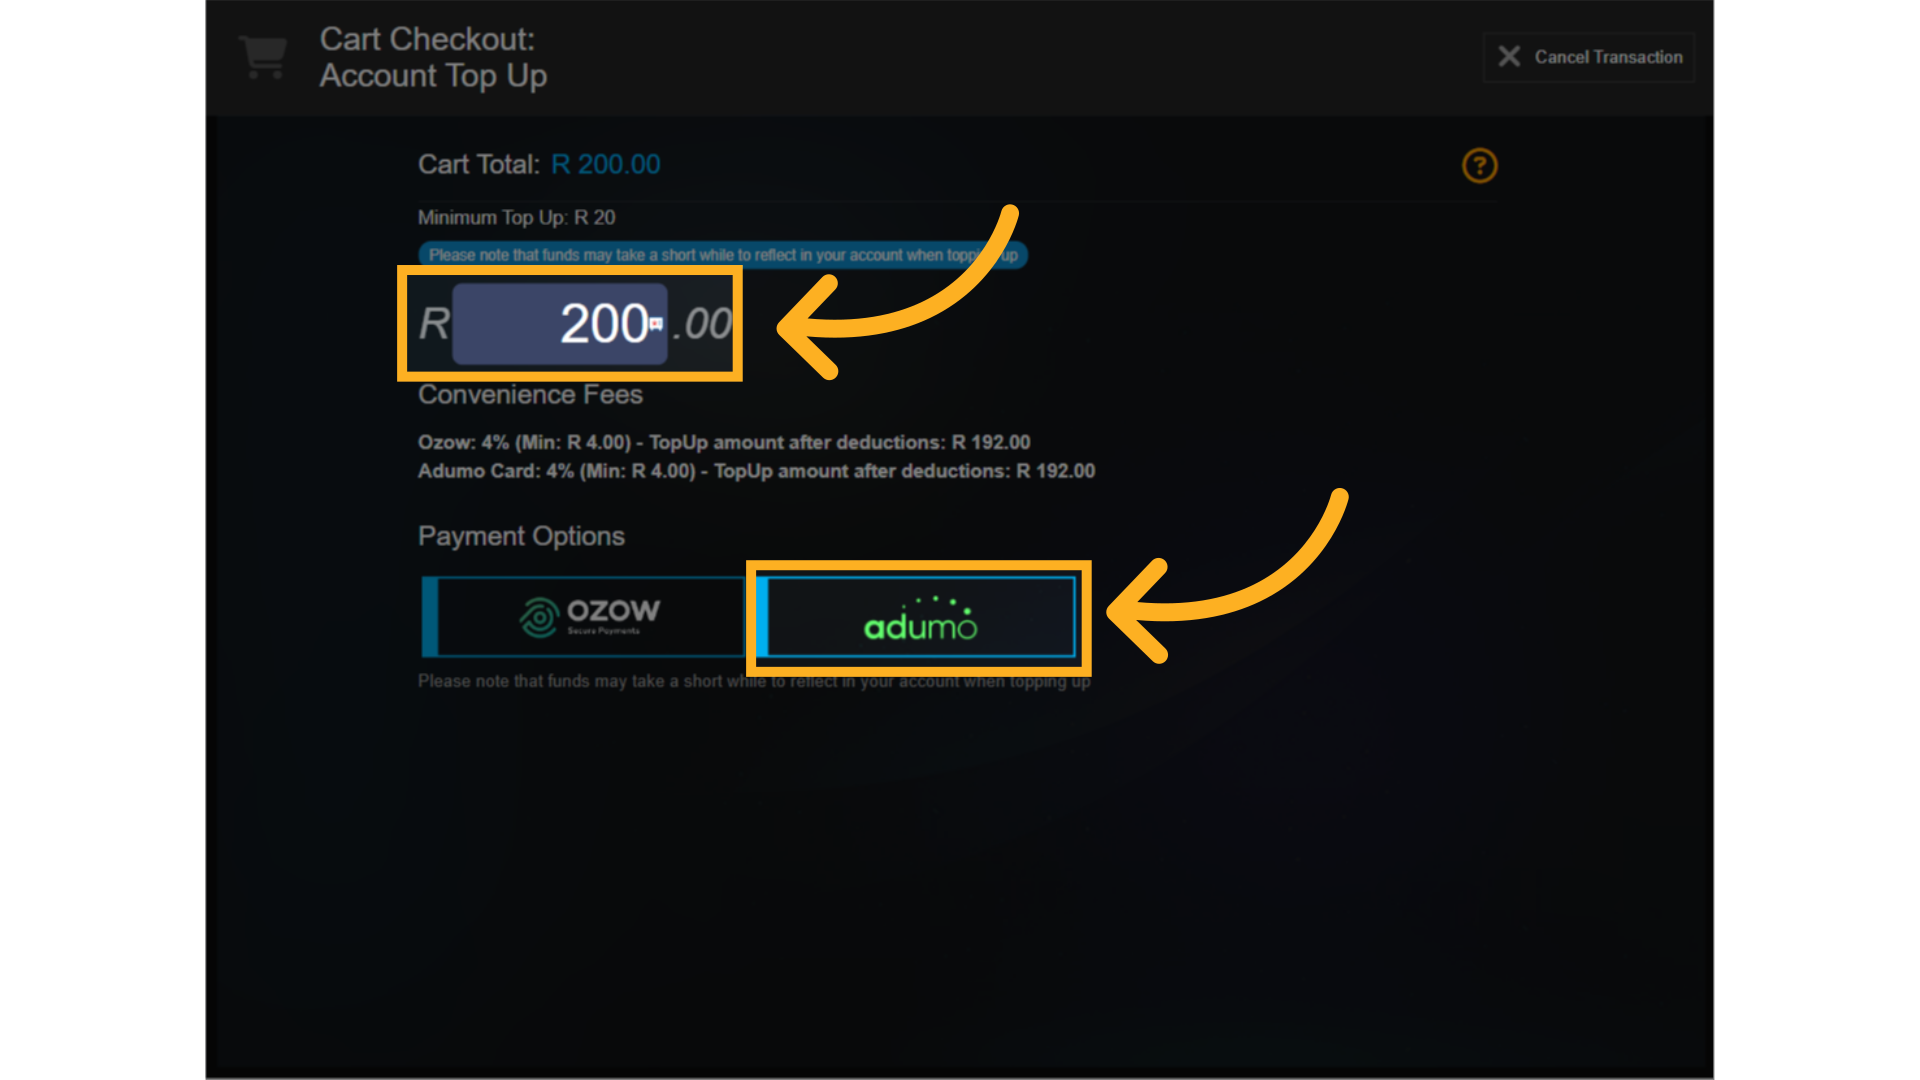
28. Pay for Top Up
1. Enter the amount you wish to deposit, with a Minimum of 20 Rand, followed by selecting your payment option.
2. Select the Adumo Payment Option.
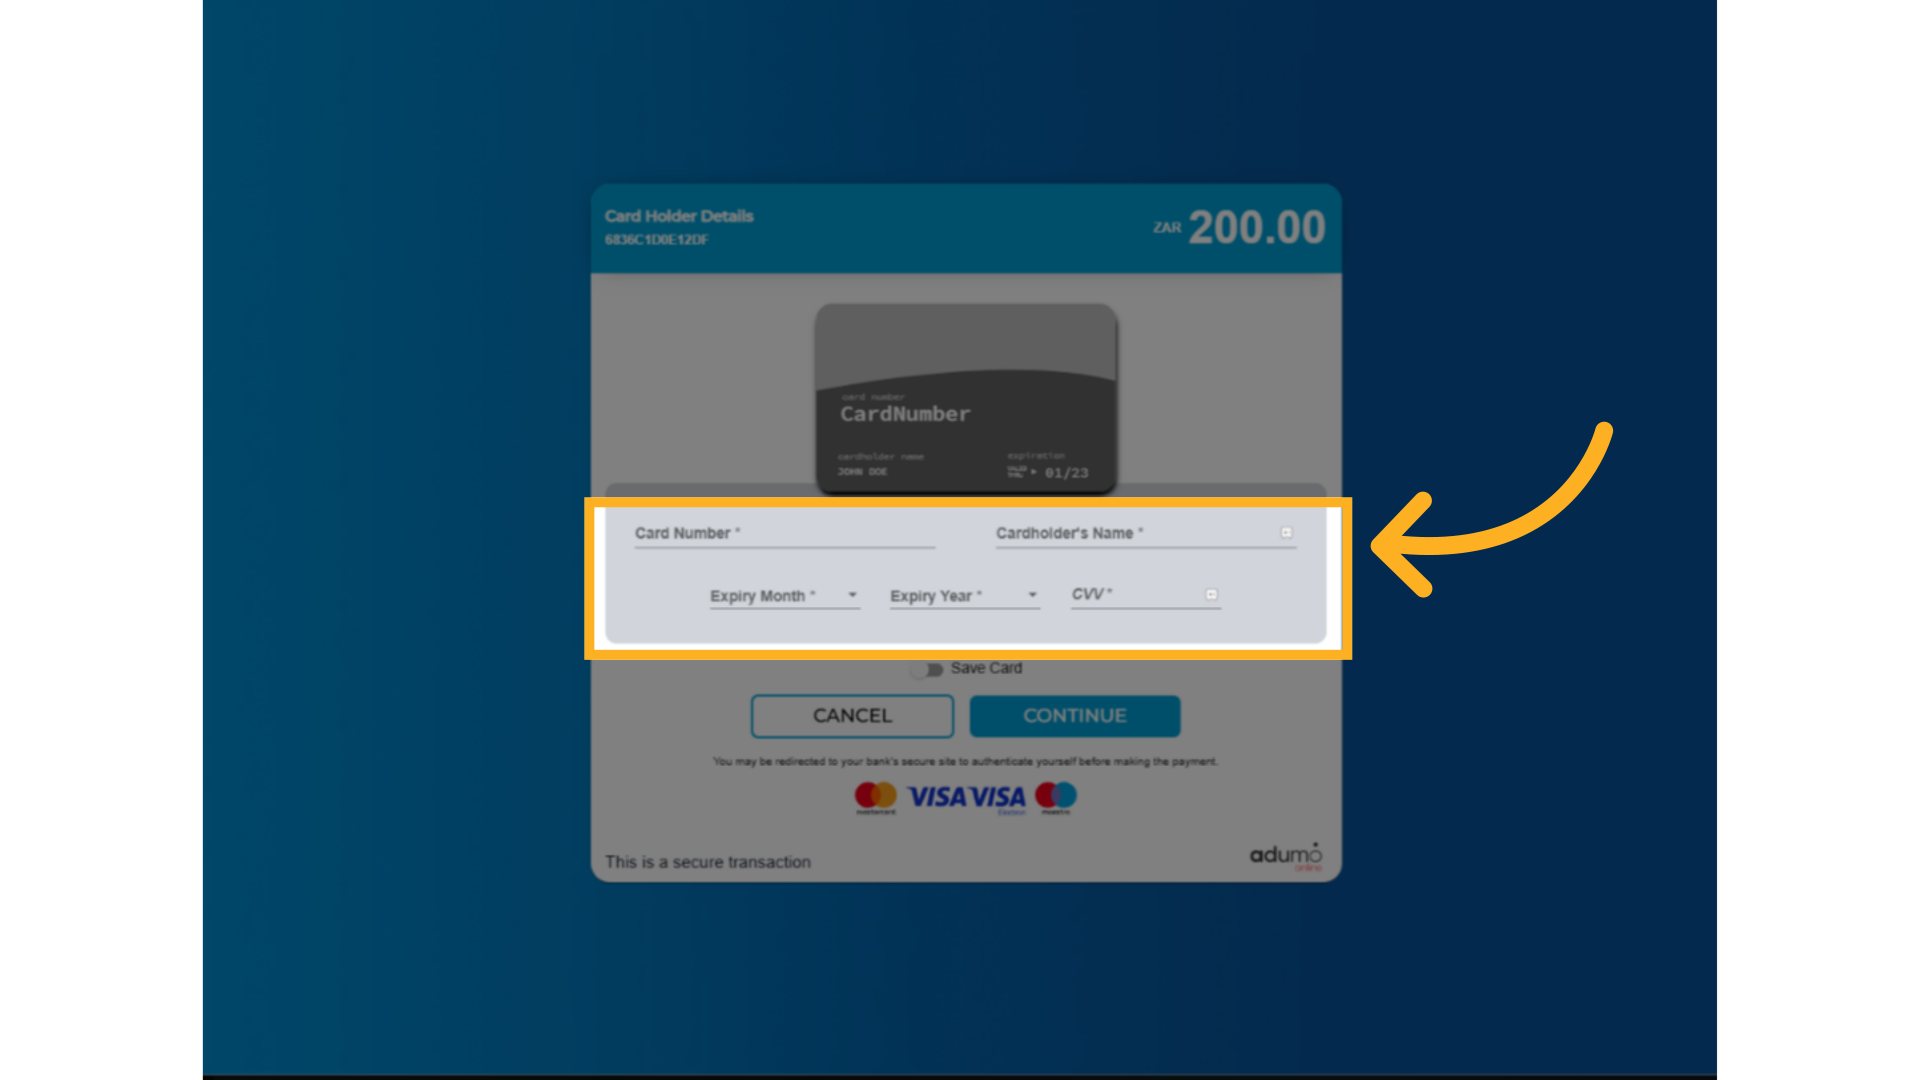
29. Card Details Entering process
Users or Parents can now simply enter their card information and click on the Continue button available to complete the payment
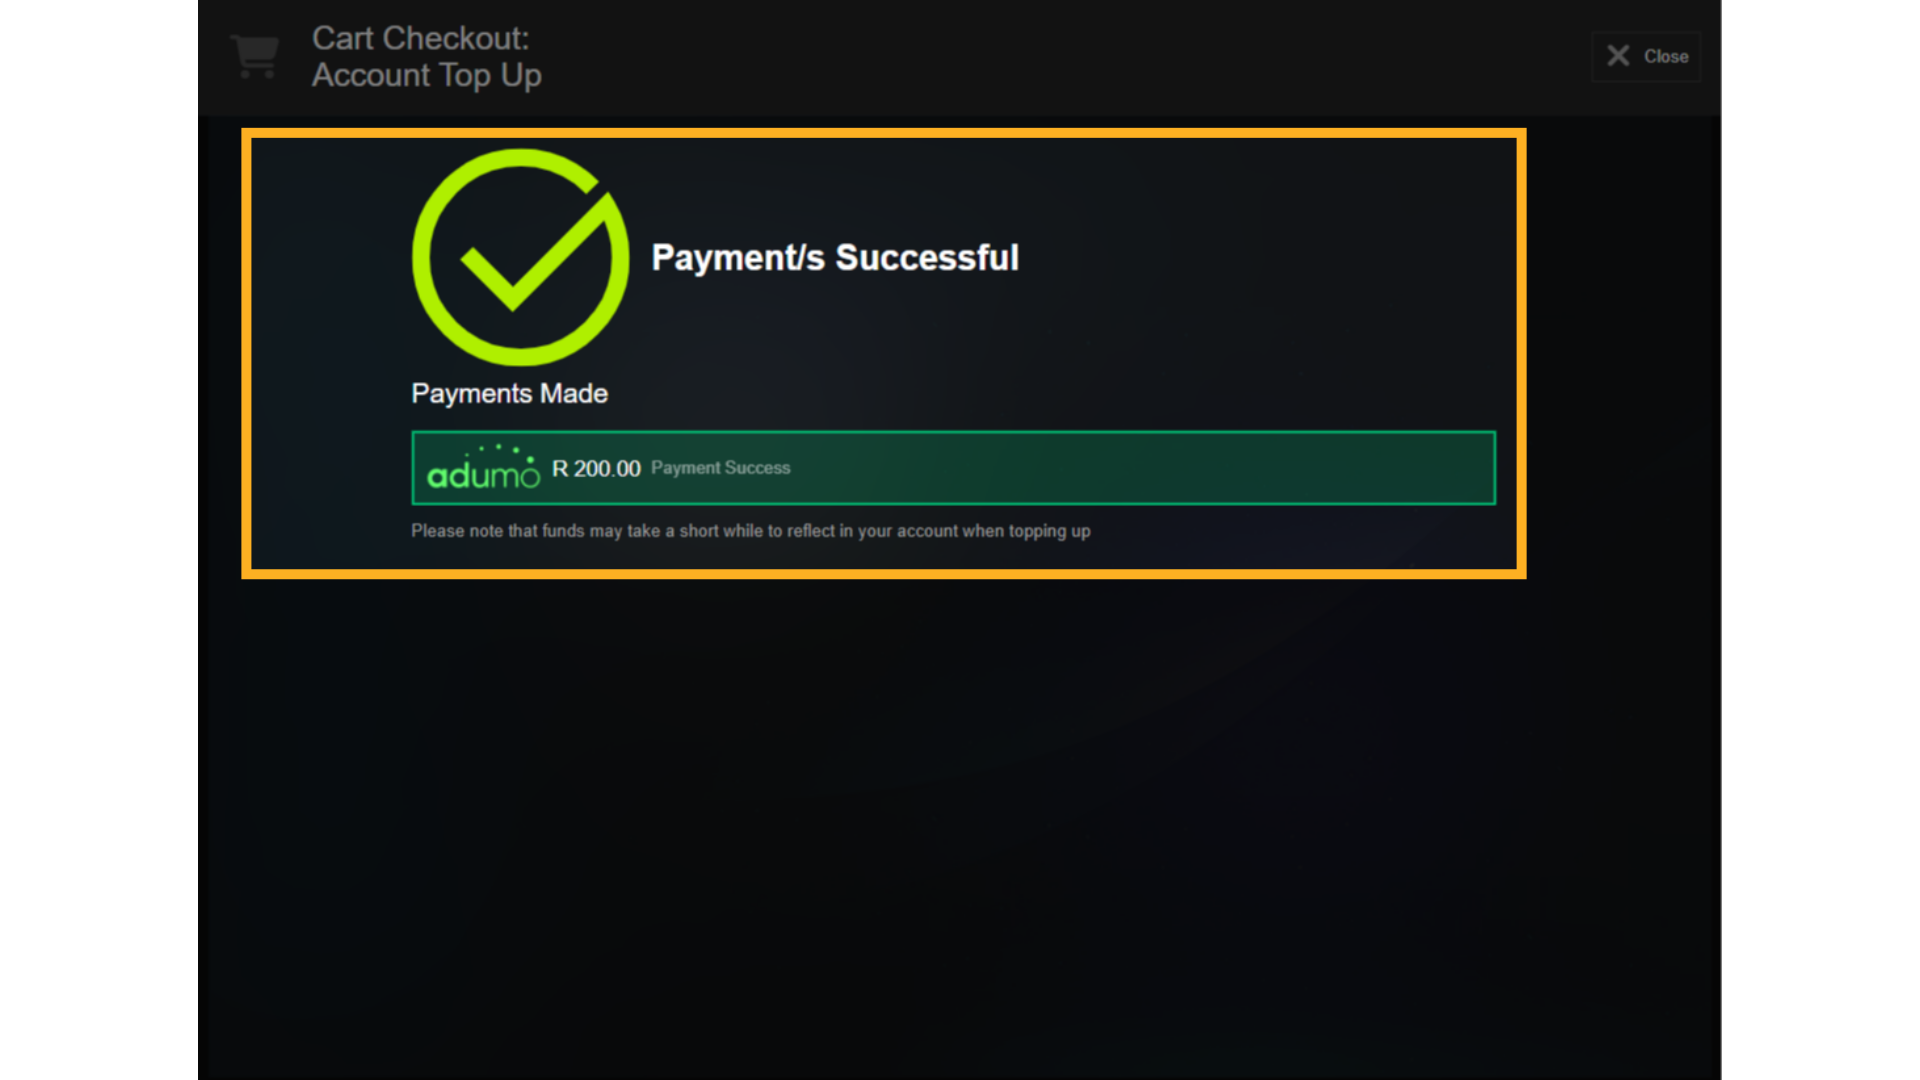
30. Adumo Payment Success
The system will indicate that the Payment was successful
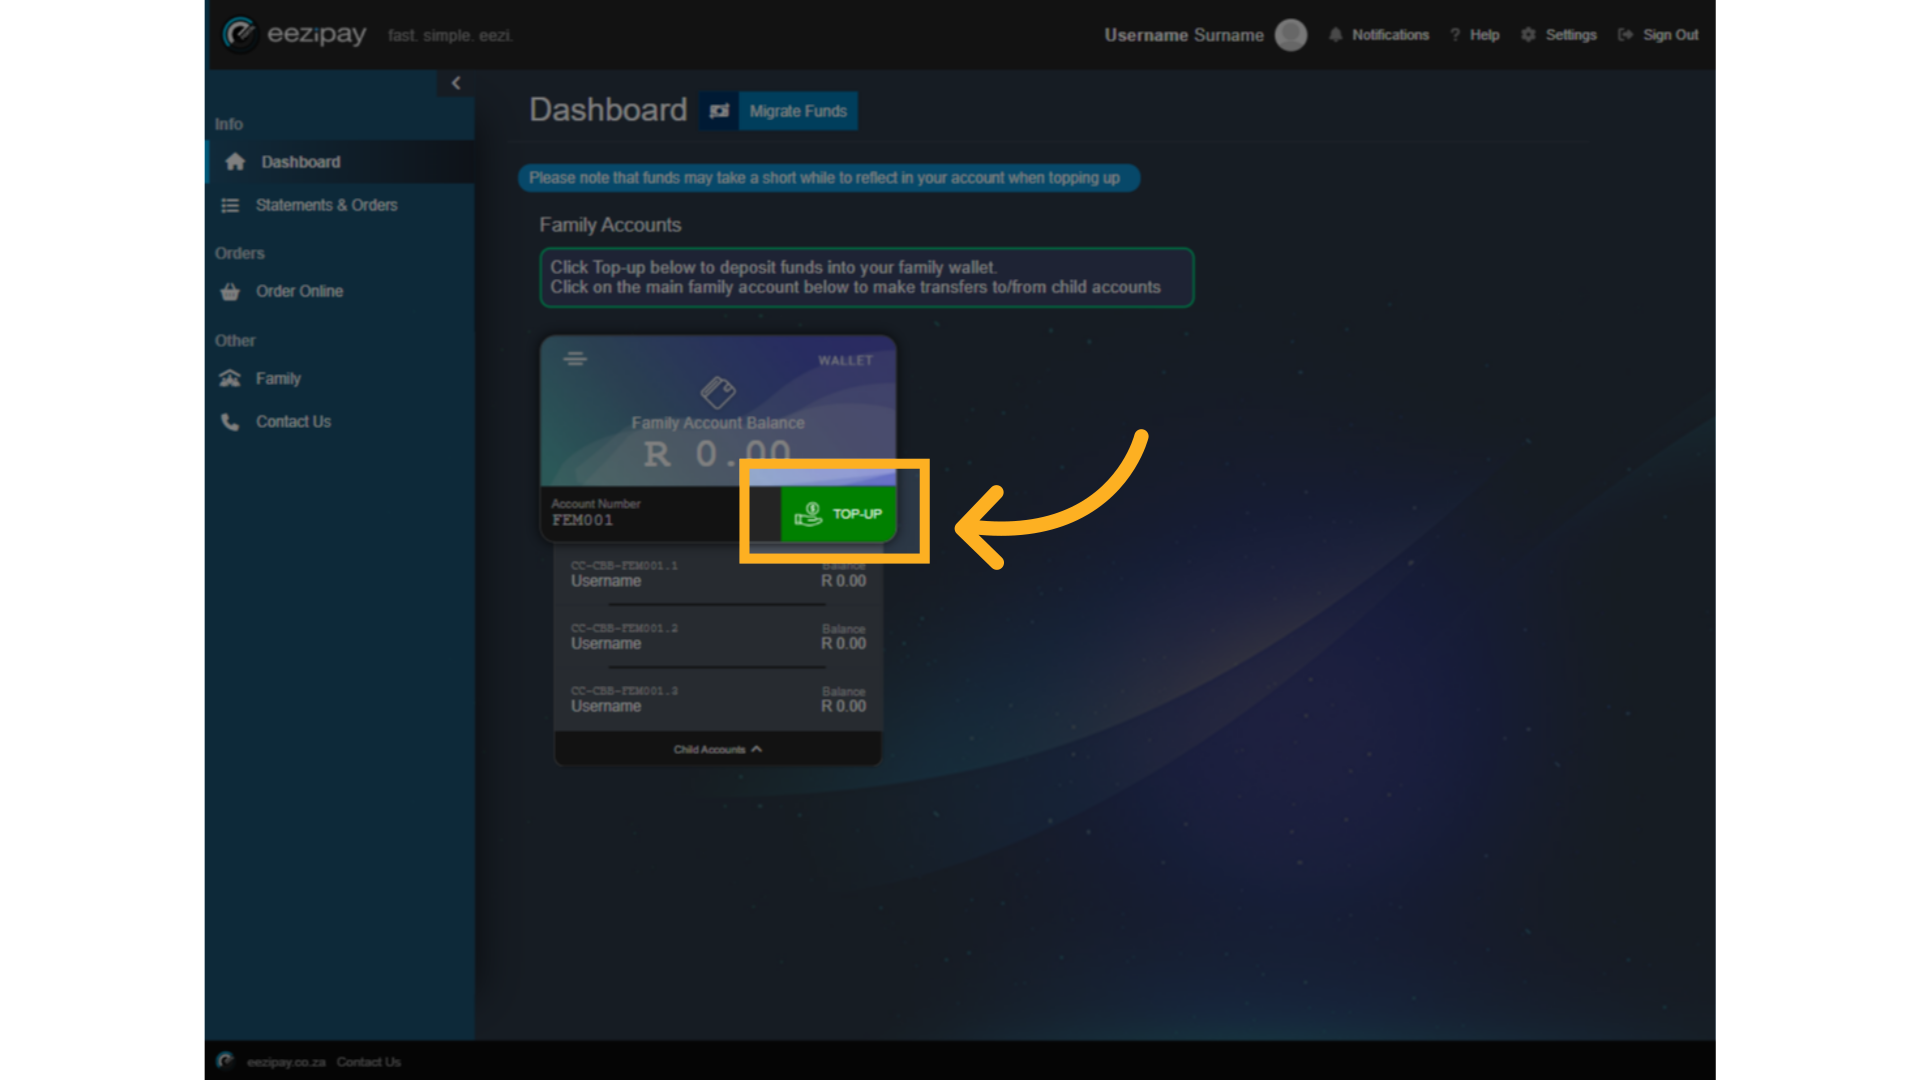
31. Deposit Top Up
To initiate a top-up to your family account via Ozo, click on the Top-Up button.
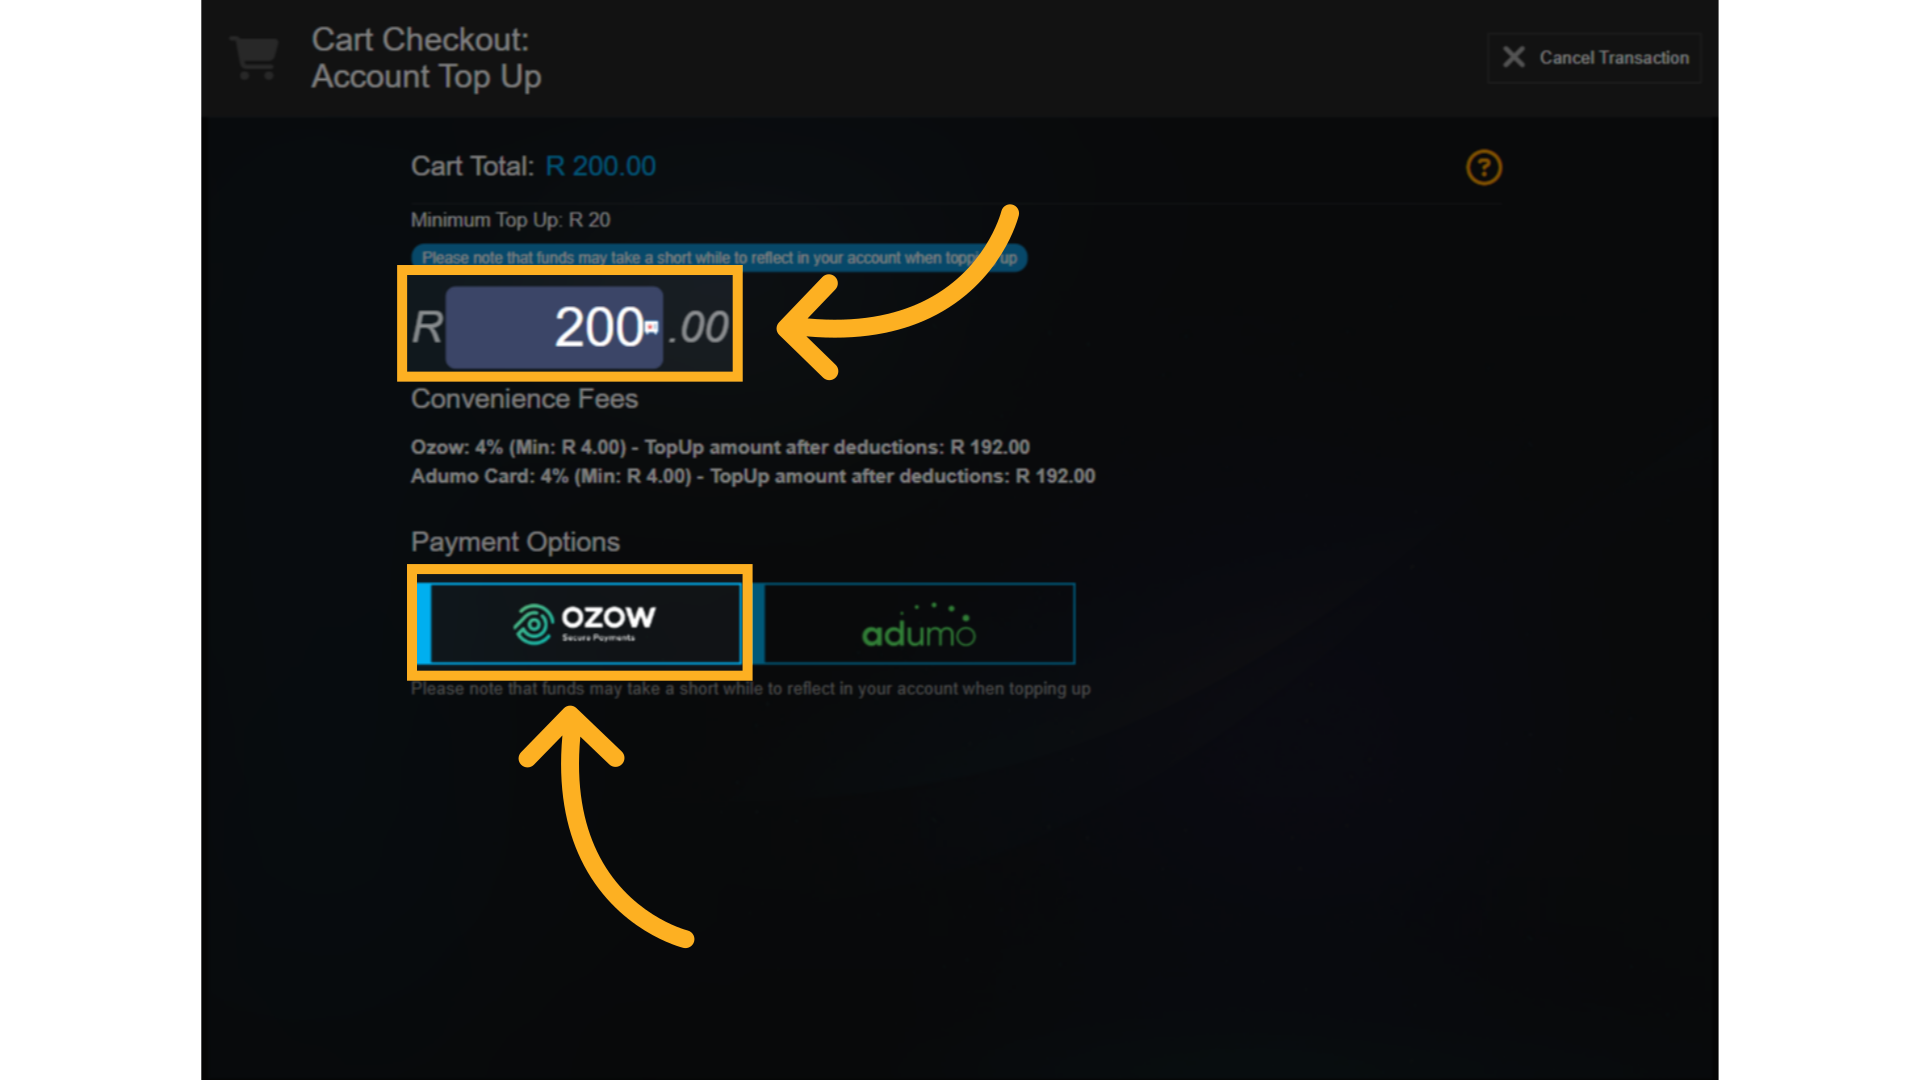
32. Pay For Top Up via Ozow
1. Enter the amount you wish to deposit, with a Minimum of 20 Rand. 2. Select the Ozo payment option.
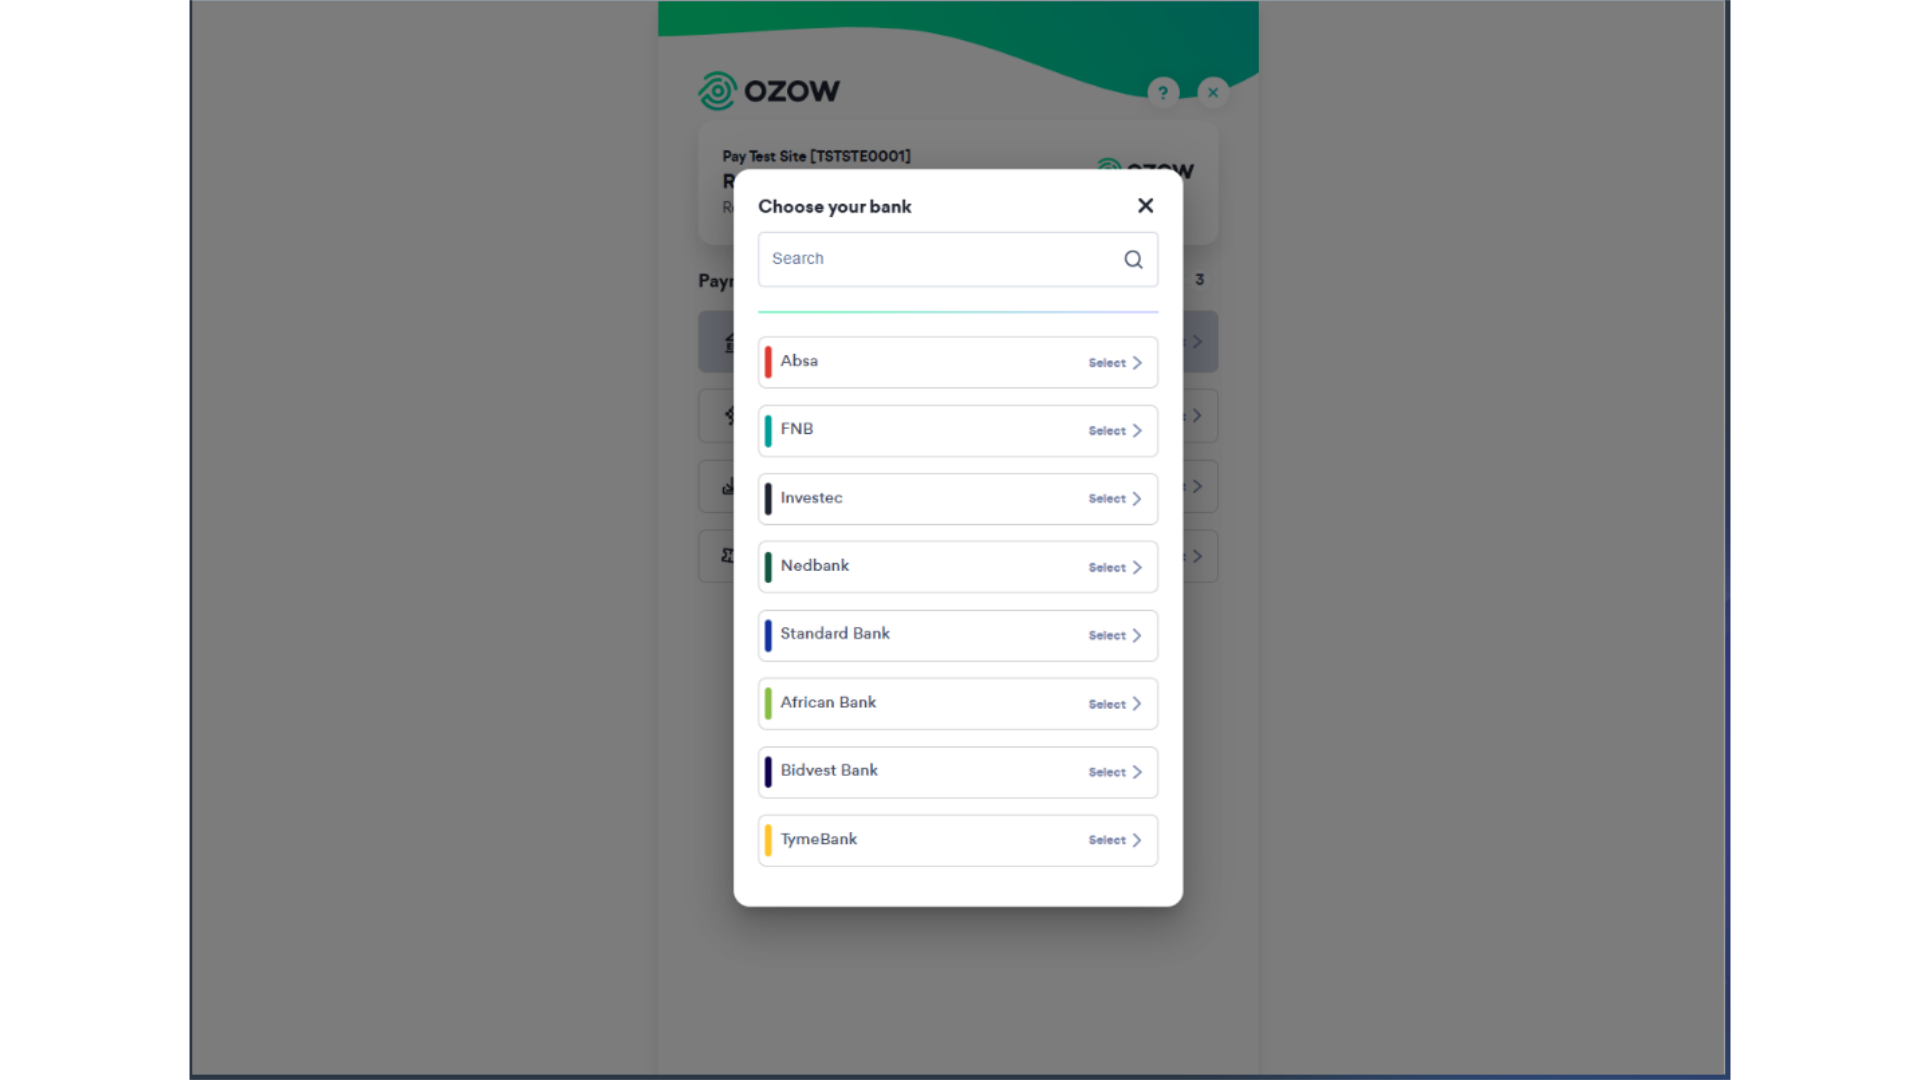
33. Ozow Step 1
The system processes the payment and prompts you for your bank selection.
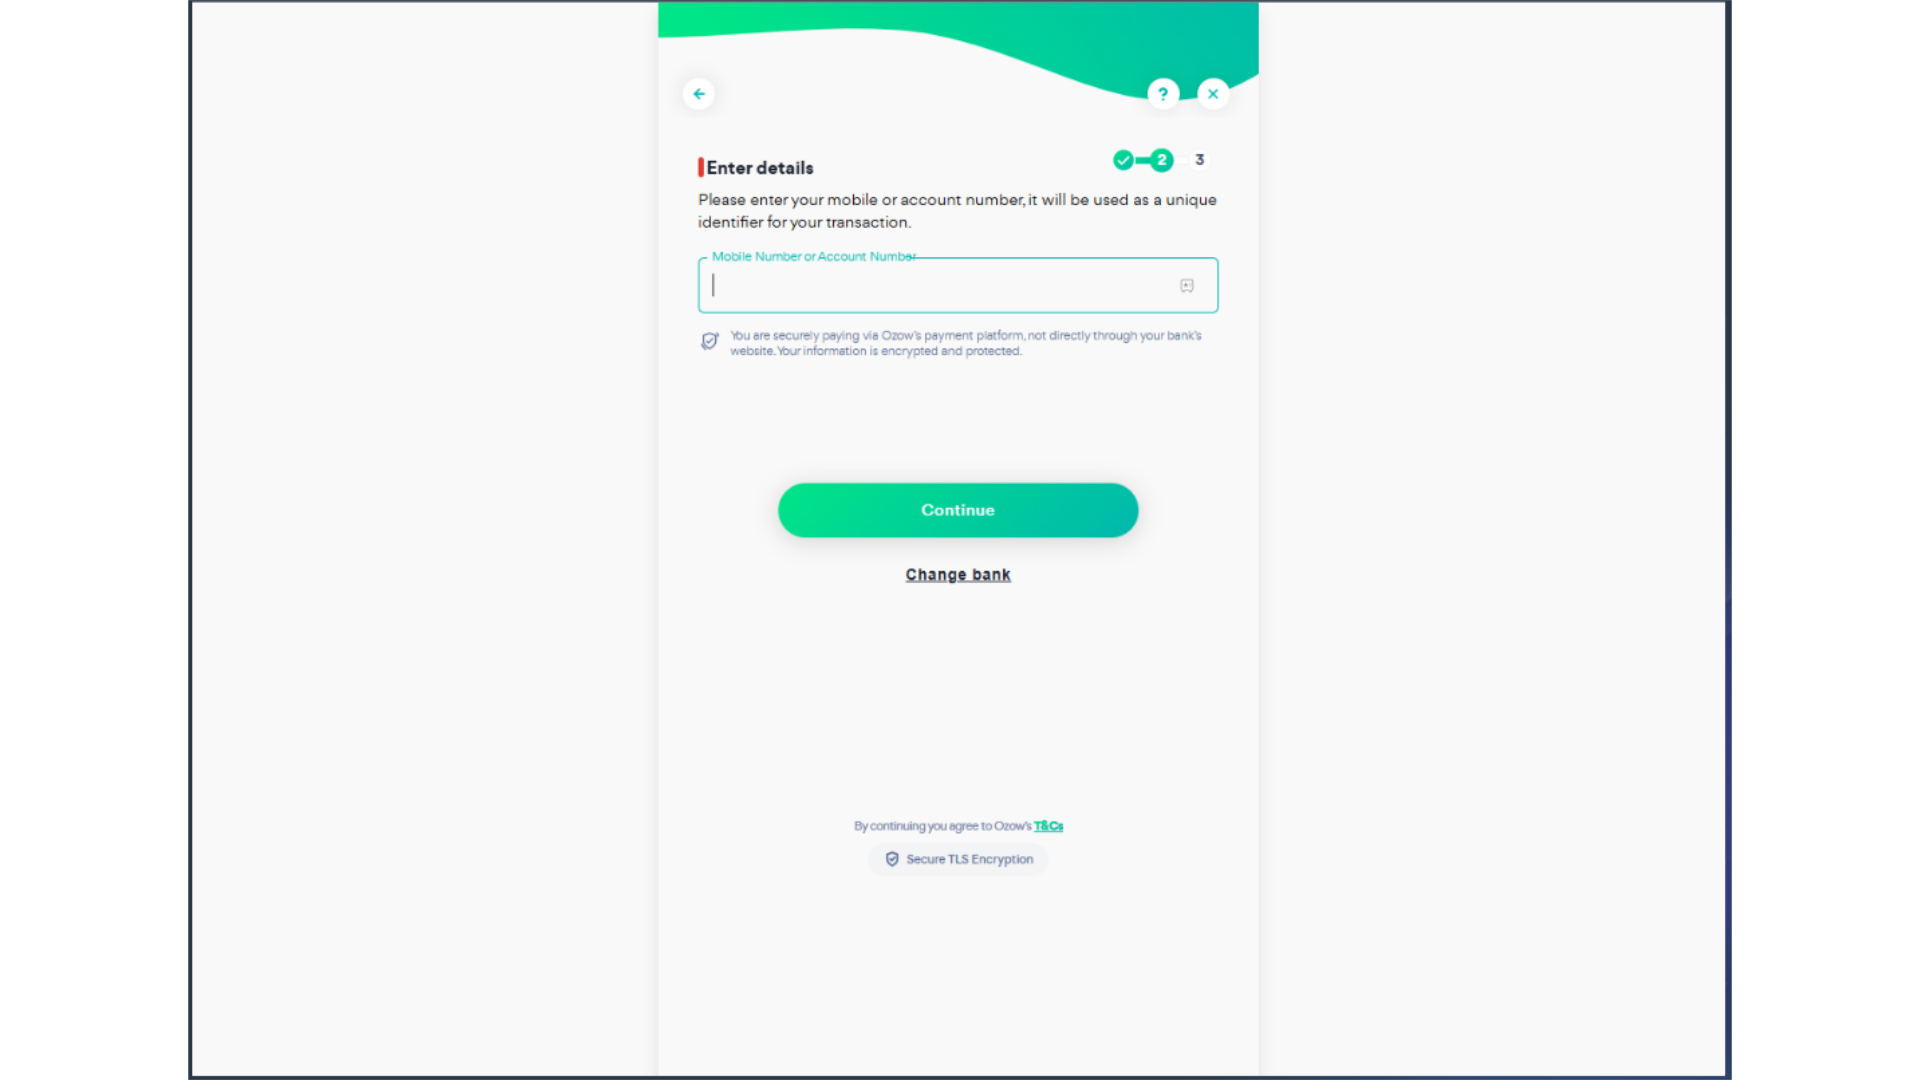
34. Ozow Step 2
After selecting the bank, the system will prompt you to provide your login details to proceed with the payment. Simply enter your profile information, followed by clicking on the Continue button to complete the payment process.
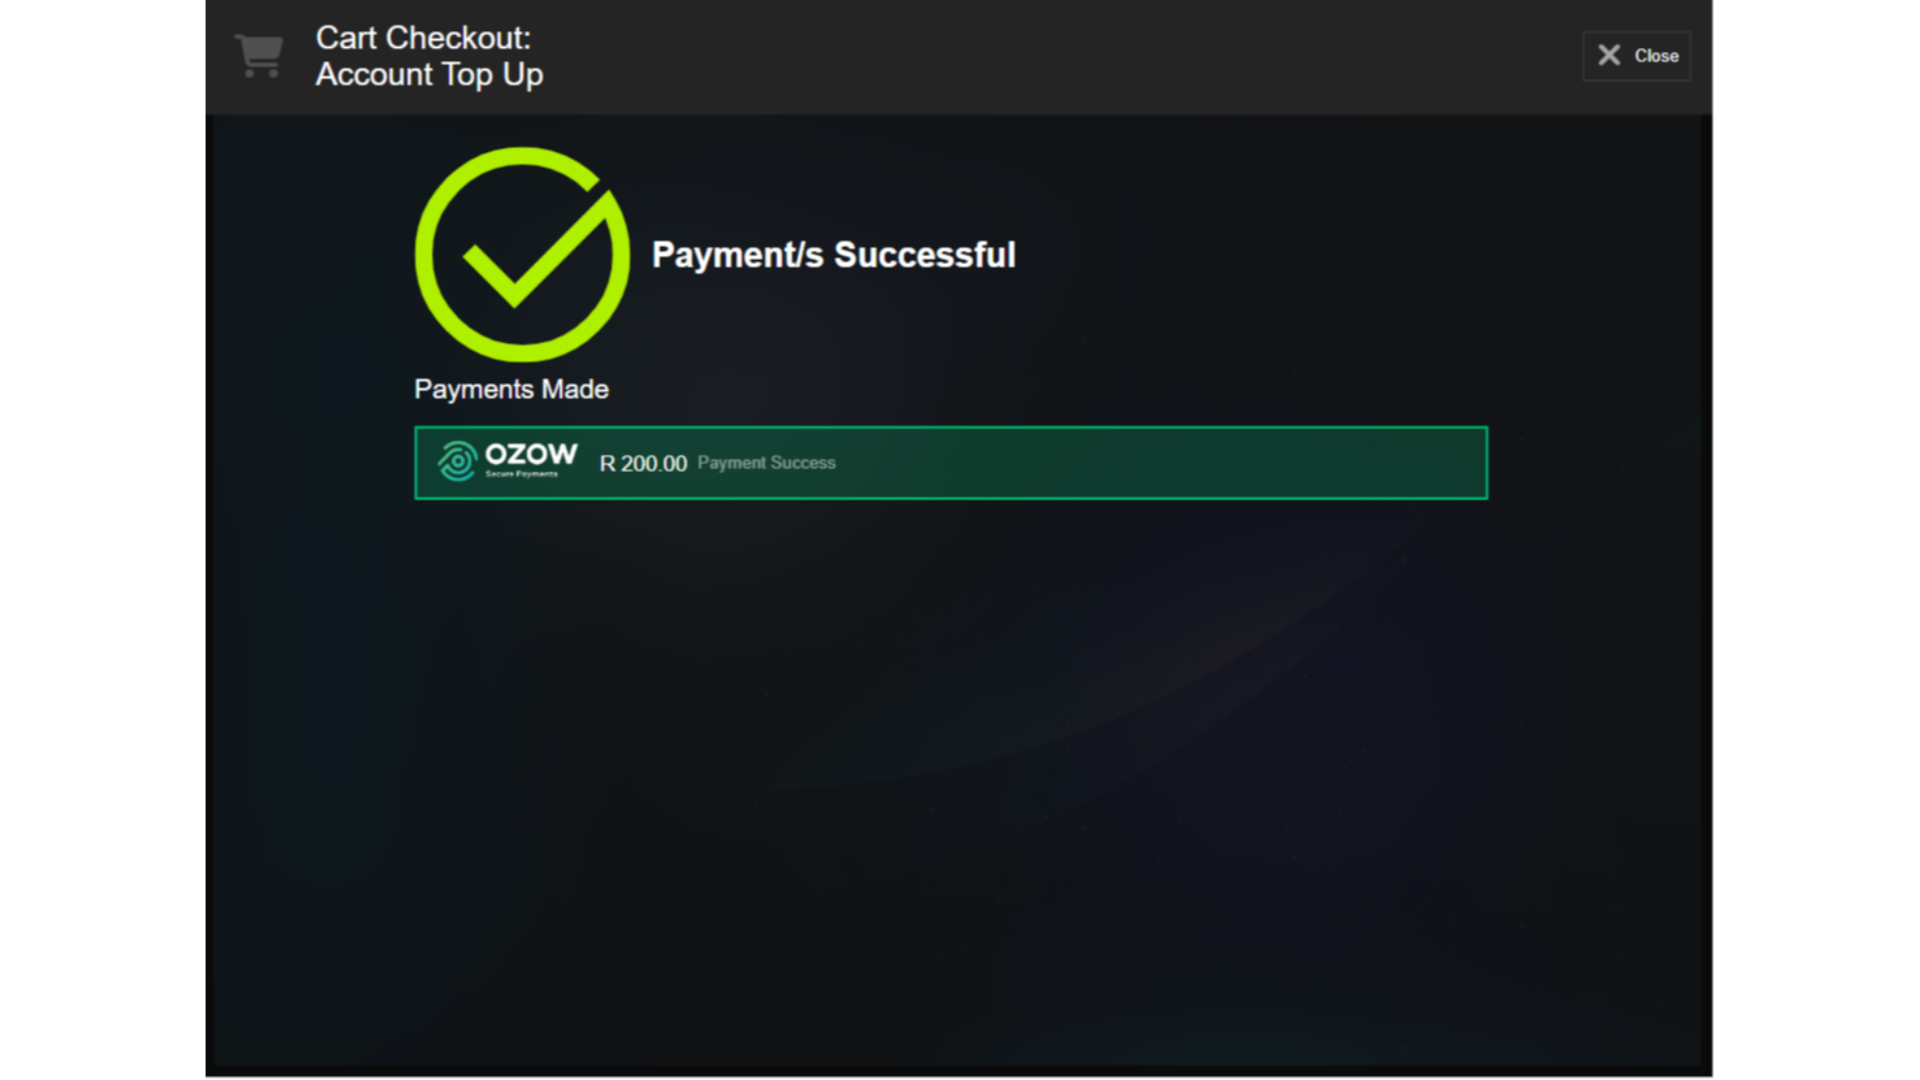
35. Payment successful
Once complete, the system will indicate that the payment was successful.
36. How to Transfer Funds from a Family Account to a Child Account
How to Transfer Funds from a Family Account to a Child Account
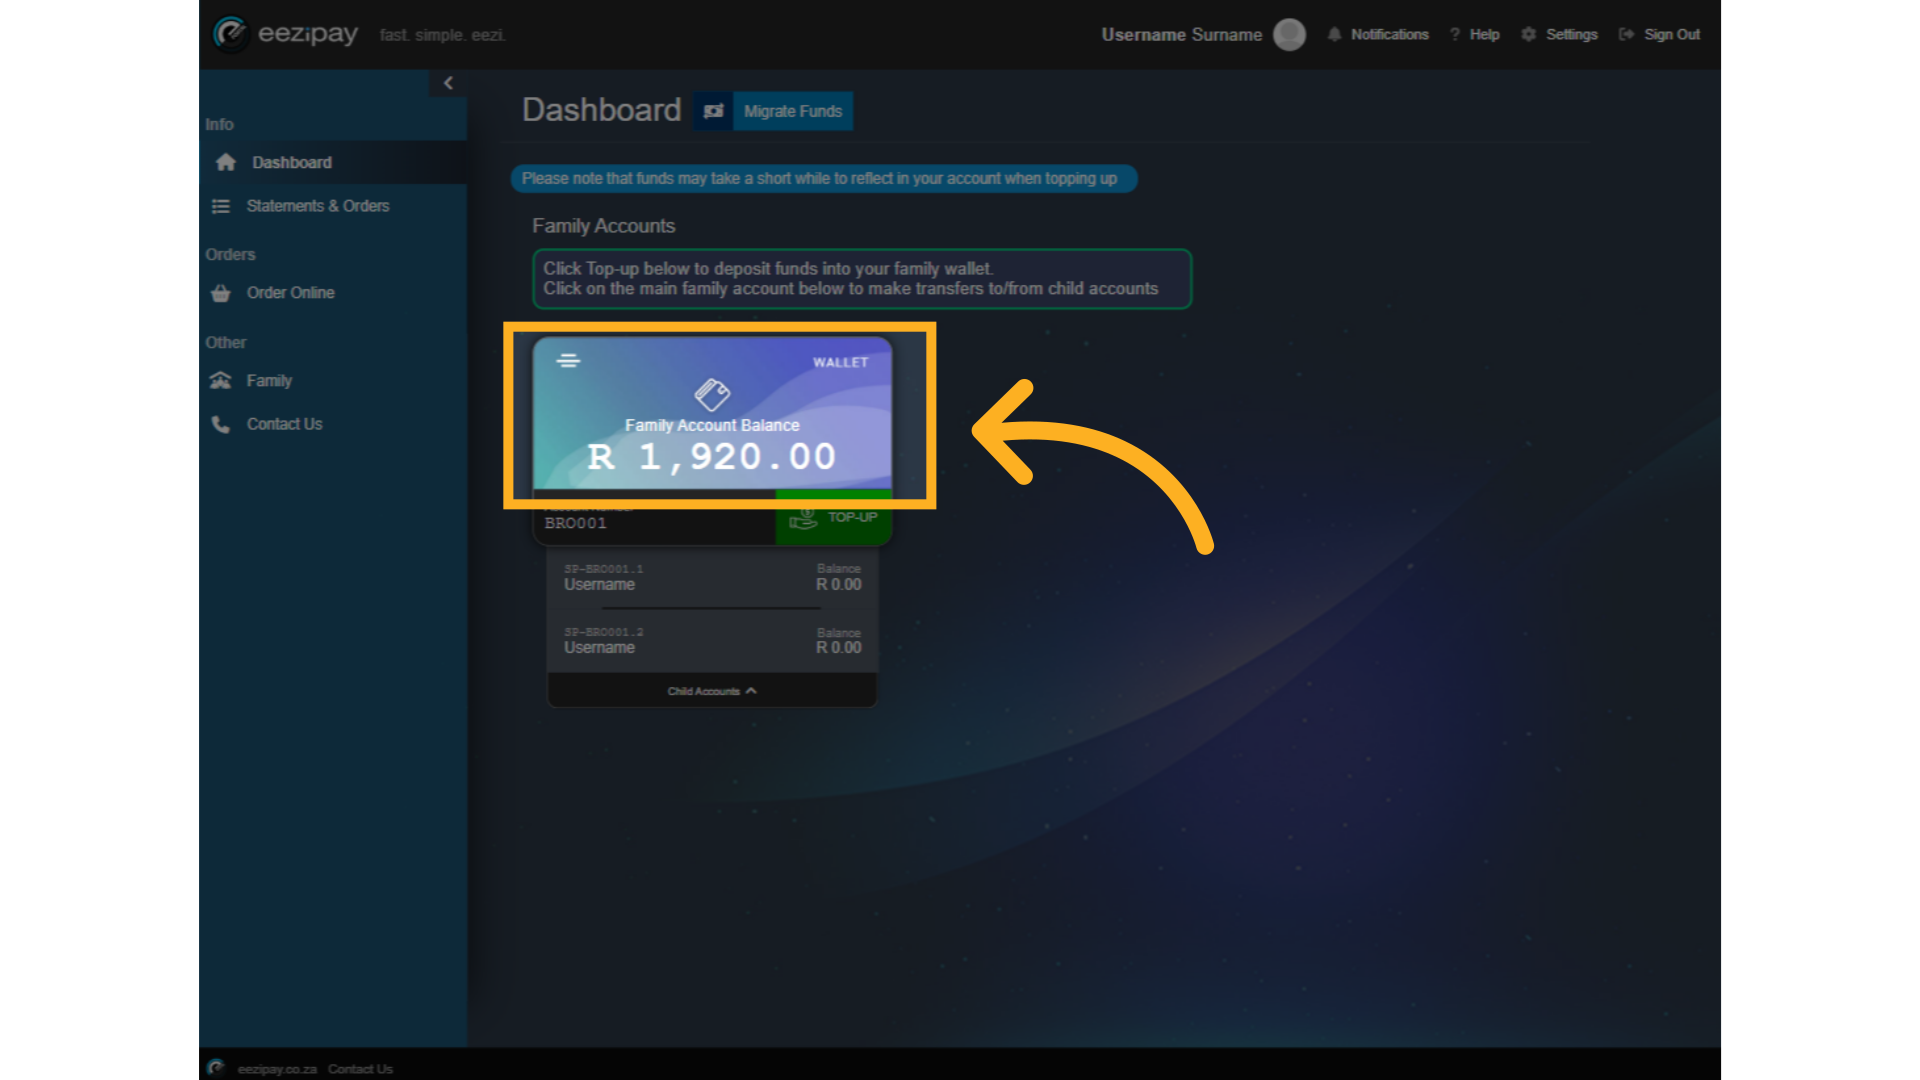
37. Click on Child Account
Users can simply click on the Family account

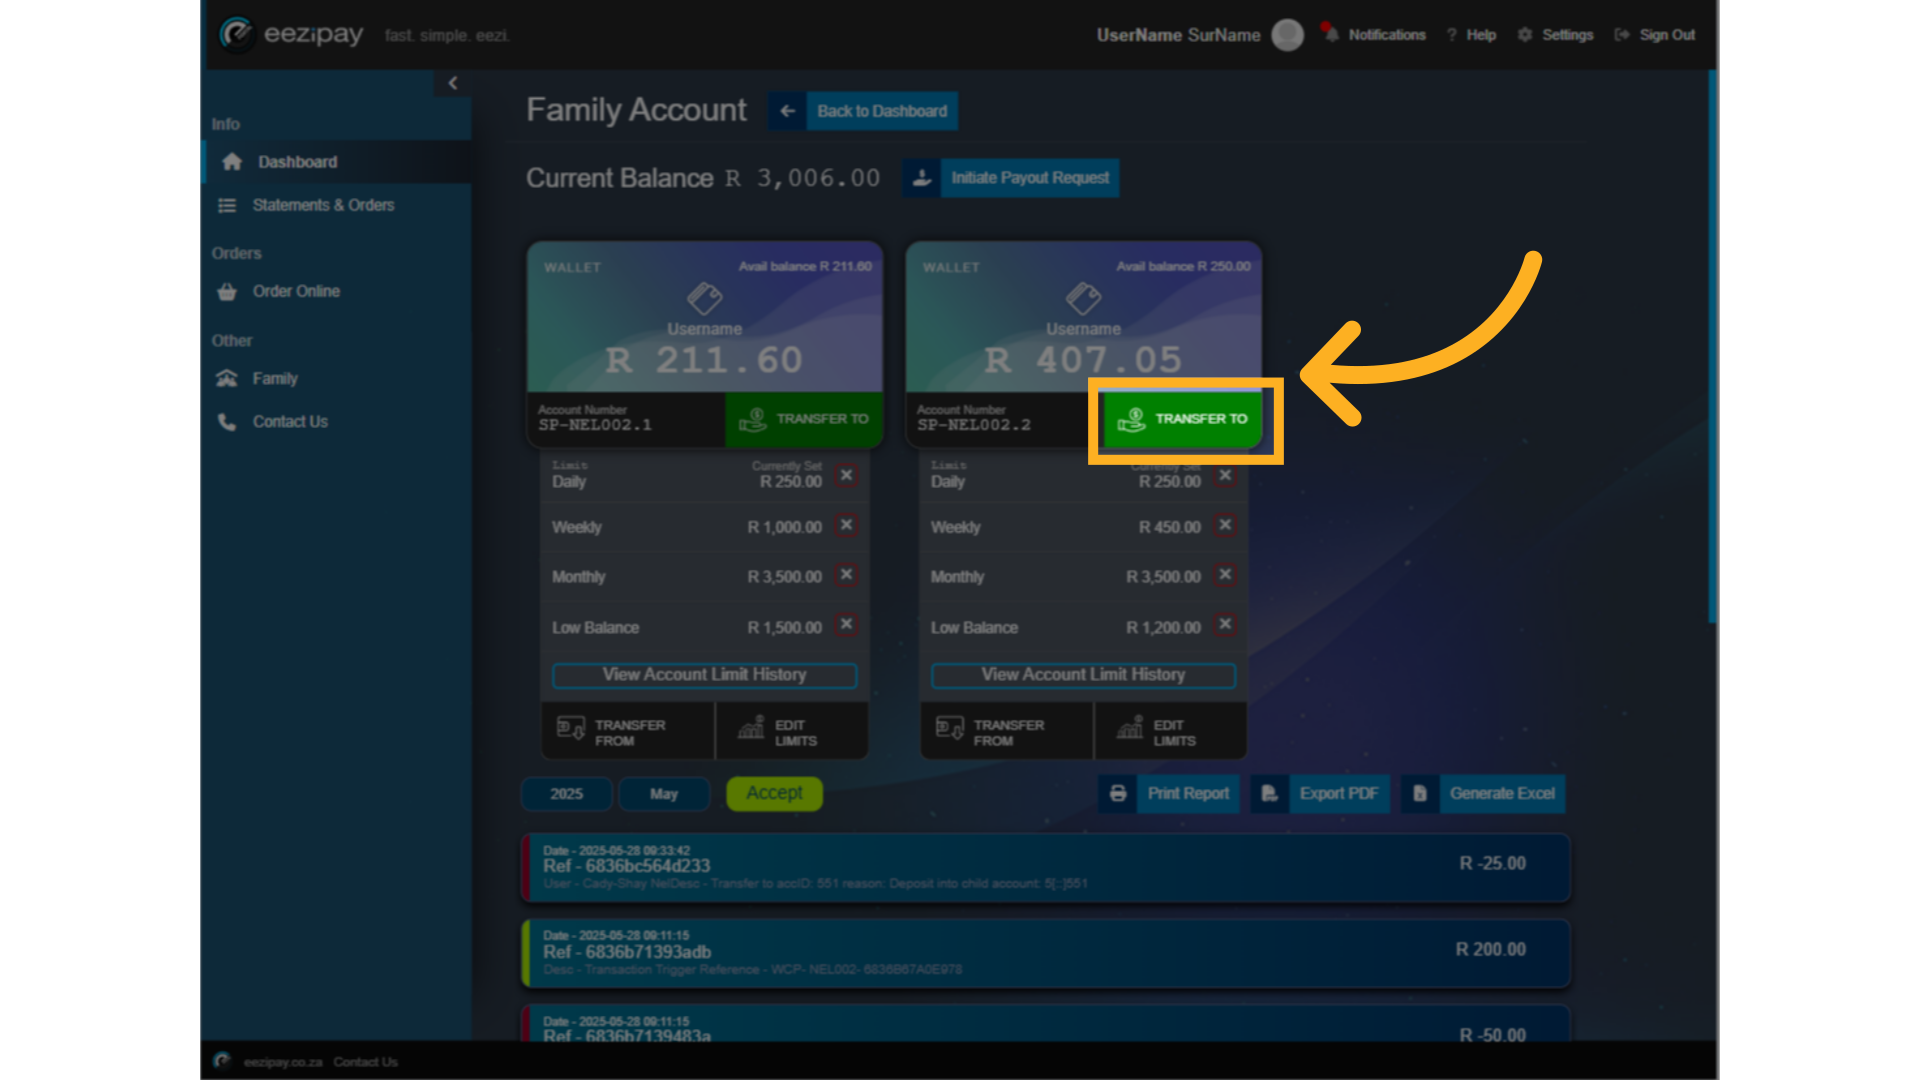
38. Transfer To button
Click on the Transfer To button to start the process.
39. Child Transfer Amount
Simply enter the amount you want to transfer to your Childs account.
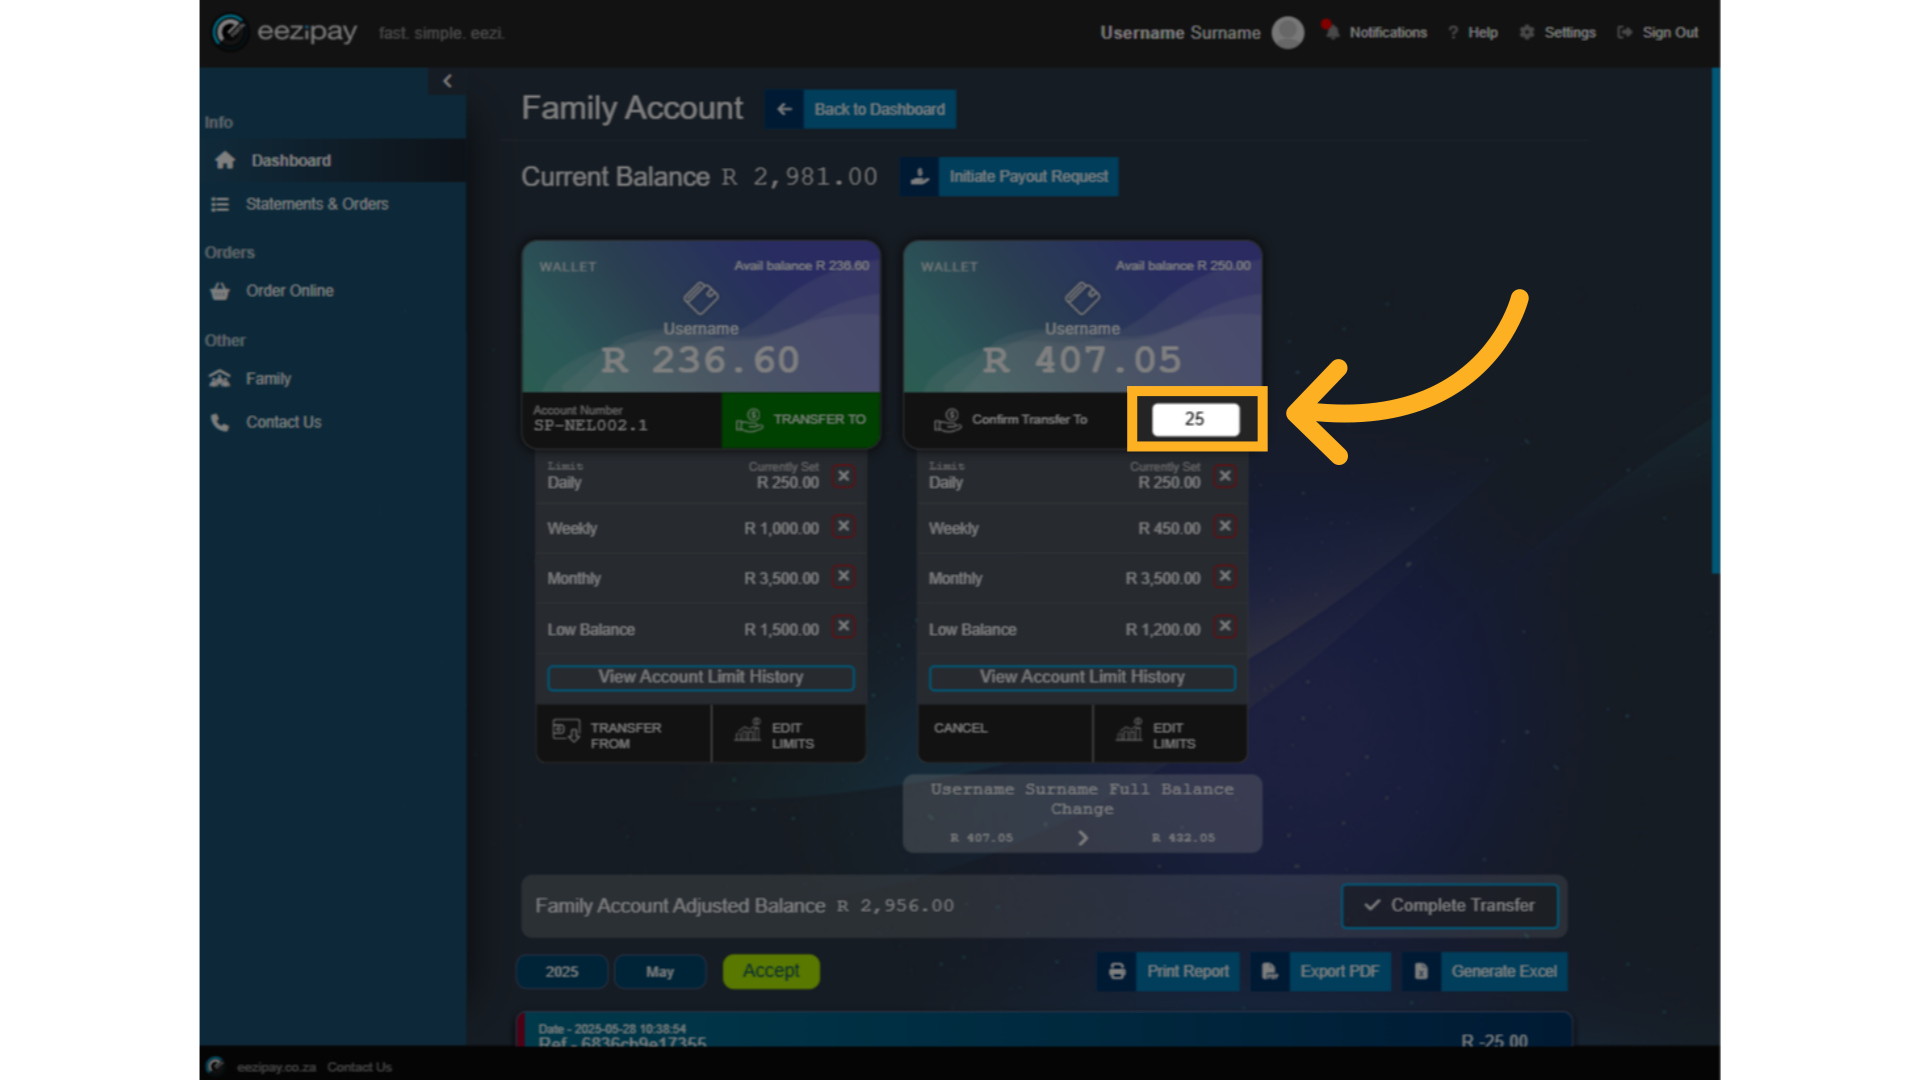
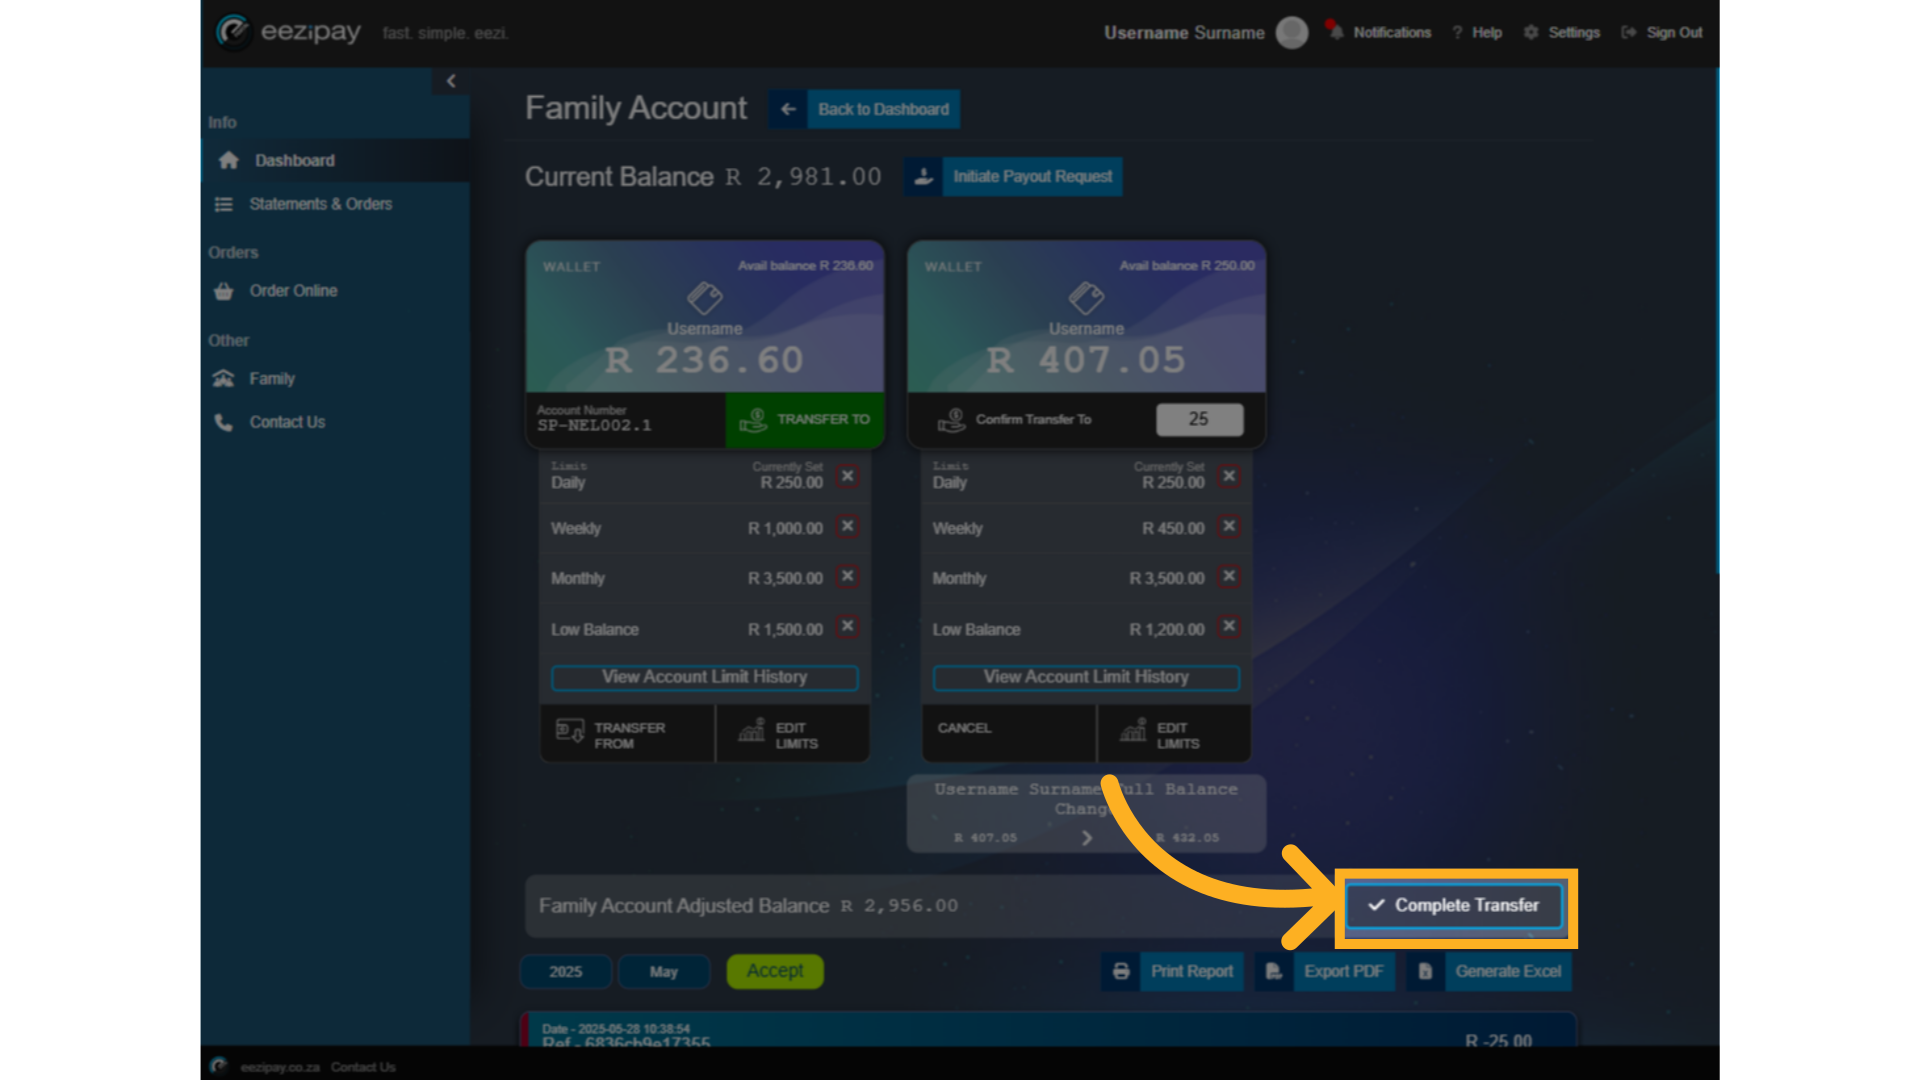
40. Complete Transfer
Then, click on the Complete Transfer button to complete the transfer process.
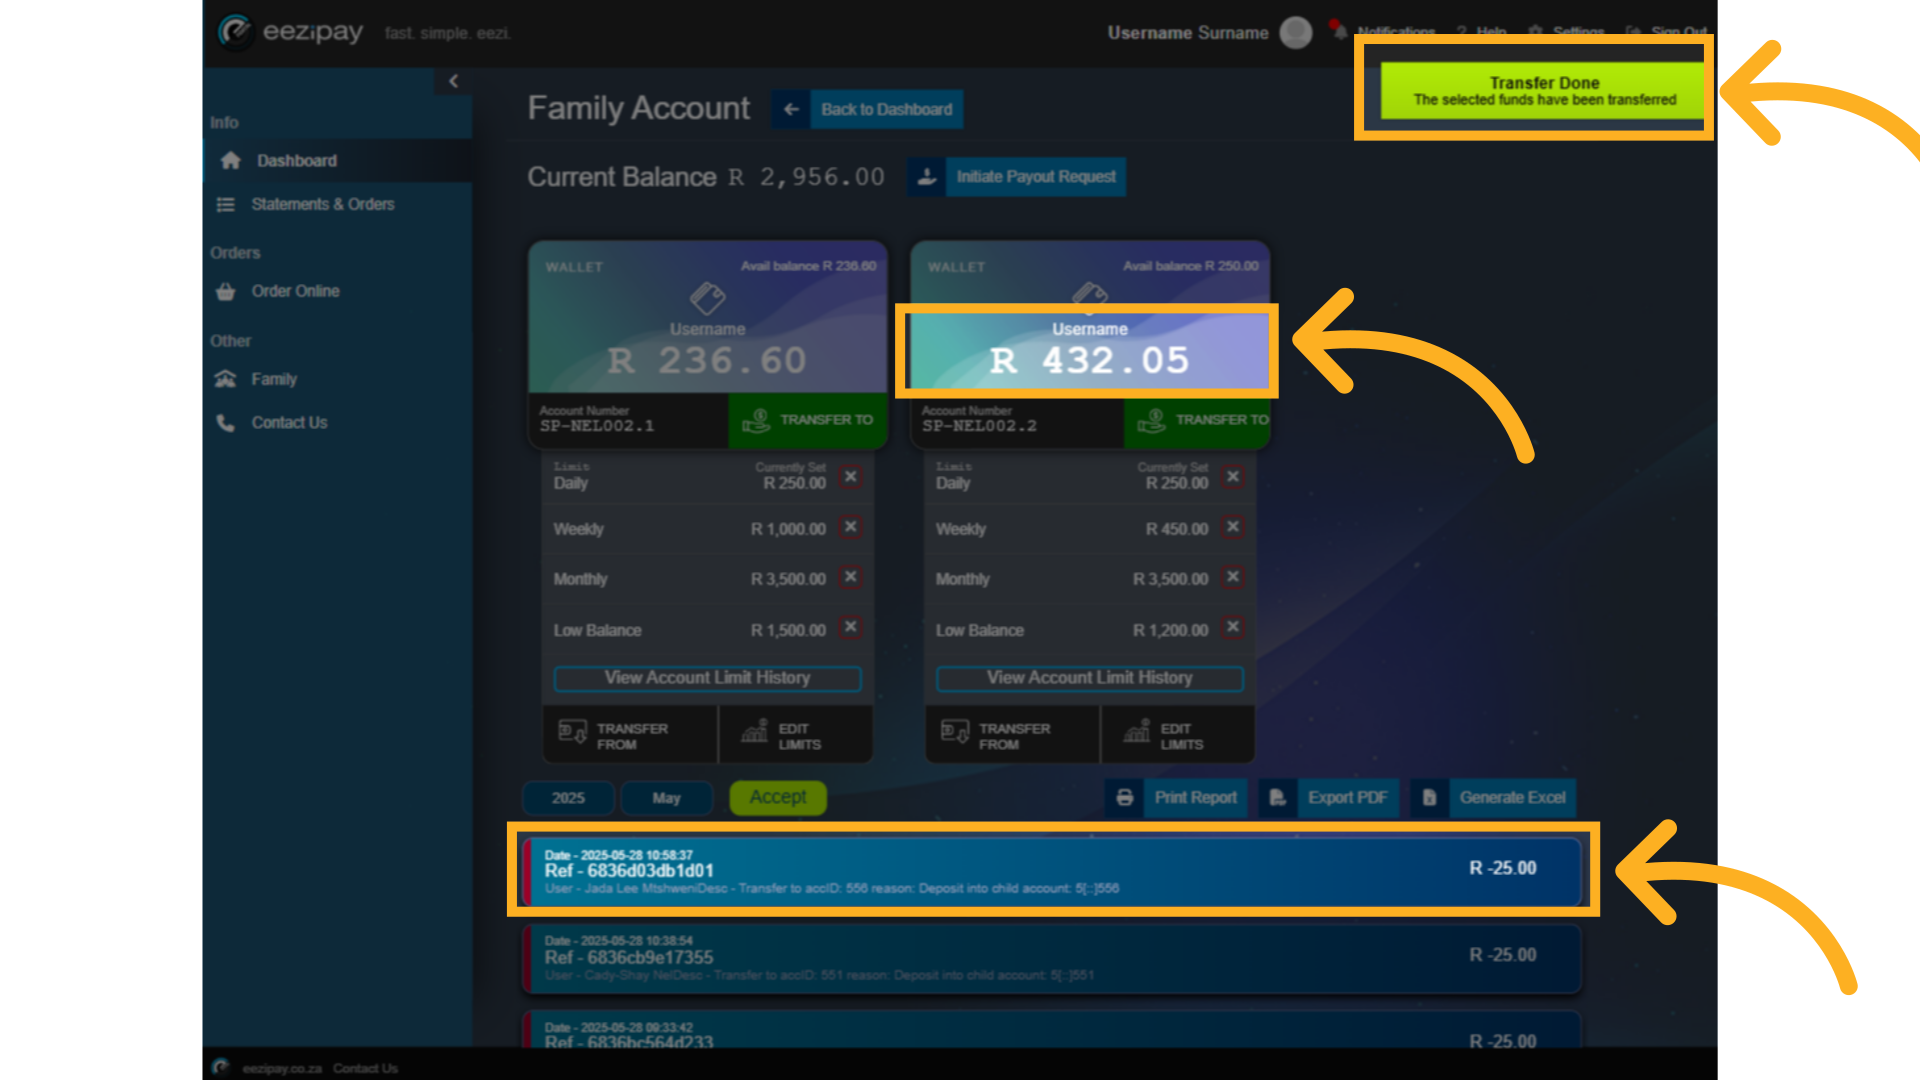
41. Child Transfer Success
Once the transfer is complete you will see three indicators. 1. A transfer done notification at the top right. 2. The child's wallet will update with the deposited amount. 3. A transaction statement will be visible below showing the amount which was transfered out of the Family account.
42. How to Set Limits for Children
How to Set Limits for Children

43. Click Child Account
To set limits on a child's account, first click on the family account
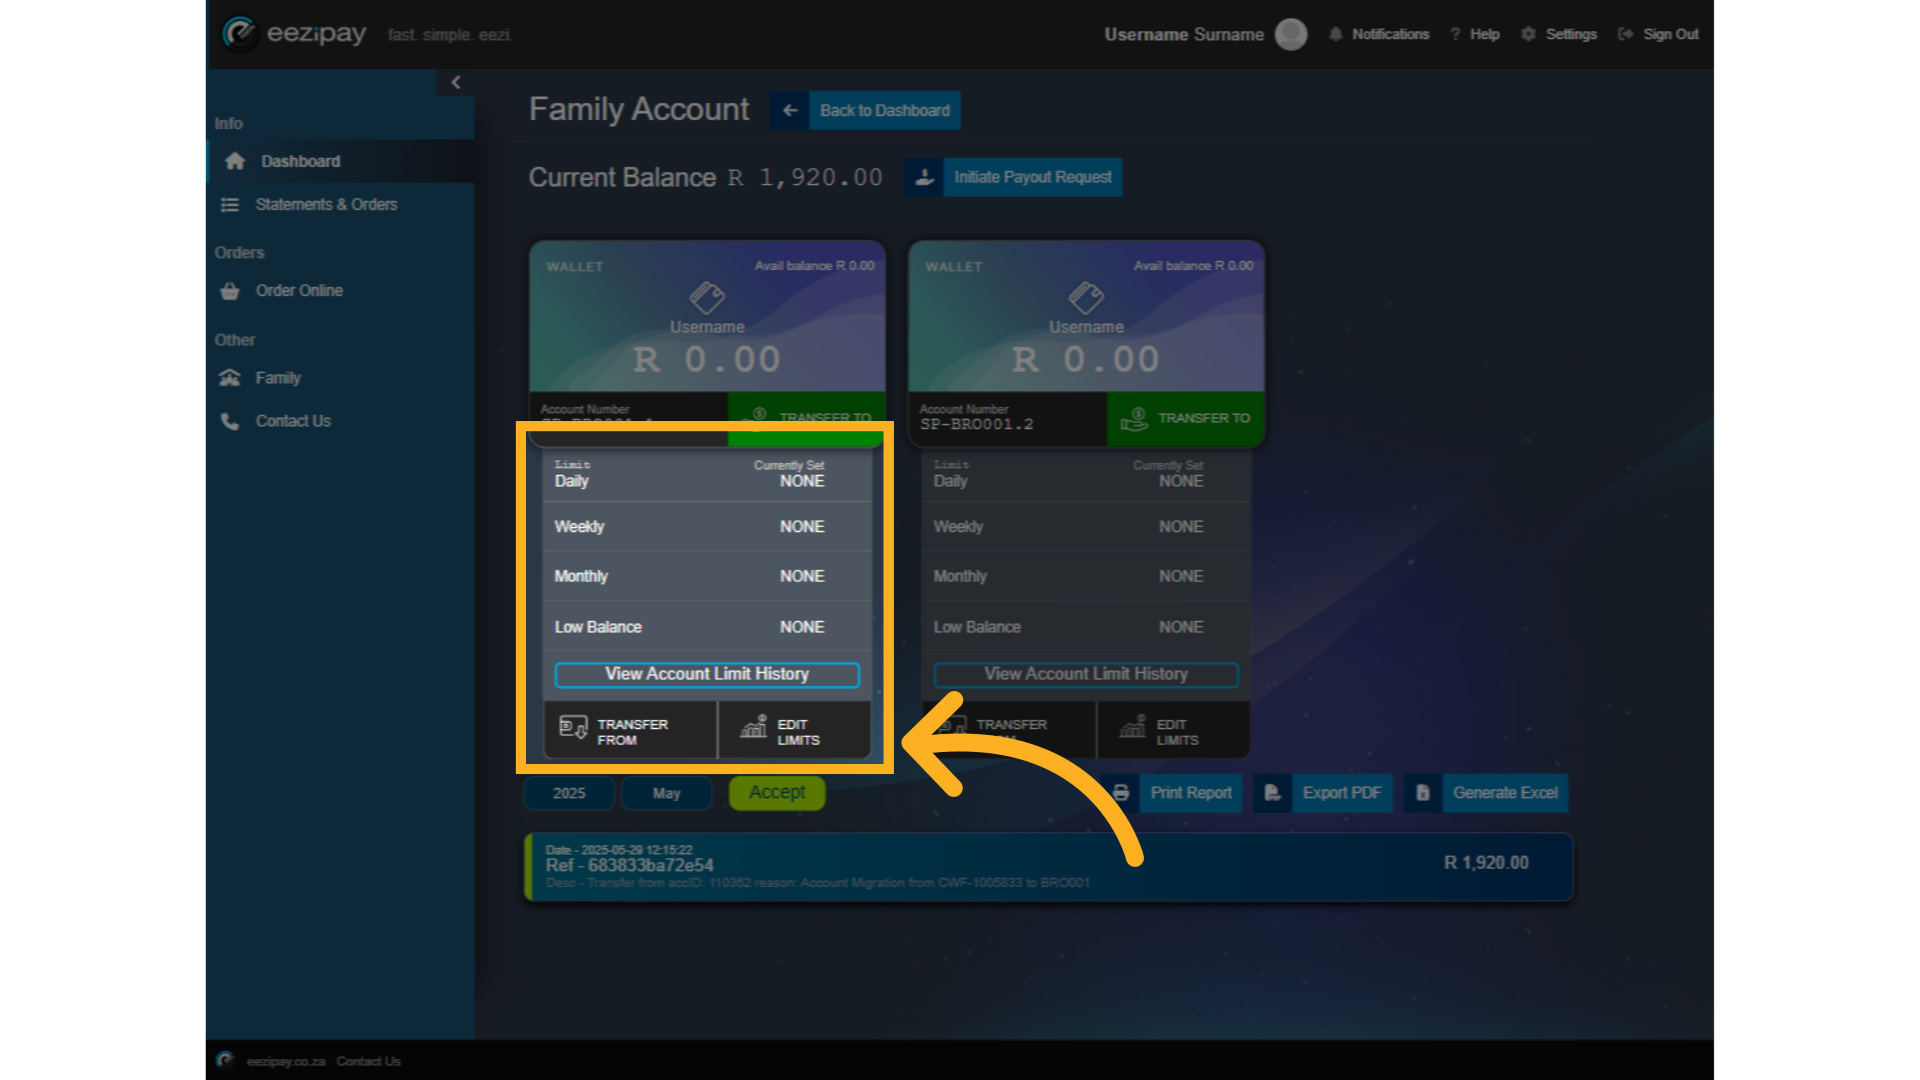
44. Child Limits
The spending limits set for each child will be visible below their account. To edit the limits, click on the Edit Limits button.
45. Set Limits
Enter the Daily, Weekly, Monthly, and Low balance limits followed by clicking on the Set Limits button to save the limits successfully.

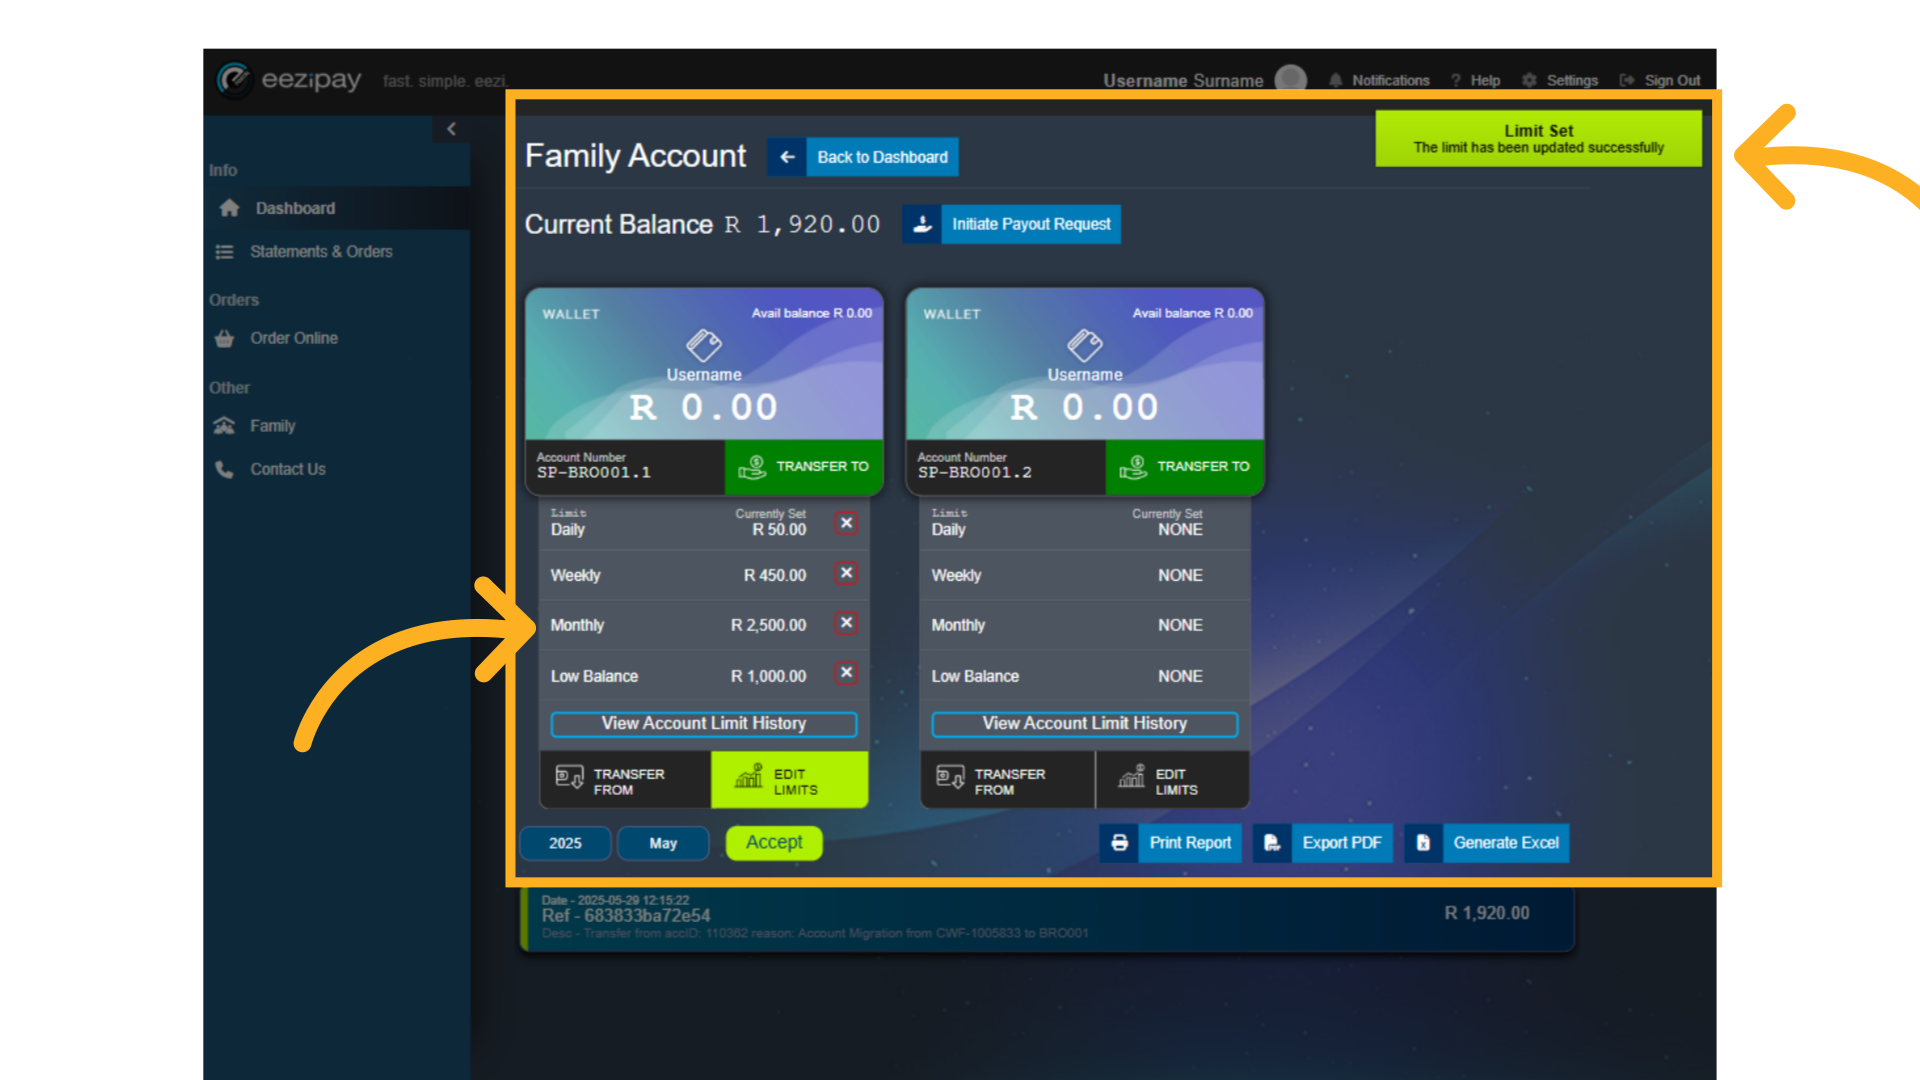
46. Limits Set
Once complete, you will see the following. 1. The system will indicate that the child's limits have been successfully set. 2. You will see that the limits have been updated.
47. How to Order via
Order Online
How to Order via Order Online
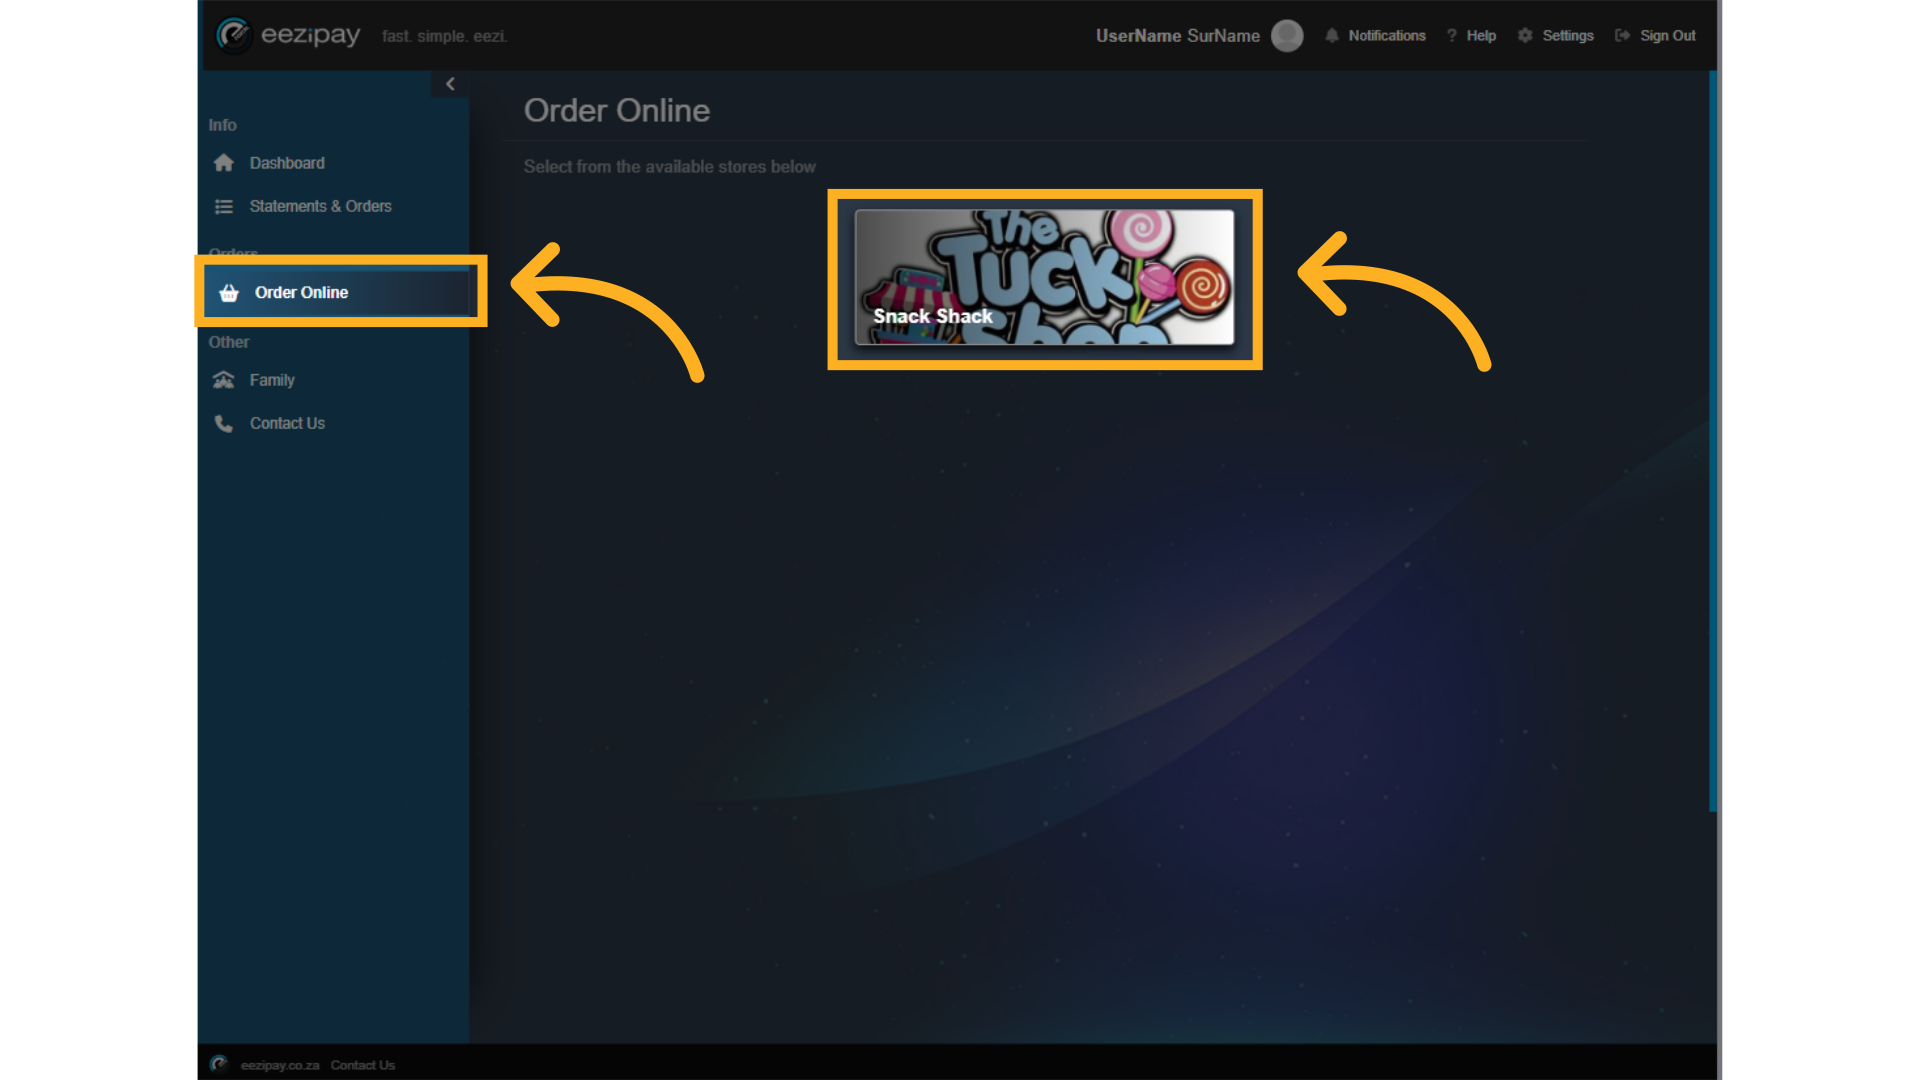
48. Select Order Online Store
If a merchant at your school offers the ability to Order Online, their store will be visible in the Order Online Tab. To place an online order, simply click on Order Online, then select the store you would like to purchase from.
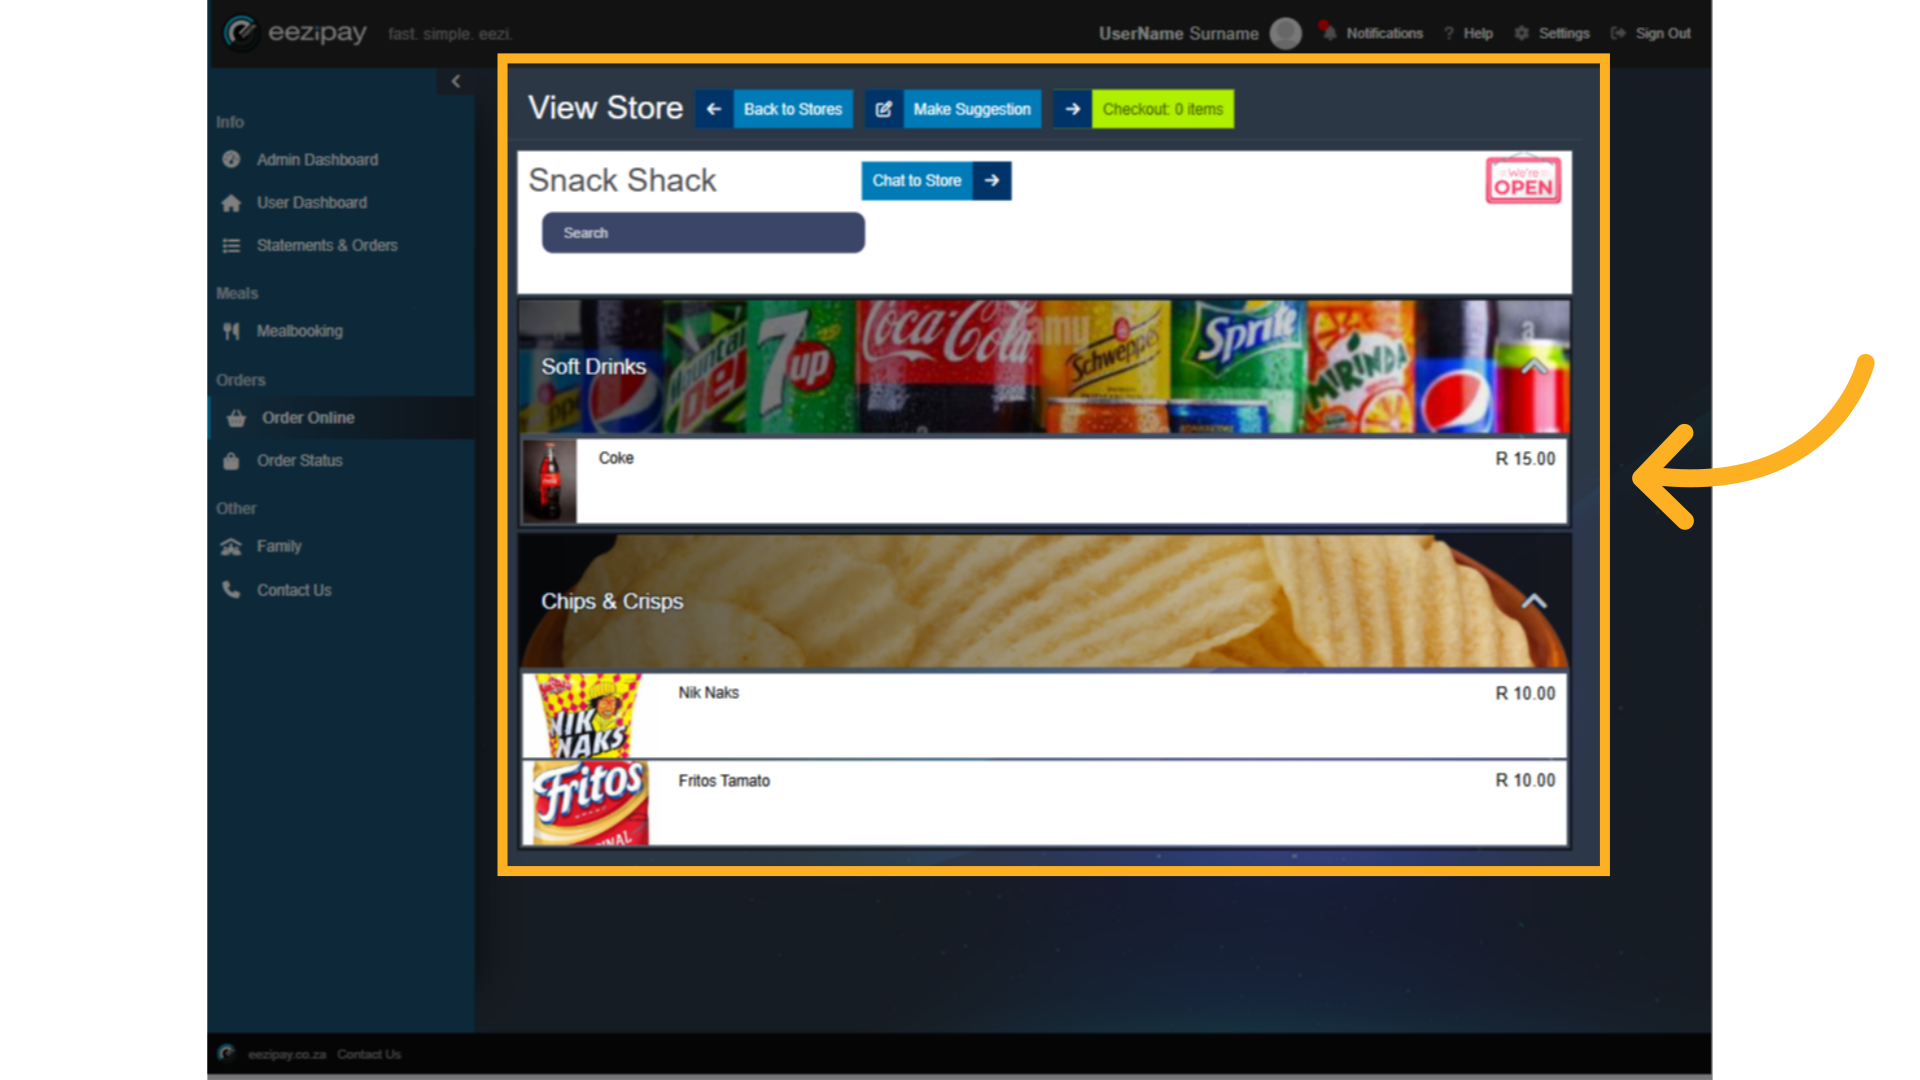
49. Store Categories
You will be able to see store categories with their items that are available for purchase. Click on the one you would like to order.
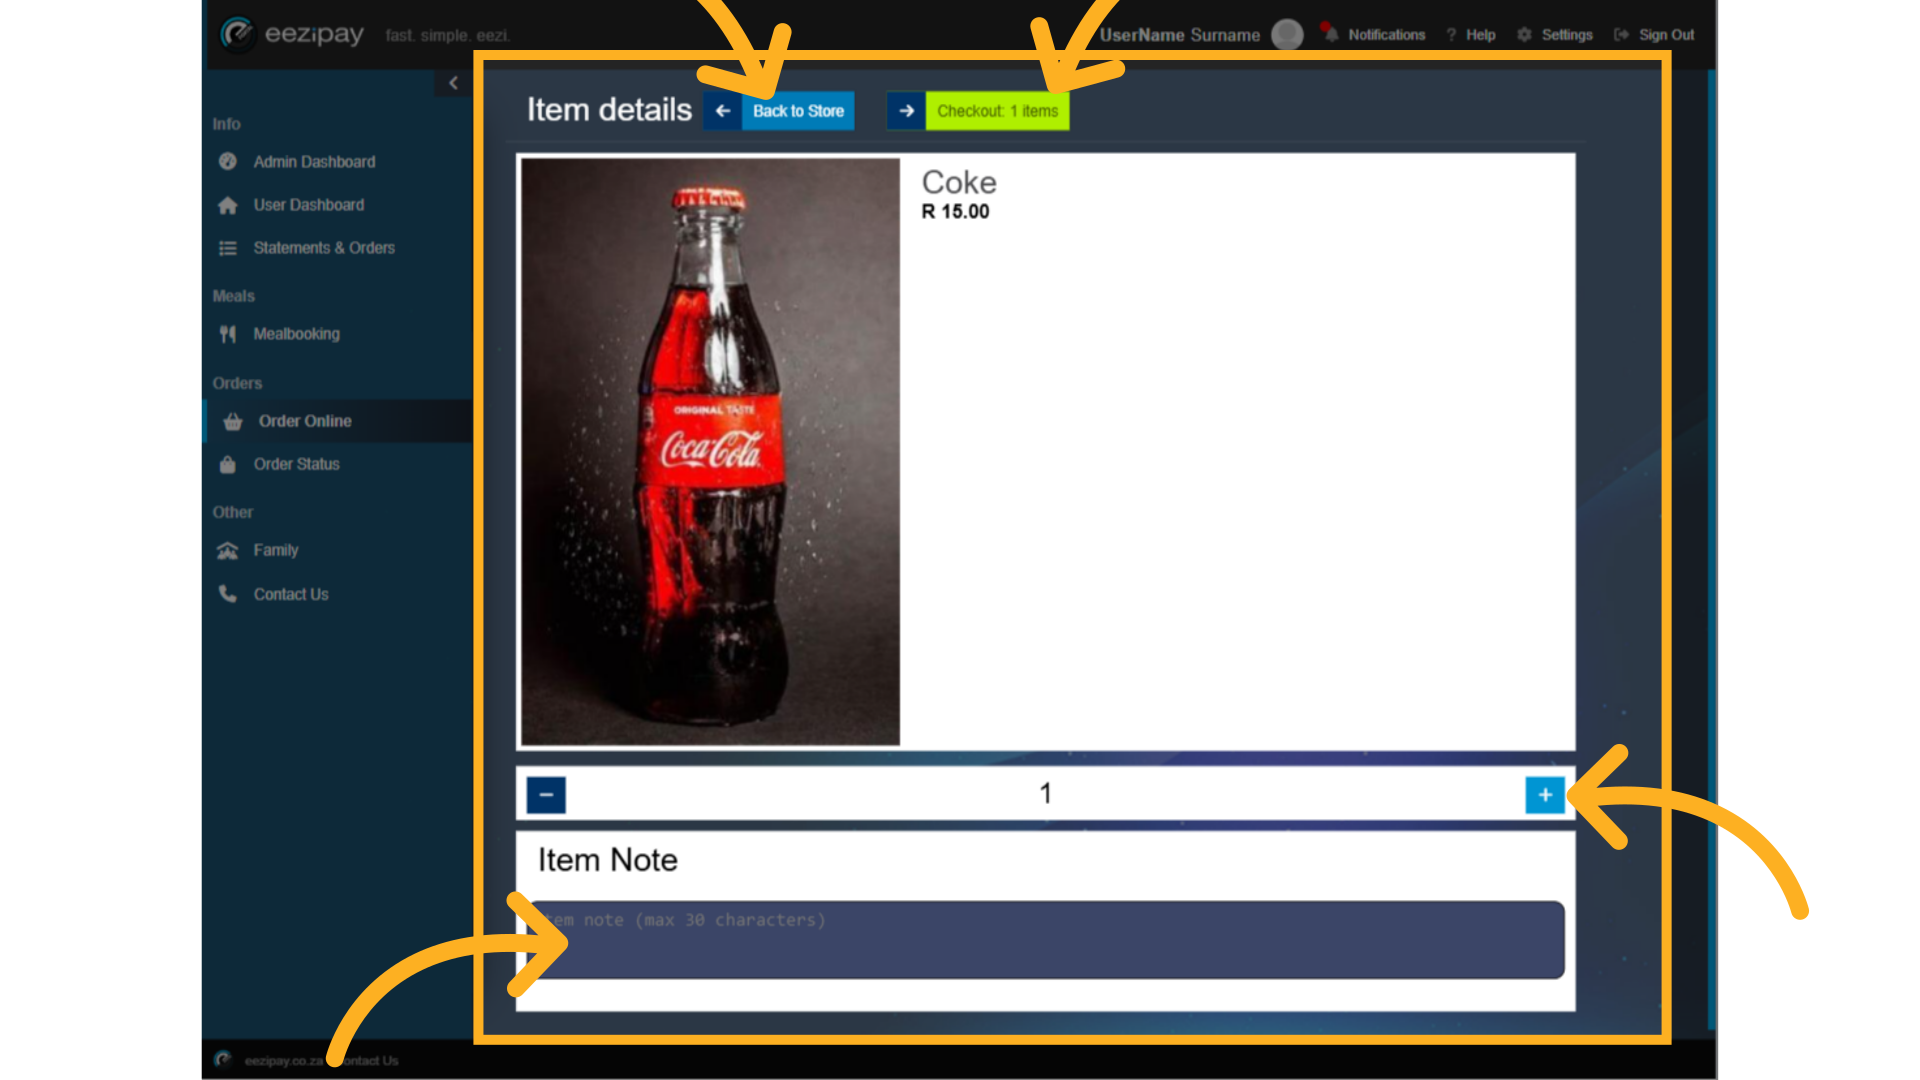
50. Product Amount Selection
1. Use the plus sign to select how many of the product you would like to order. 2, Include any notes that should go with the order. 3. If you want to add more products to your order, click on the "Back to Store" button and add more products to your cart. 4. Once complete simply click on the "Checkout Button" above.
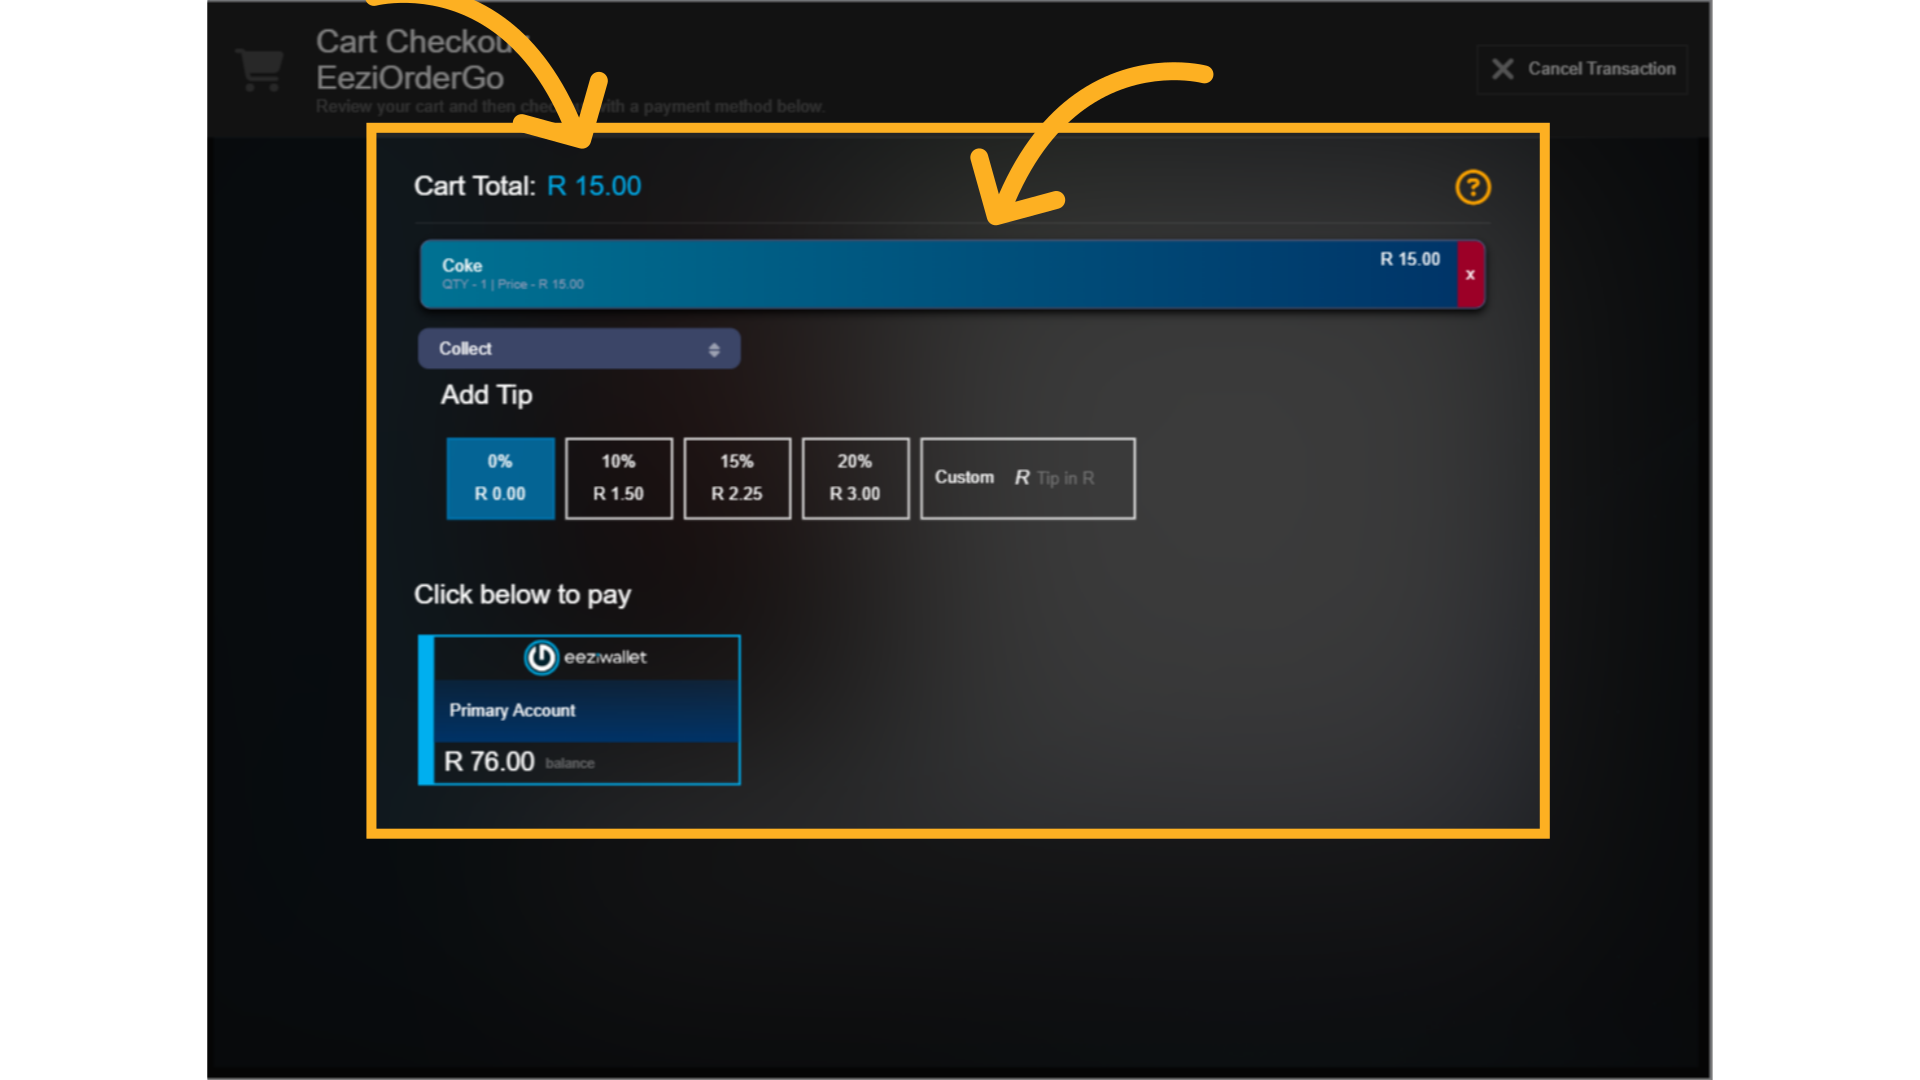
51. Cart View
Here you will see the cart overview. 1. At the top is the cart total. 2. Next you can see all the items, quantities, and prices for all the products you have selected.
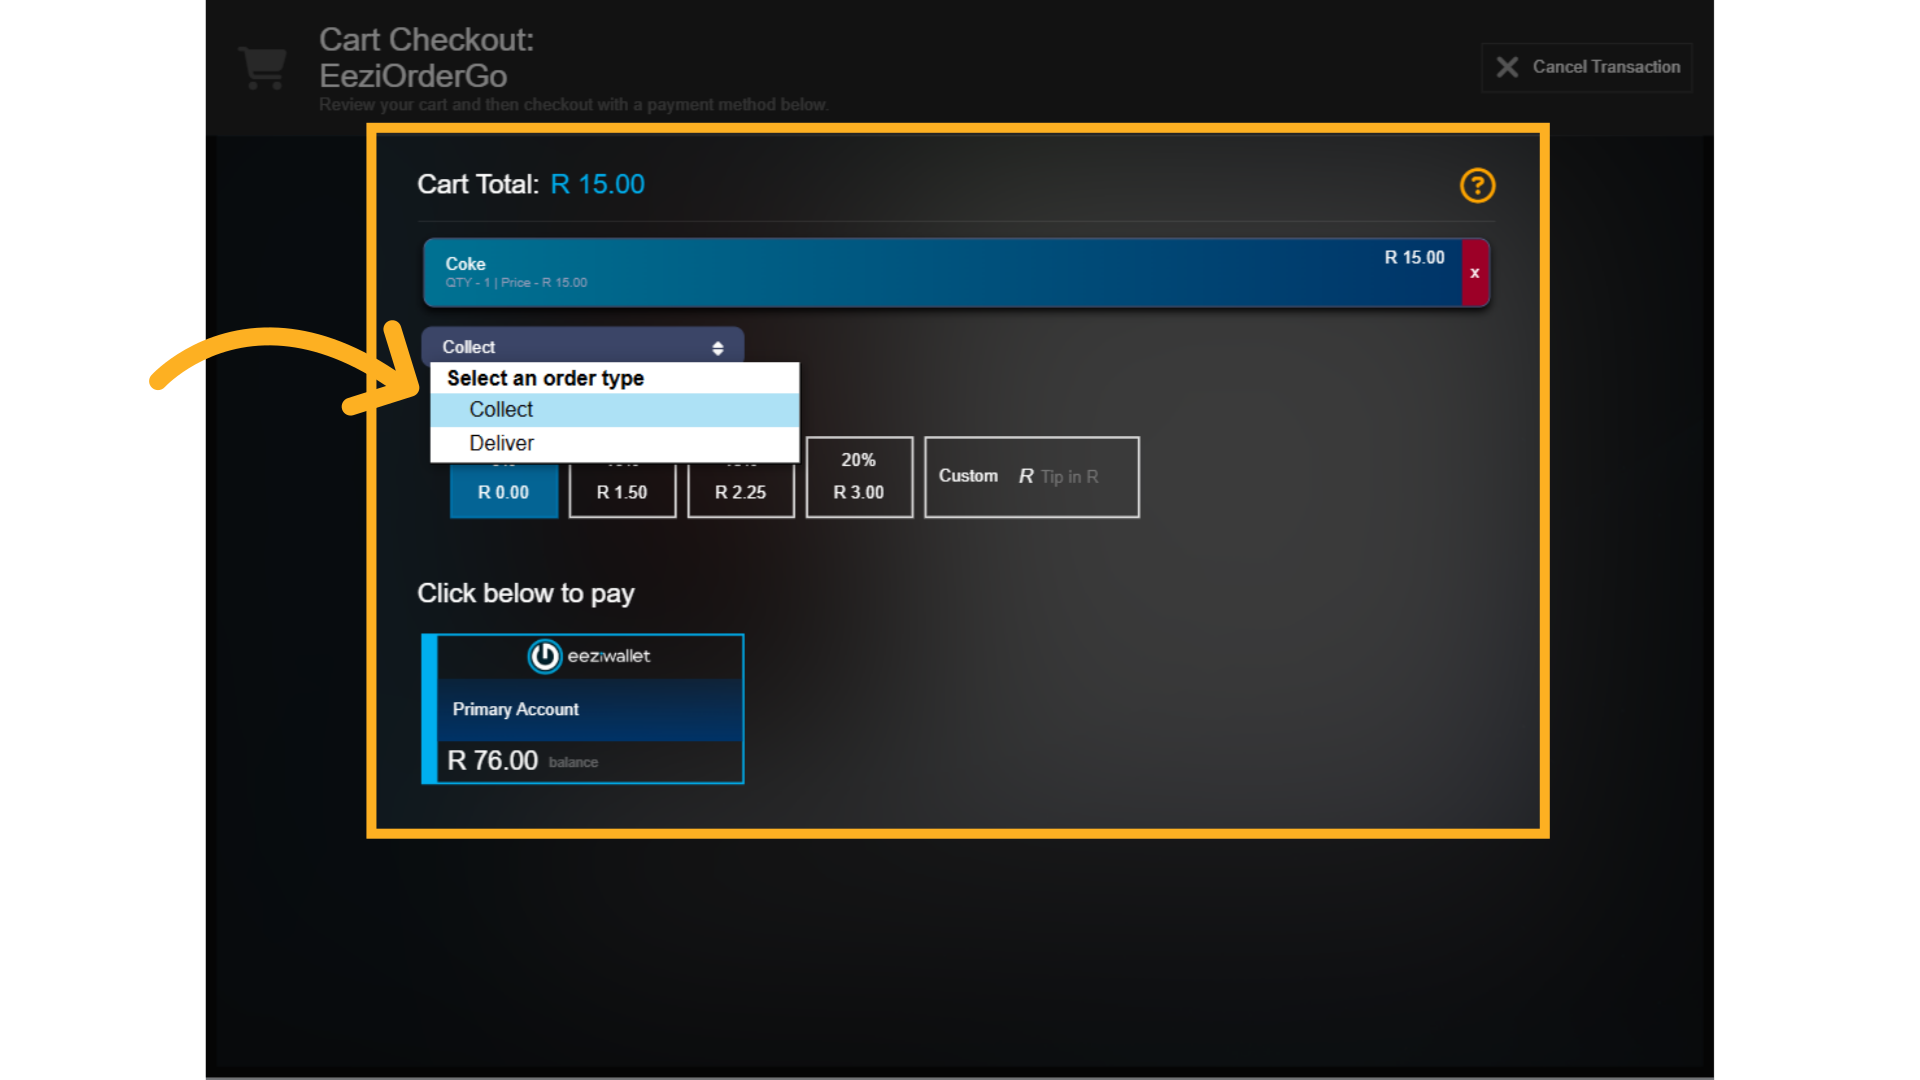
52. Collect or deliver
3. Select whether you will collect your order or if it needs to be delivered to you somewhere on campus.
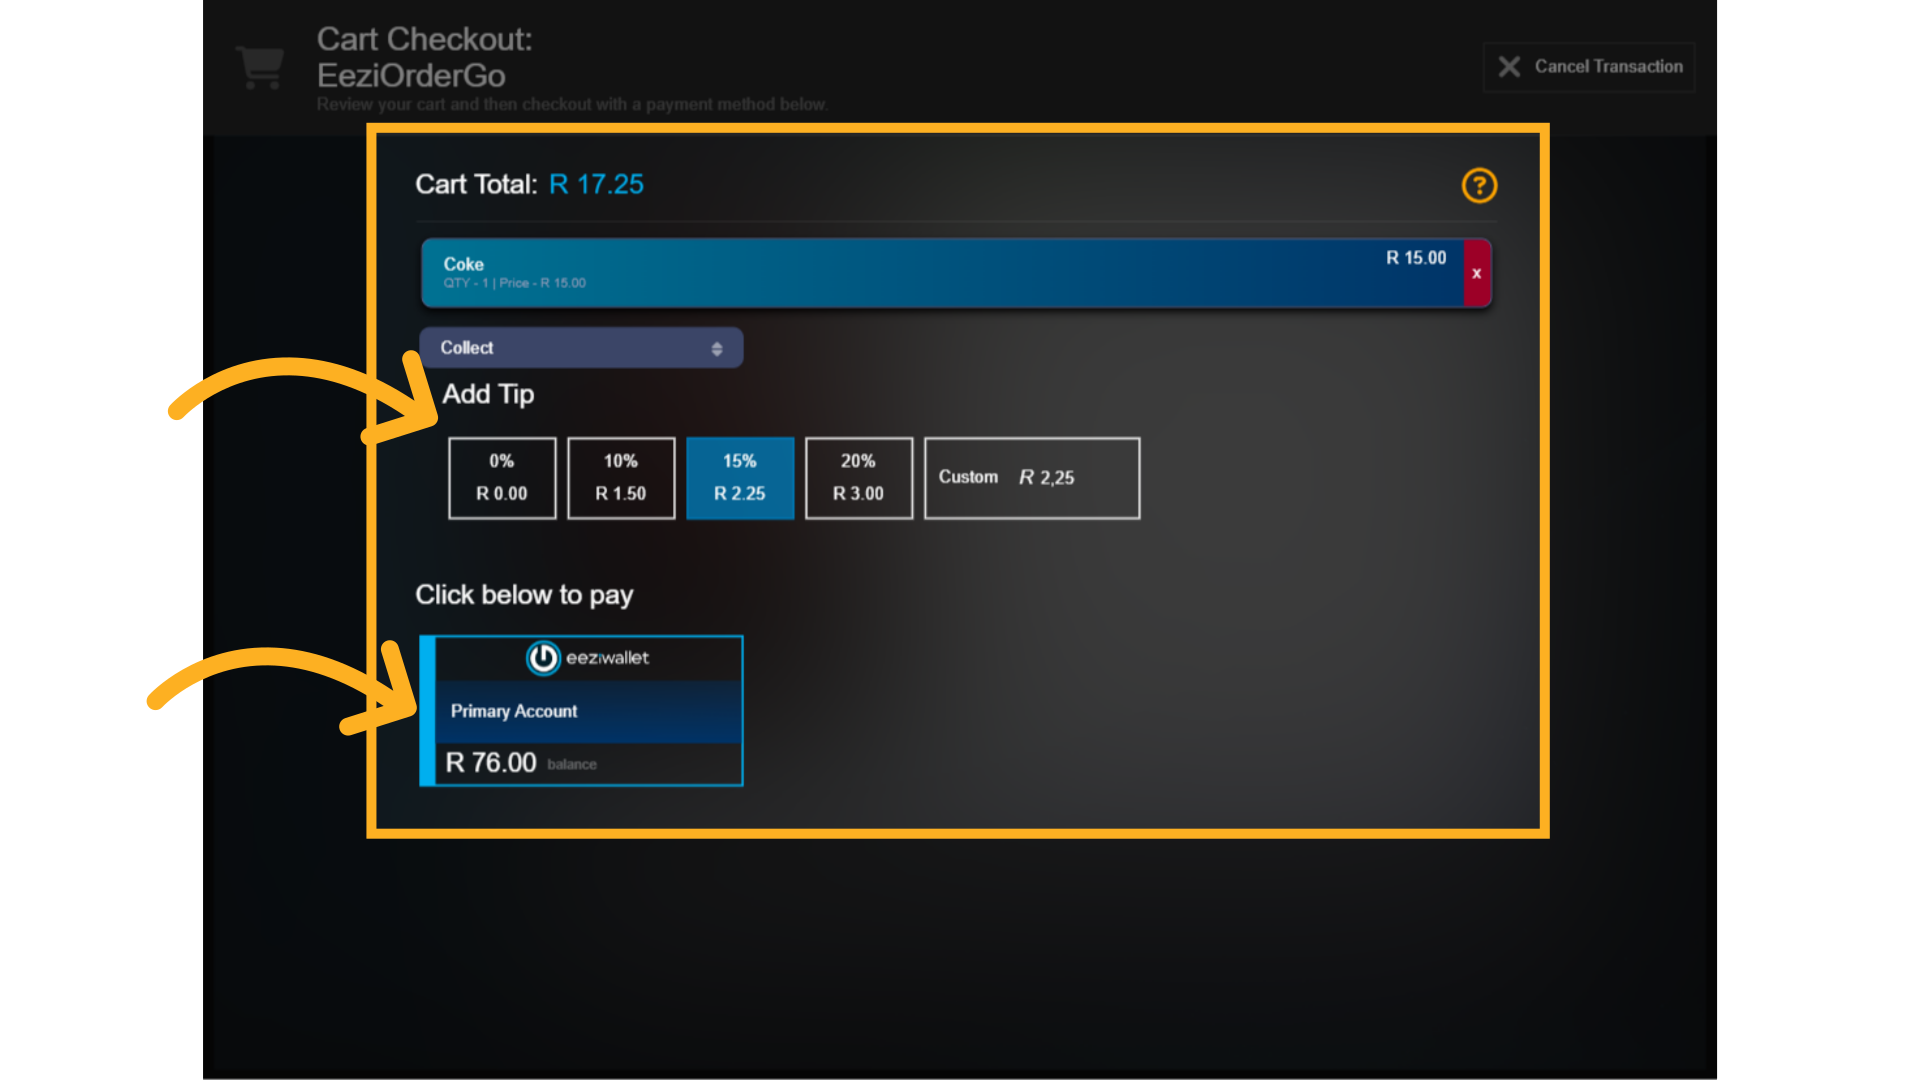
53. Make payment
4. You can add a tip by choosing a preset precentage or add a custom amount. 5. Finally click on your Eezi Wallet to make payment. You will be able to see the balance in your wallet below to ensure that you can cover the cart total.
54. Payment successful
The system will initiate and complete the transaction and the Payment successful message will appear. In the EeziWallet you will now see the available balance after the payment.
55. How to Book a Meal via Mealbooking
How to Book a Meal via Mealbooking

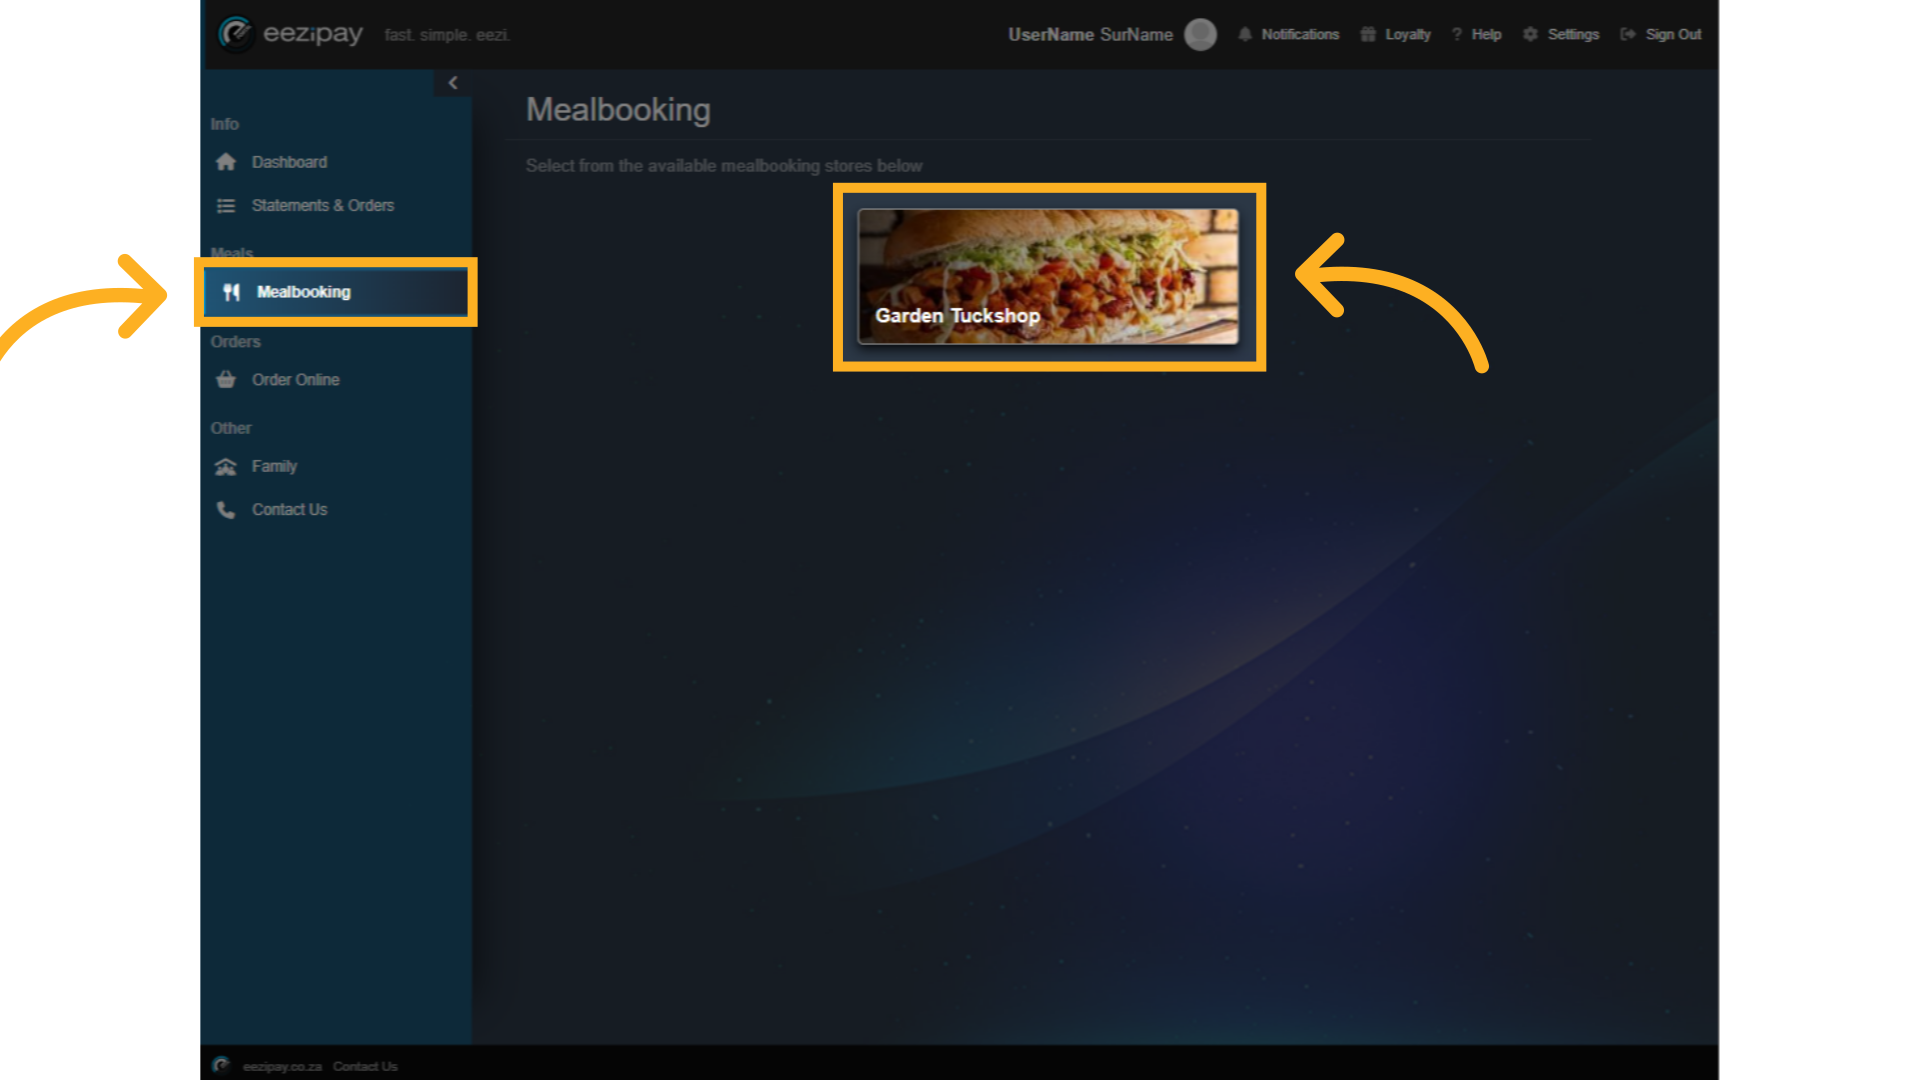
56. Select Mealbooking Facility
If a merchant at your school offers the ability to Book a Meal online, their store will be visible in the Mealbooking Tab. Start by clicking the mealbooking button on the main menu on the left. Then select from the available facilities to request a food order.
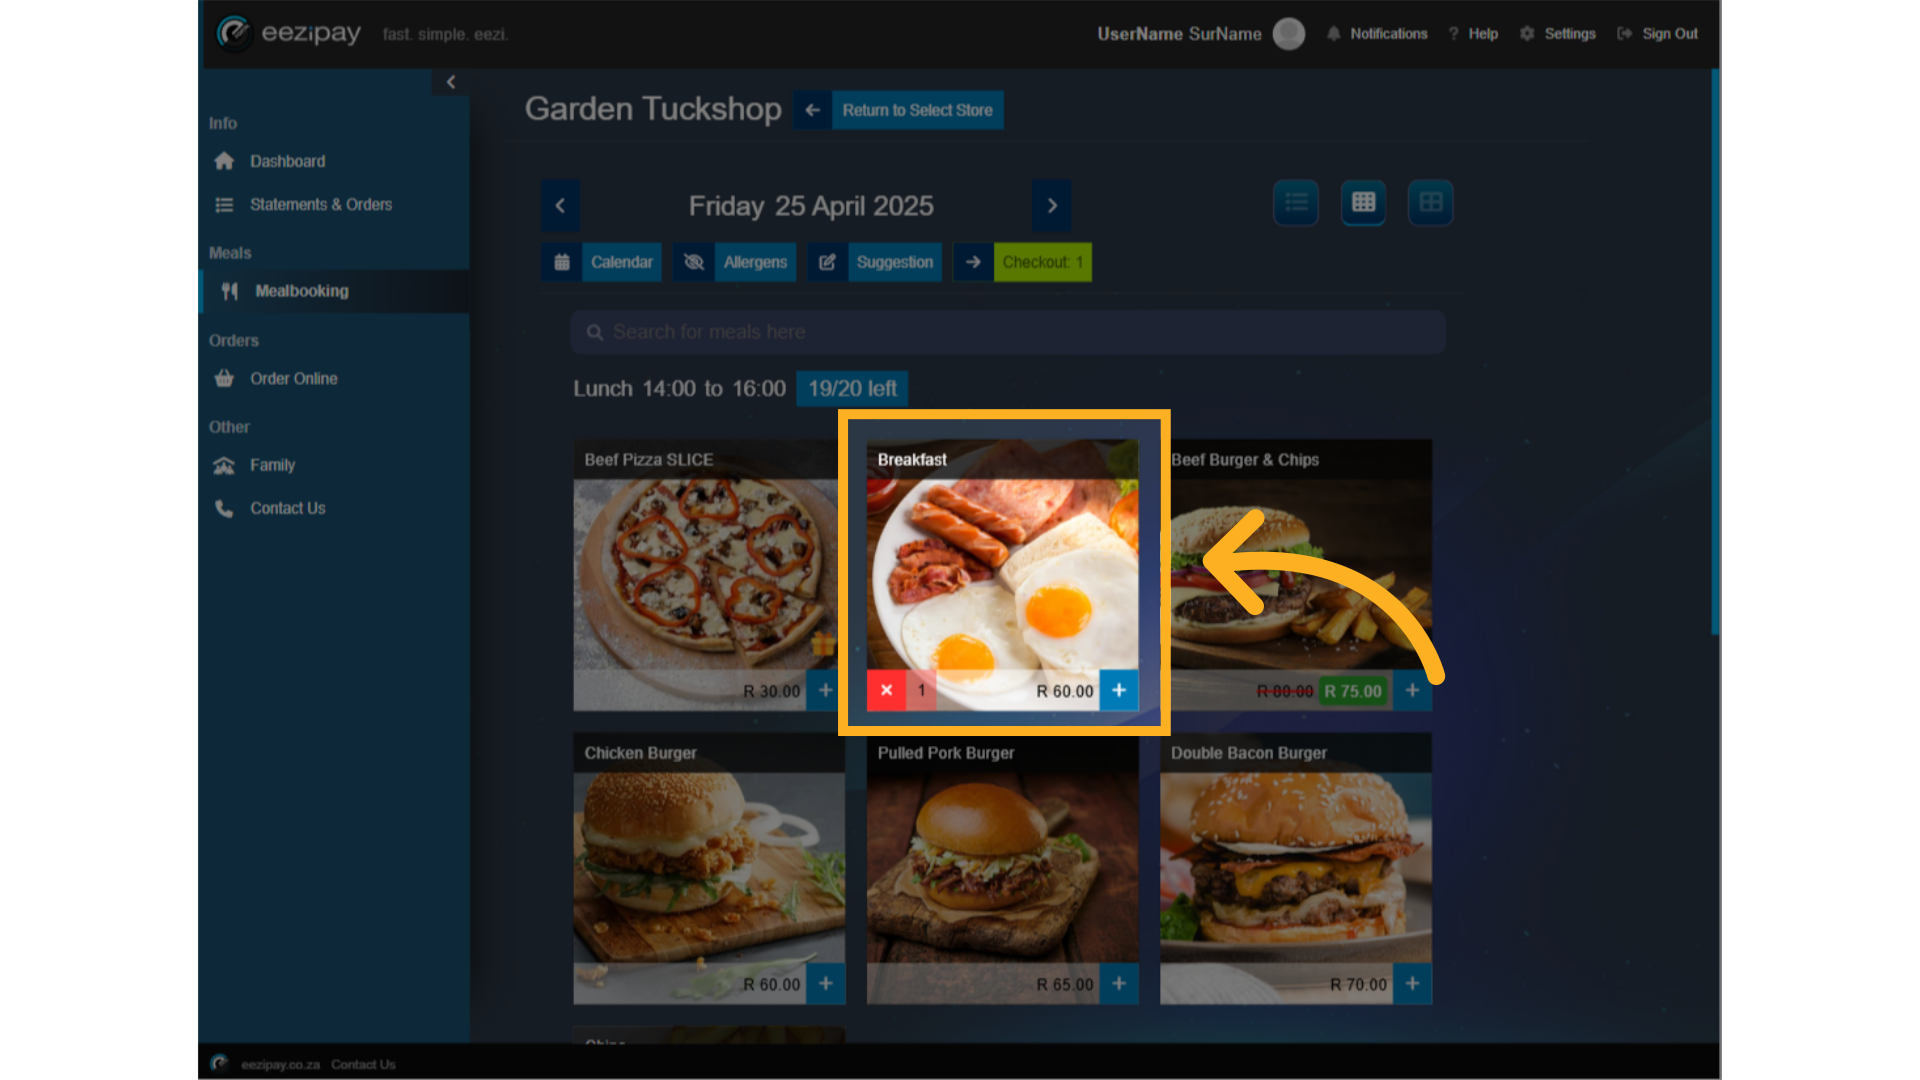
57. Mealbooking Menu
To book a meal, do the following. 1. Select the date you would like to book a meal for. 2. Ensure that your allergens are visible so that only meals that do not have your allergens are included. 3. Select which window you would like to book for, such as breakfast, lunch, or after school. 4. Meals which are currently on special will show up in green.

58. Select product
To order, click the plus button located at the bottom right of the item you wish to order. To learn more about the product, simply click on the image.
59. Product Page
On the product page, you can check allergens, reviews, and your purchase history of this product. Once you are ready to place your order, click on the checkout button.

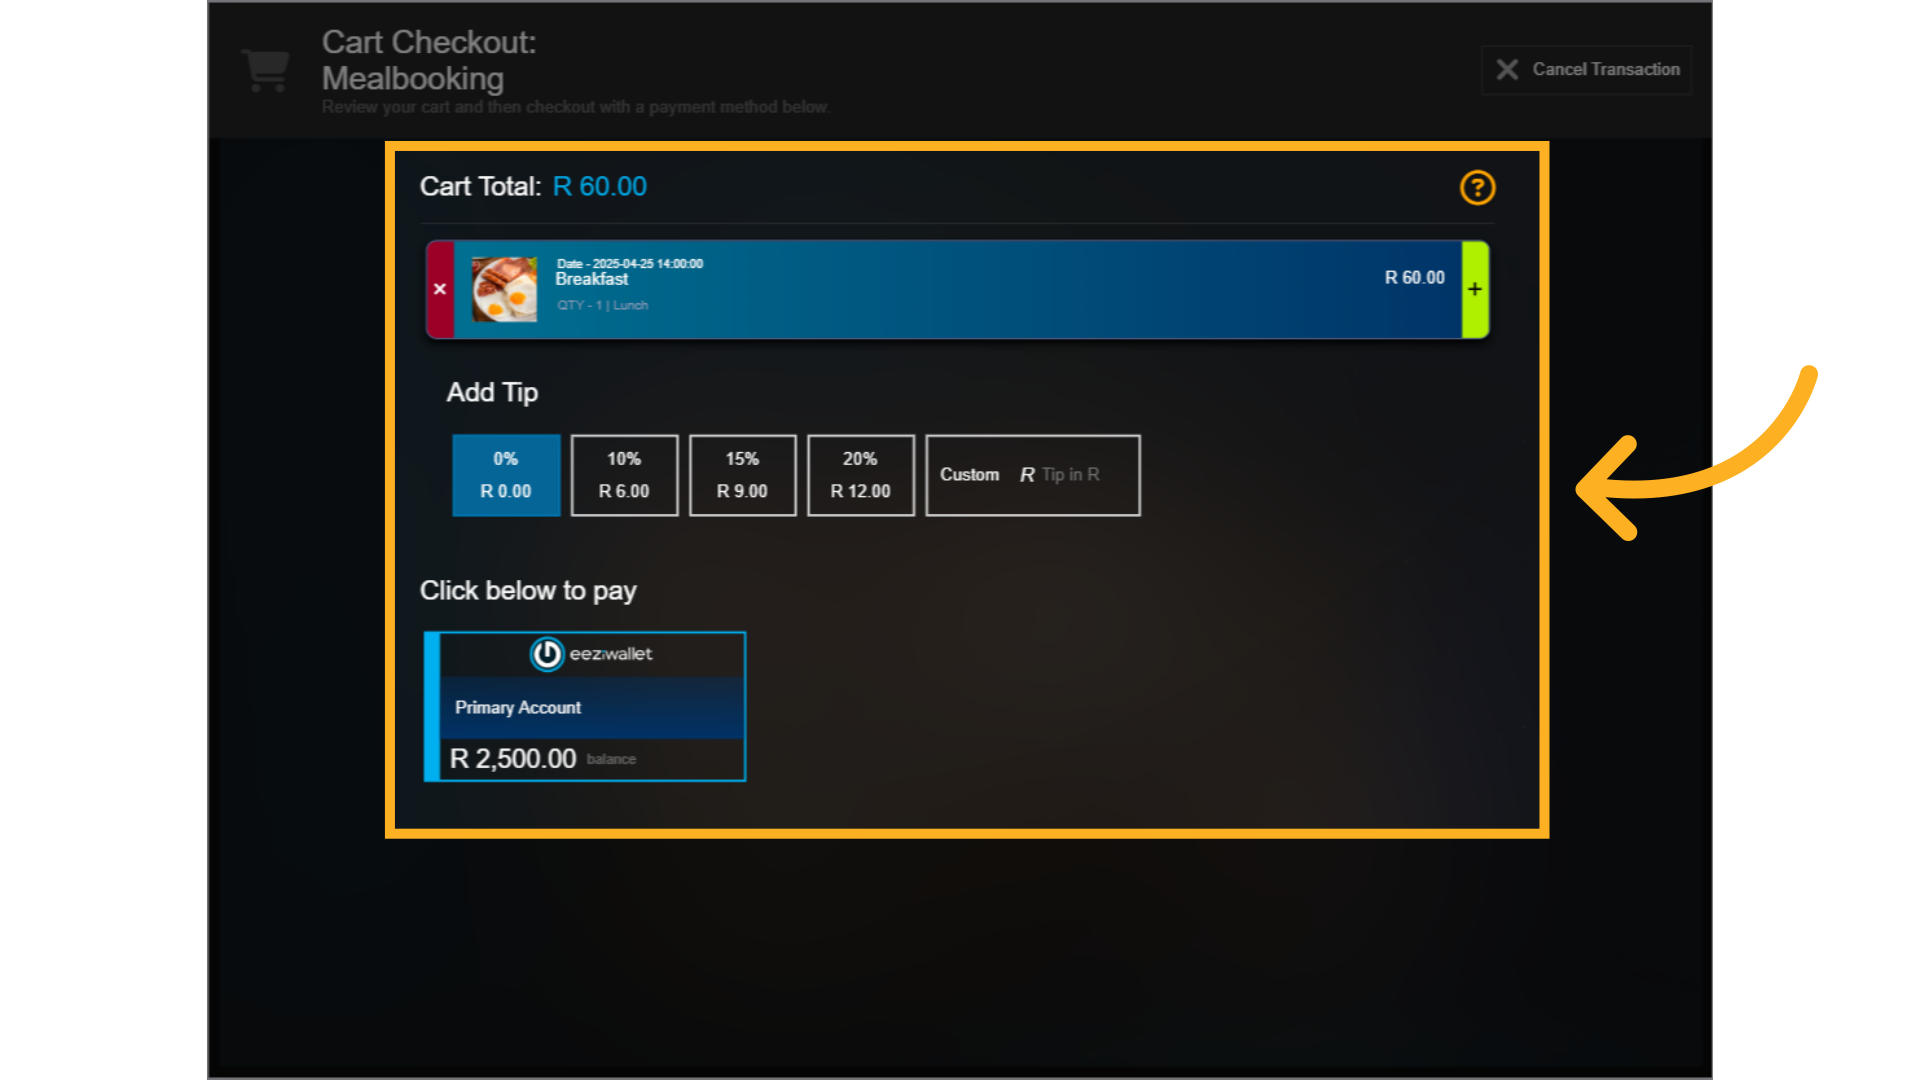
60. Cart Checkout & Payment
The Mealbooking checkout page is similar to the order online checkout page. You can check your cart total, check the items you have selected, add a tip, and finalise your payment.
61. How to VOID items via Meal Booking
How to void items via Meal Booking
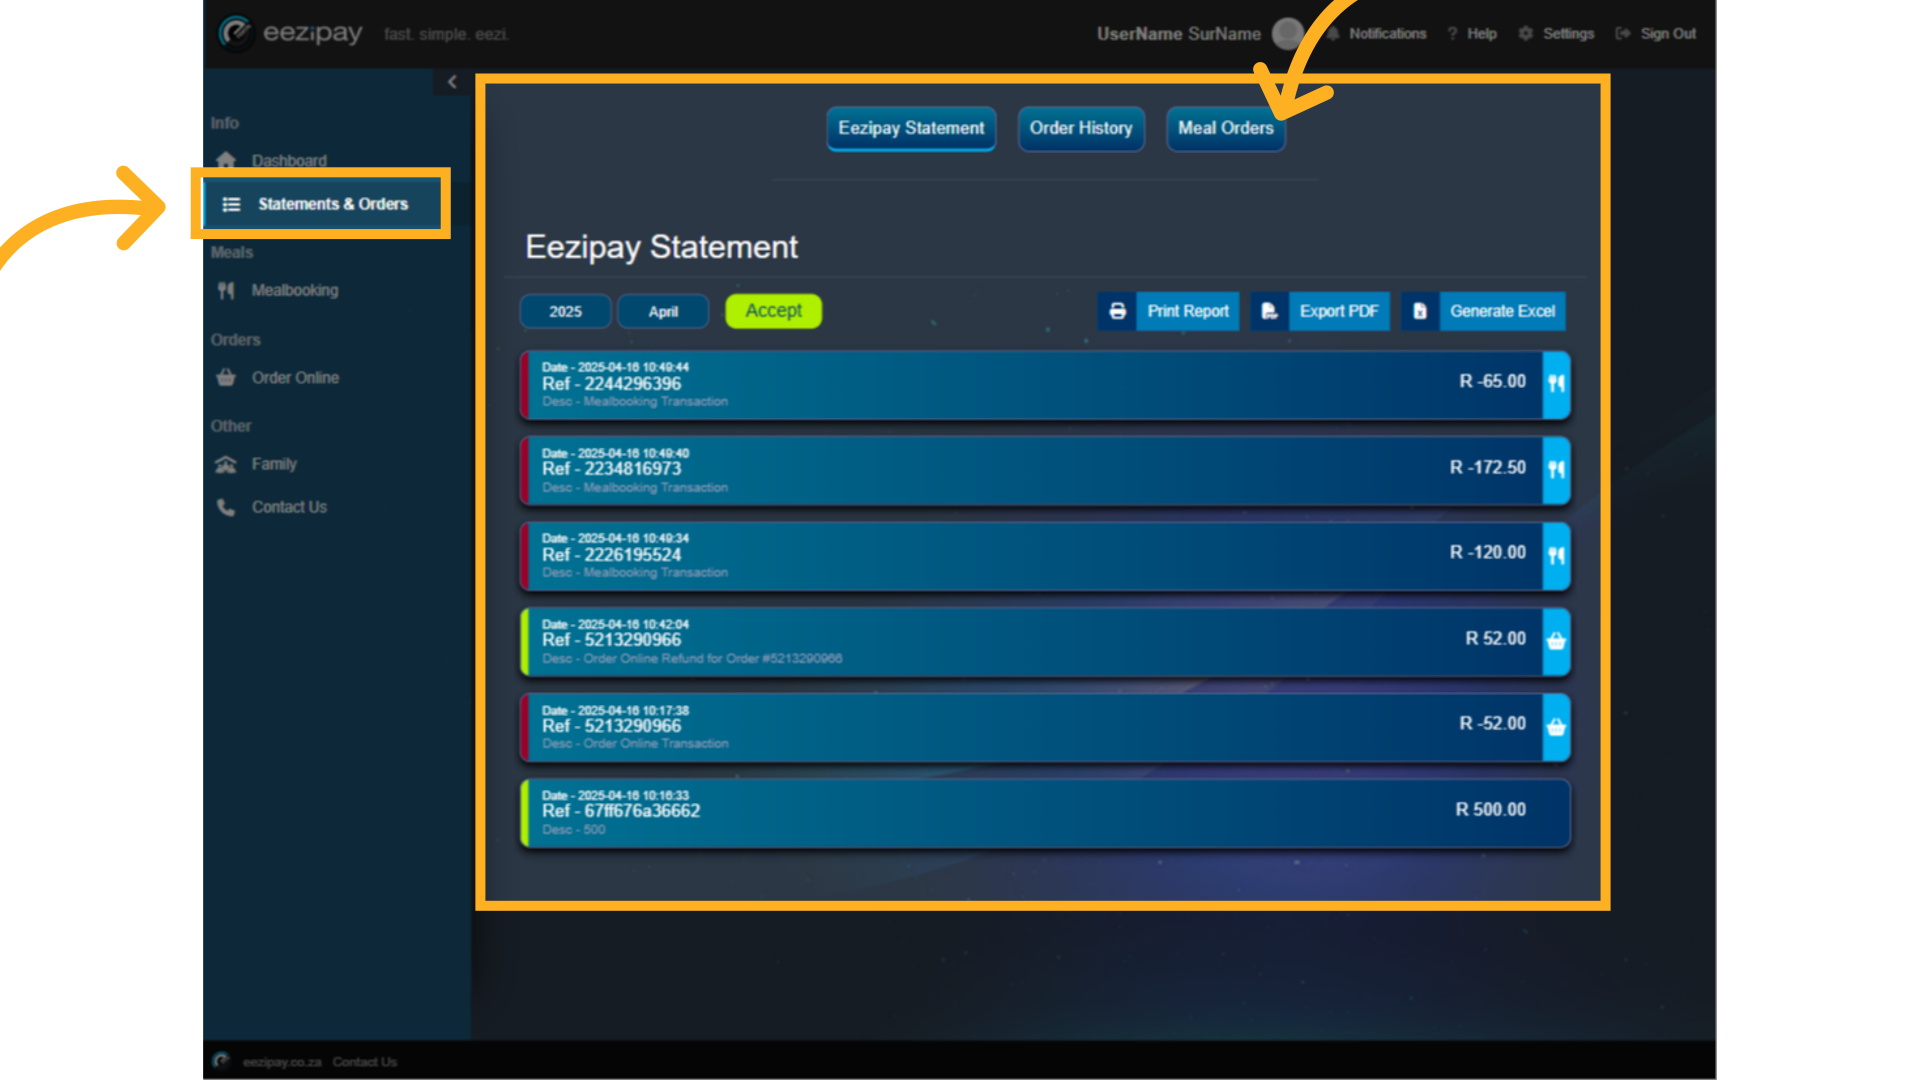
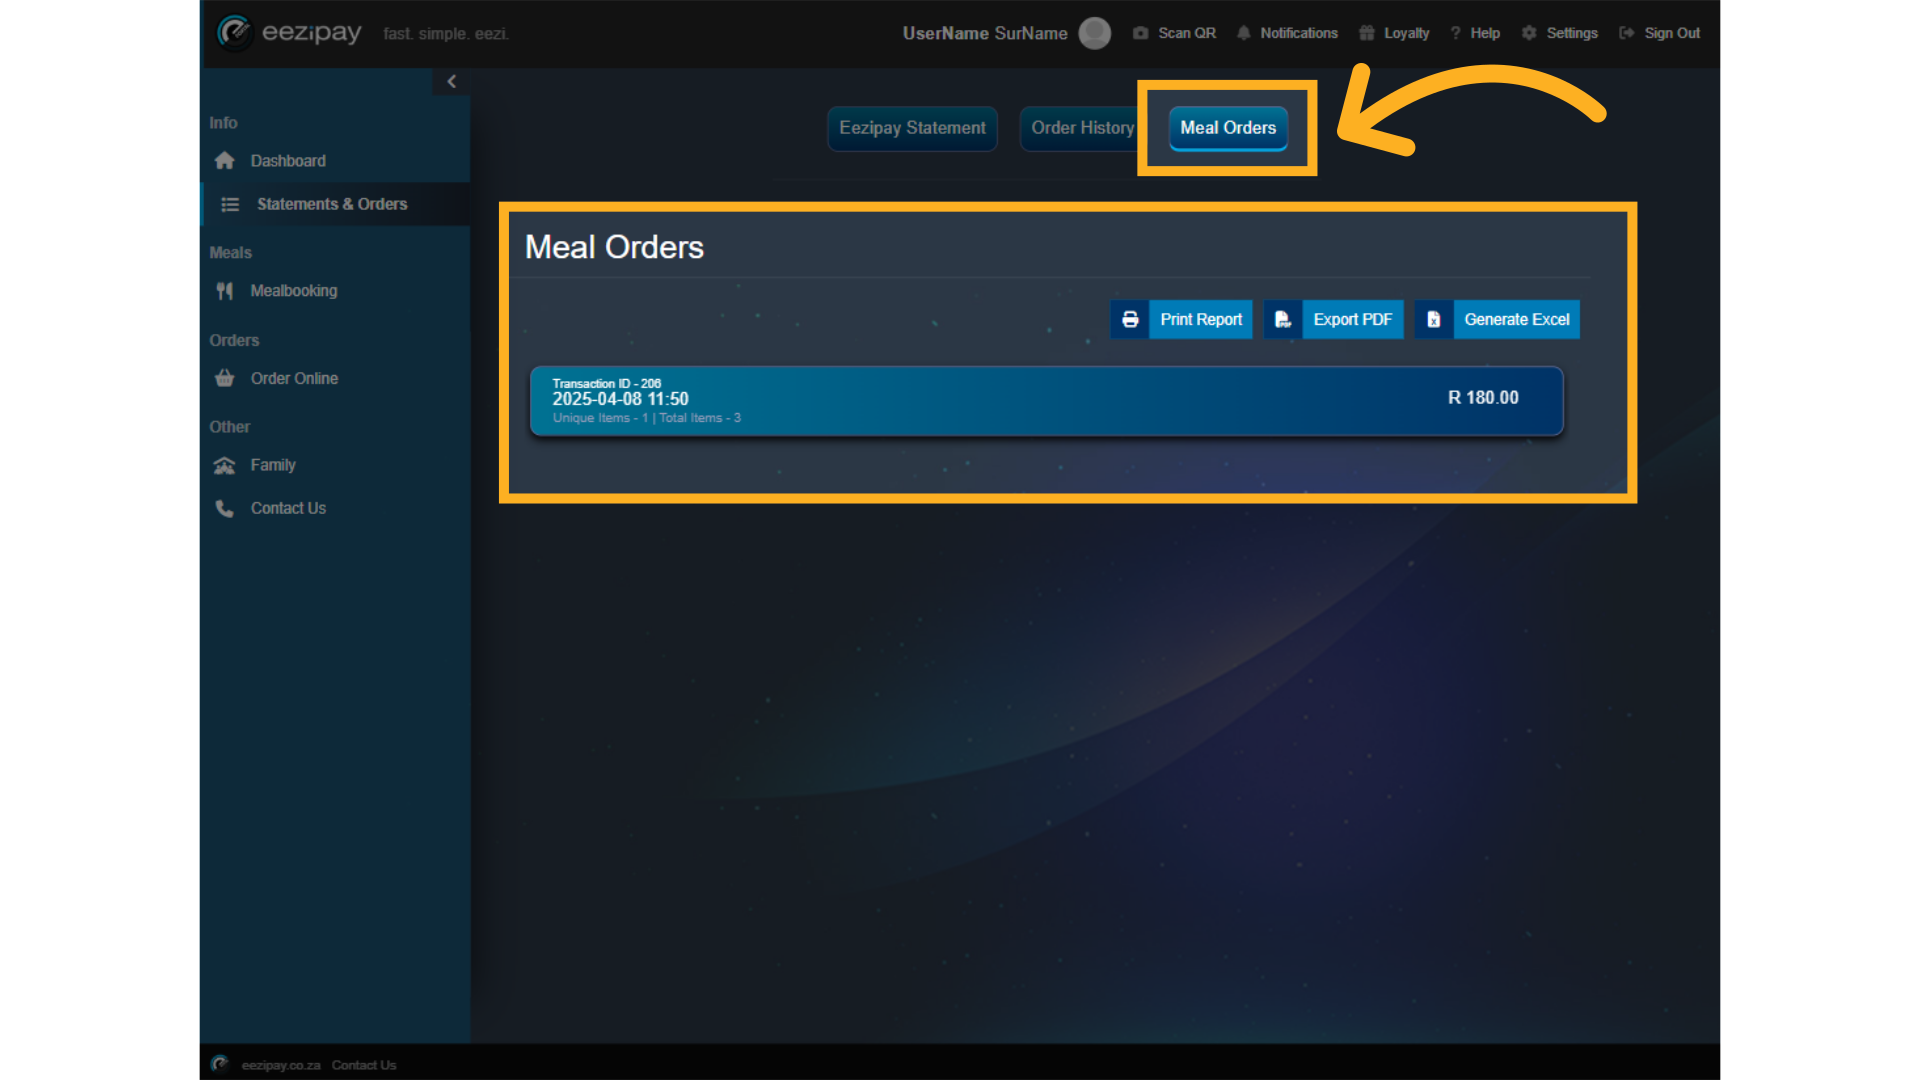
62. Statements & Orders
Click on the Statement & Orders menu option, then click on the Meal Orders Menu option at the top.
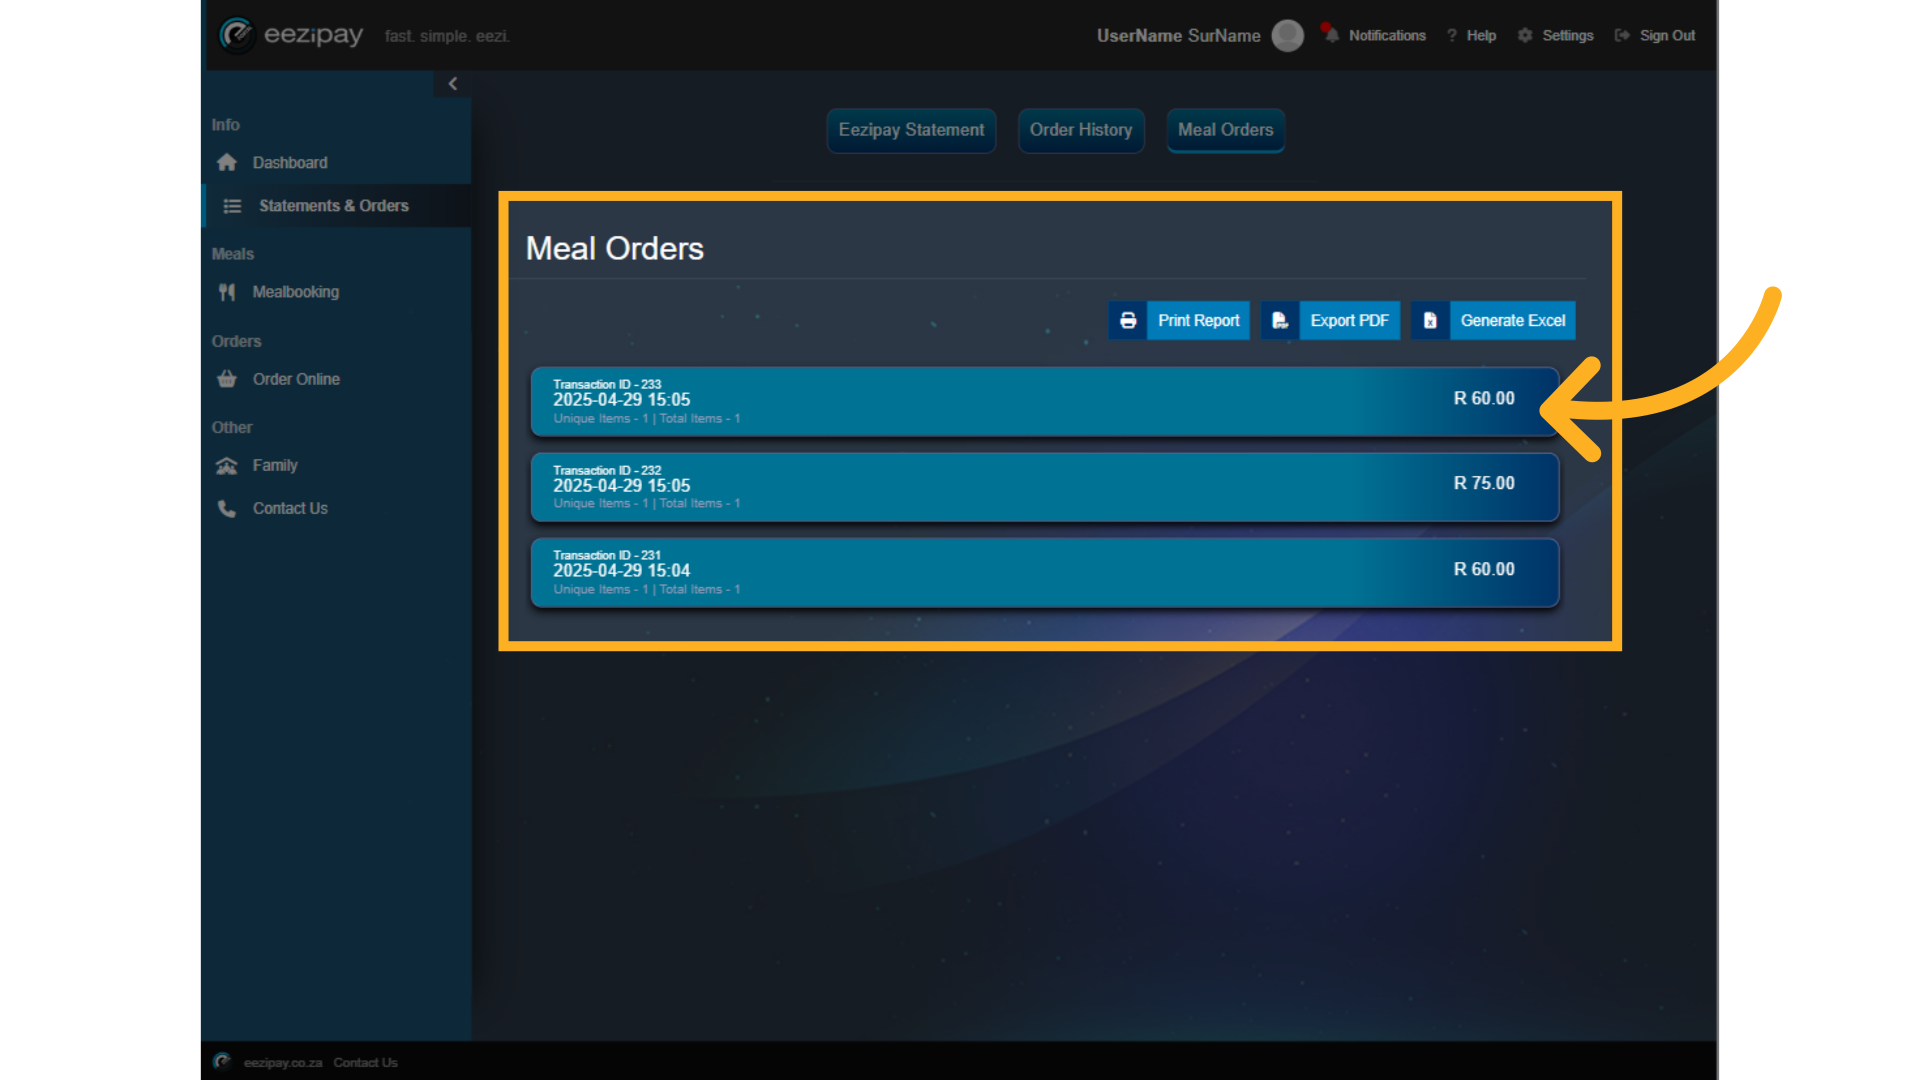
63. Select Meal Order
First select the Meal order you wish to Void.
64. Void Meal Order
Once the meal order is selected, click on the Red X located on the right side of the transaction.

65. Complete Void
In order to finalise the process, click on the Proceed button to complete the Void of the Meal Item.

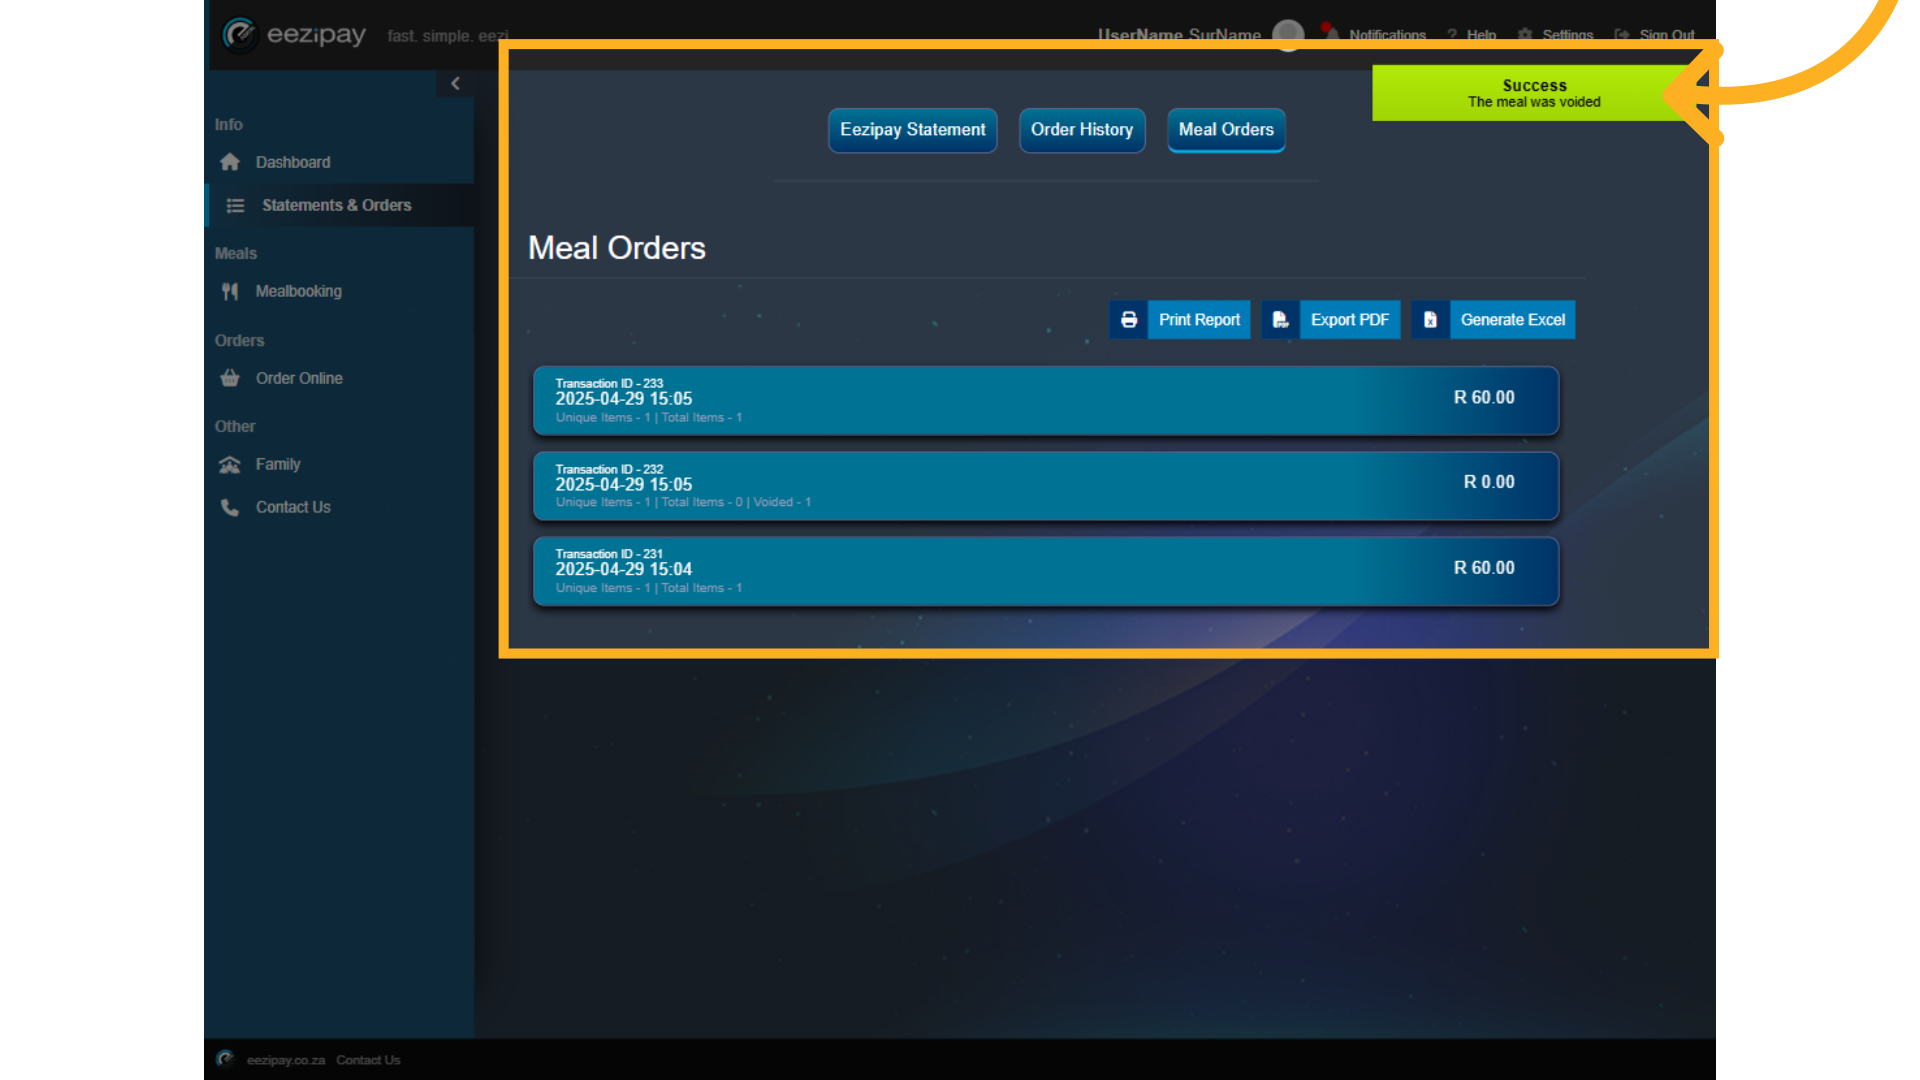
66. Void Successful
Once done, the system will indicate that the Meal item was successfully voided.
67. How to Order On Behalf of Your Child
How to Order On Behalf of Your Child
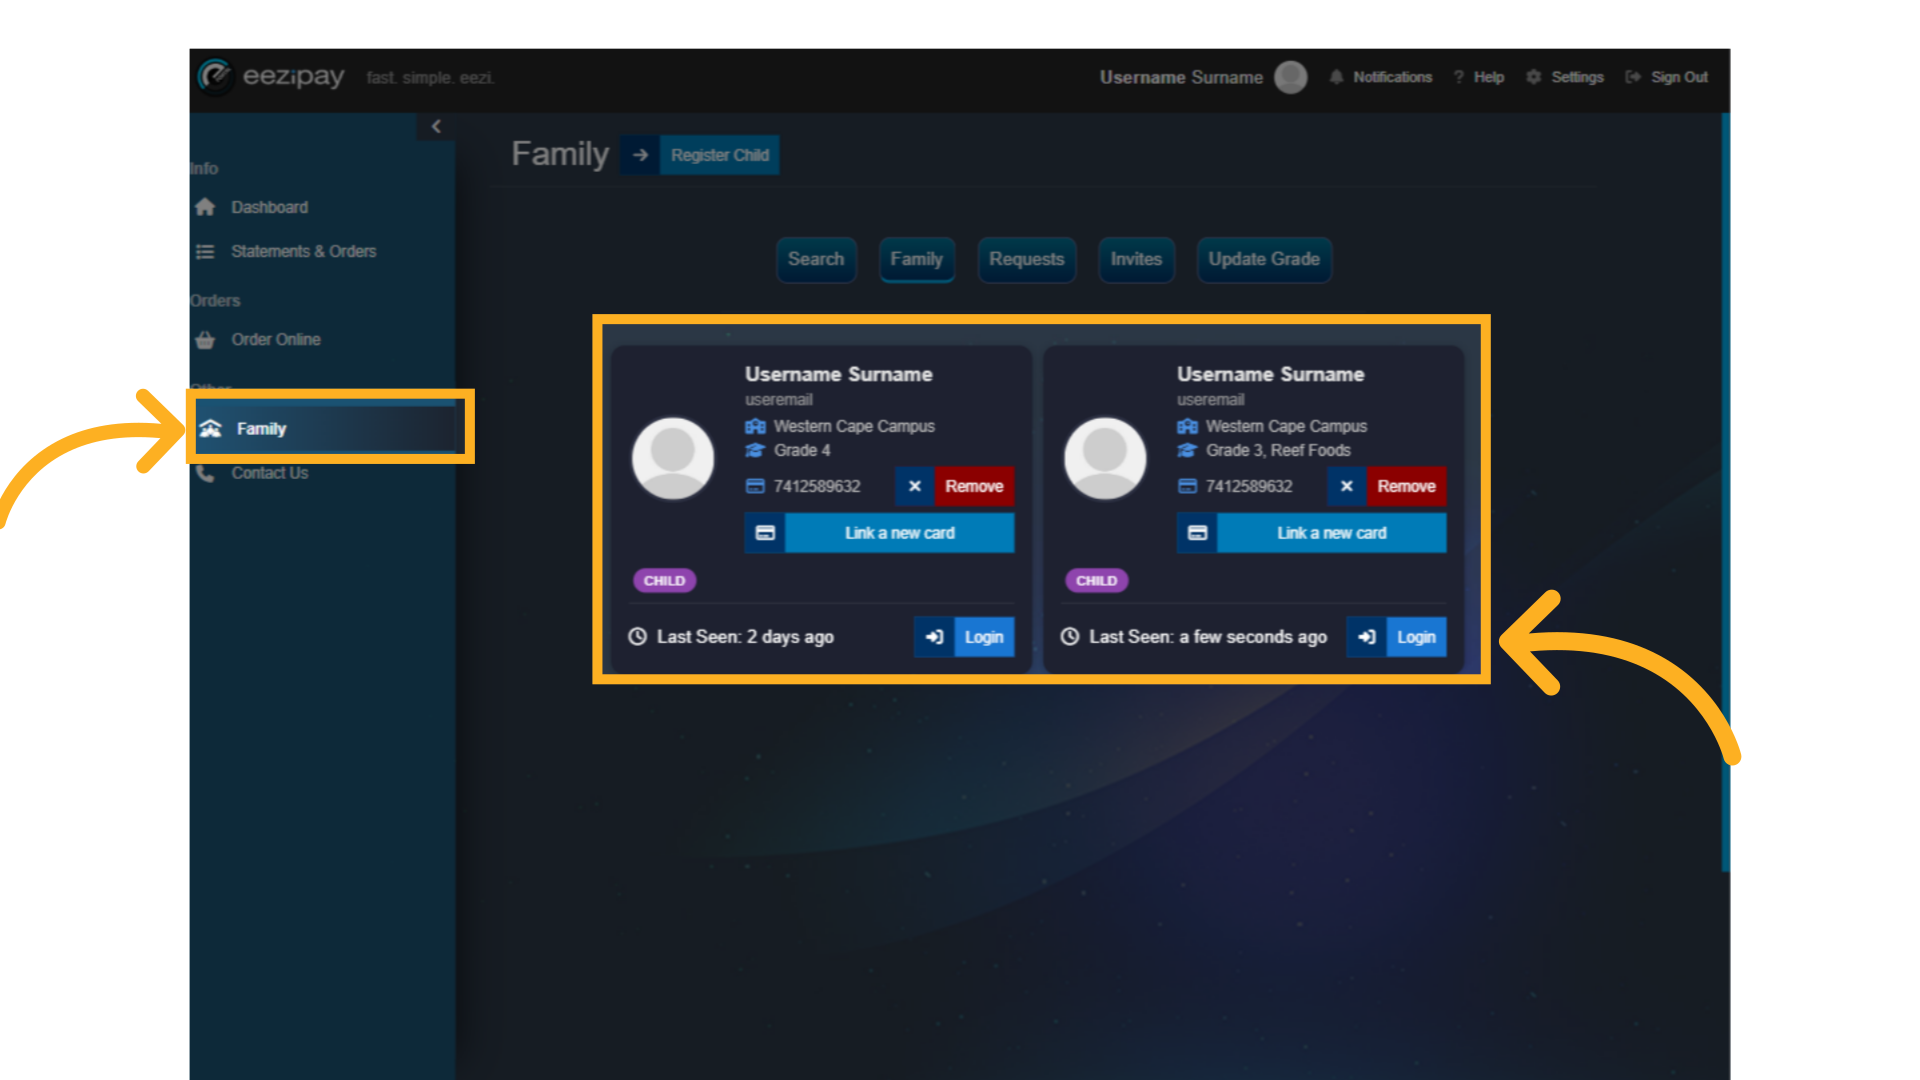
68. Login as Child
As a parent, you are able to order online and book meals for yourself from your own profile, but if you wish to order online or book meals on behalf of your child, you need to login as your child by following these steps. 1. Click on the Family button in the left menu. 2. Click the "Login Button" for the child you wish to place an order.
69. Select Mealbooking Menu Option & Store
Simply click on the Mealbooking Menu Option followed by selecting the Mealbooking store
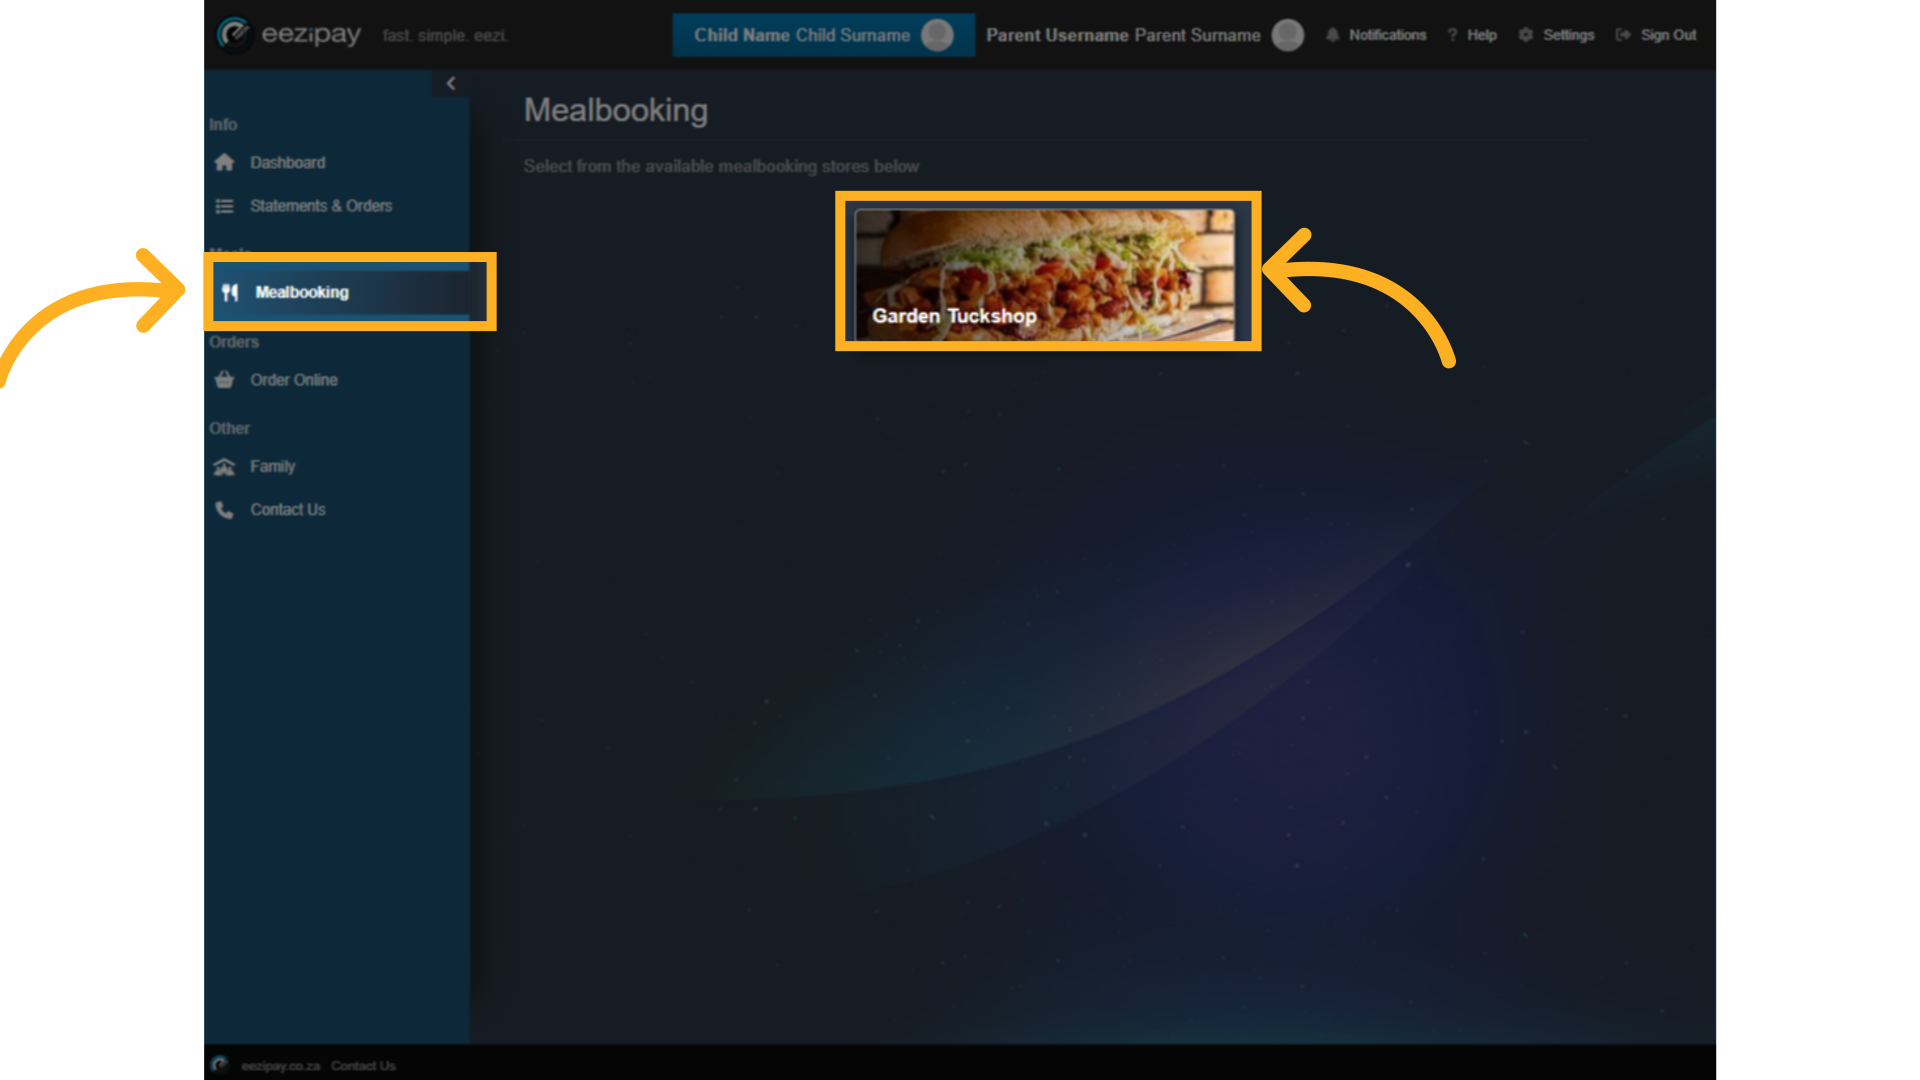
70. Add Meal
Simply select the meal you wish to order from the Mealbooking store by selecting the plus icon next to the meal item. To proceed with the payment click on the Checkout button.

71. Make Payment
Then select your Eeziwallet to complete the payment for the meal ordered.
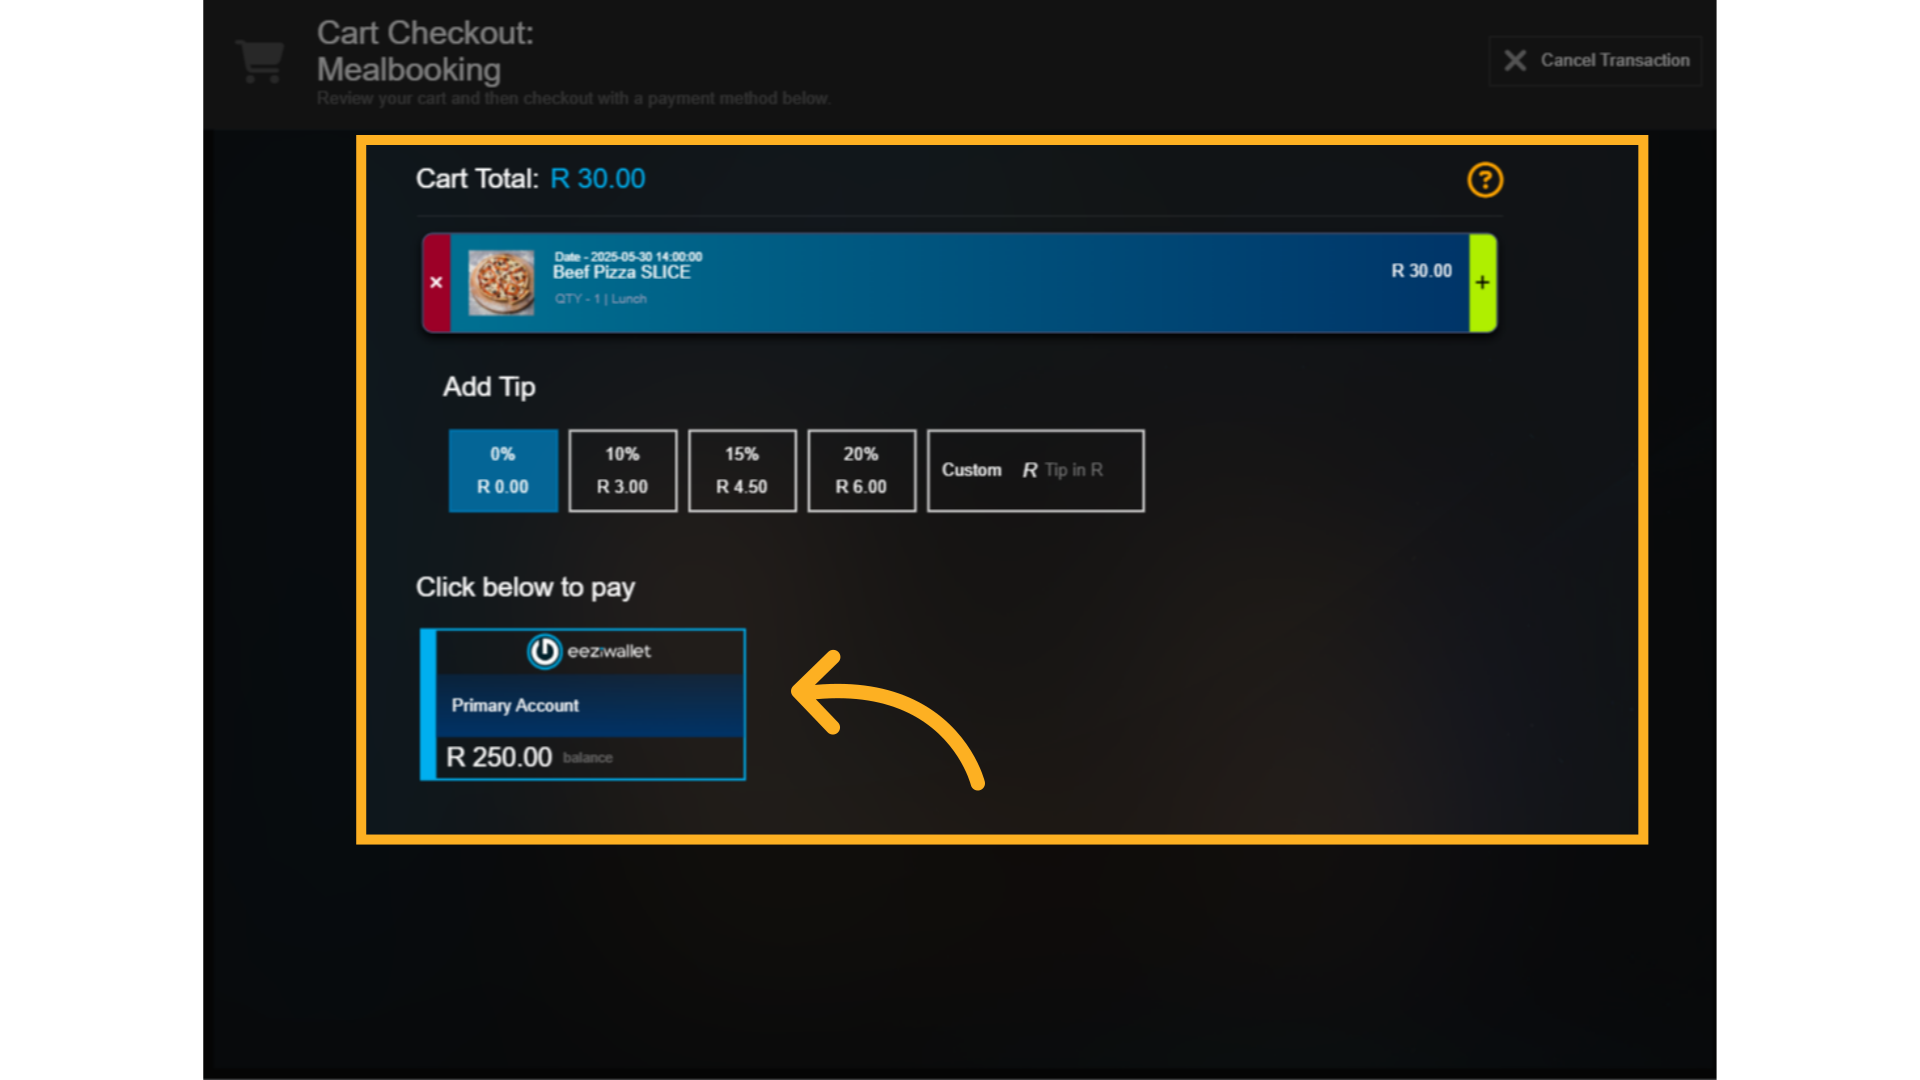
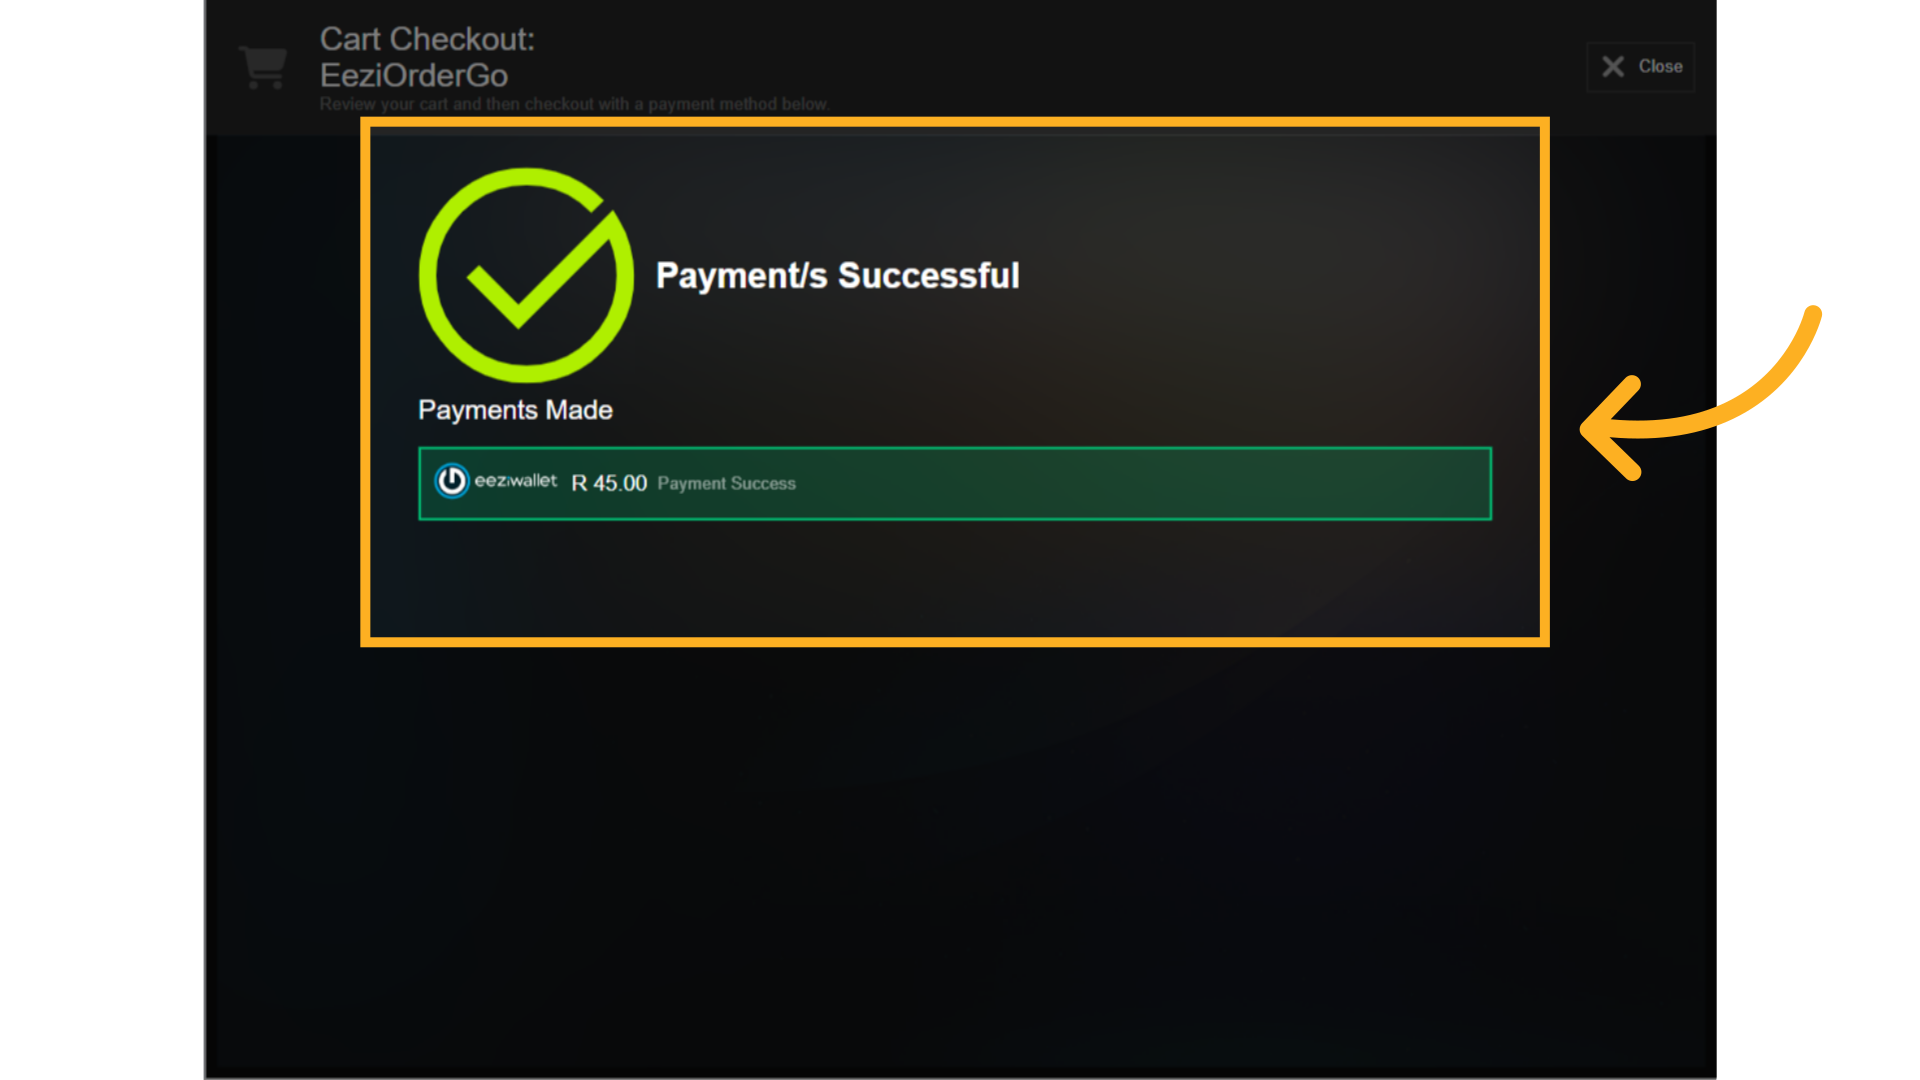
72. Close to return to Dashboard
The application will complete the payment and provide a success screen indicating that the payment was successful. To return to the Mealbooking store page, click on the Close button.

73. Sign out of child profile
To Sign Out of a child's profile, simply click on the Sign Out menu option located on the top right-hand corner of the application to return to the parent's Dashboard view.
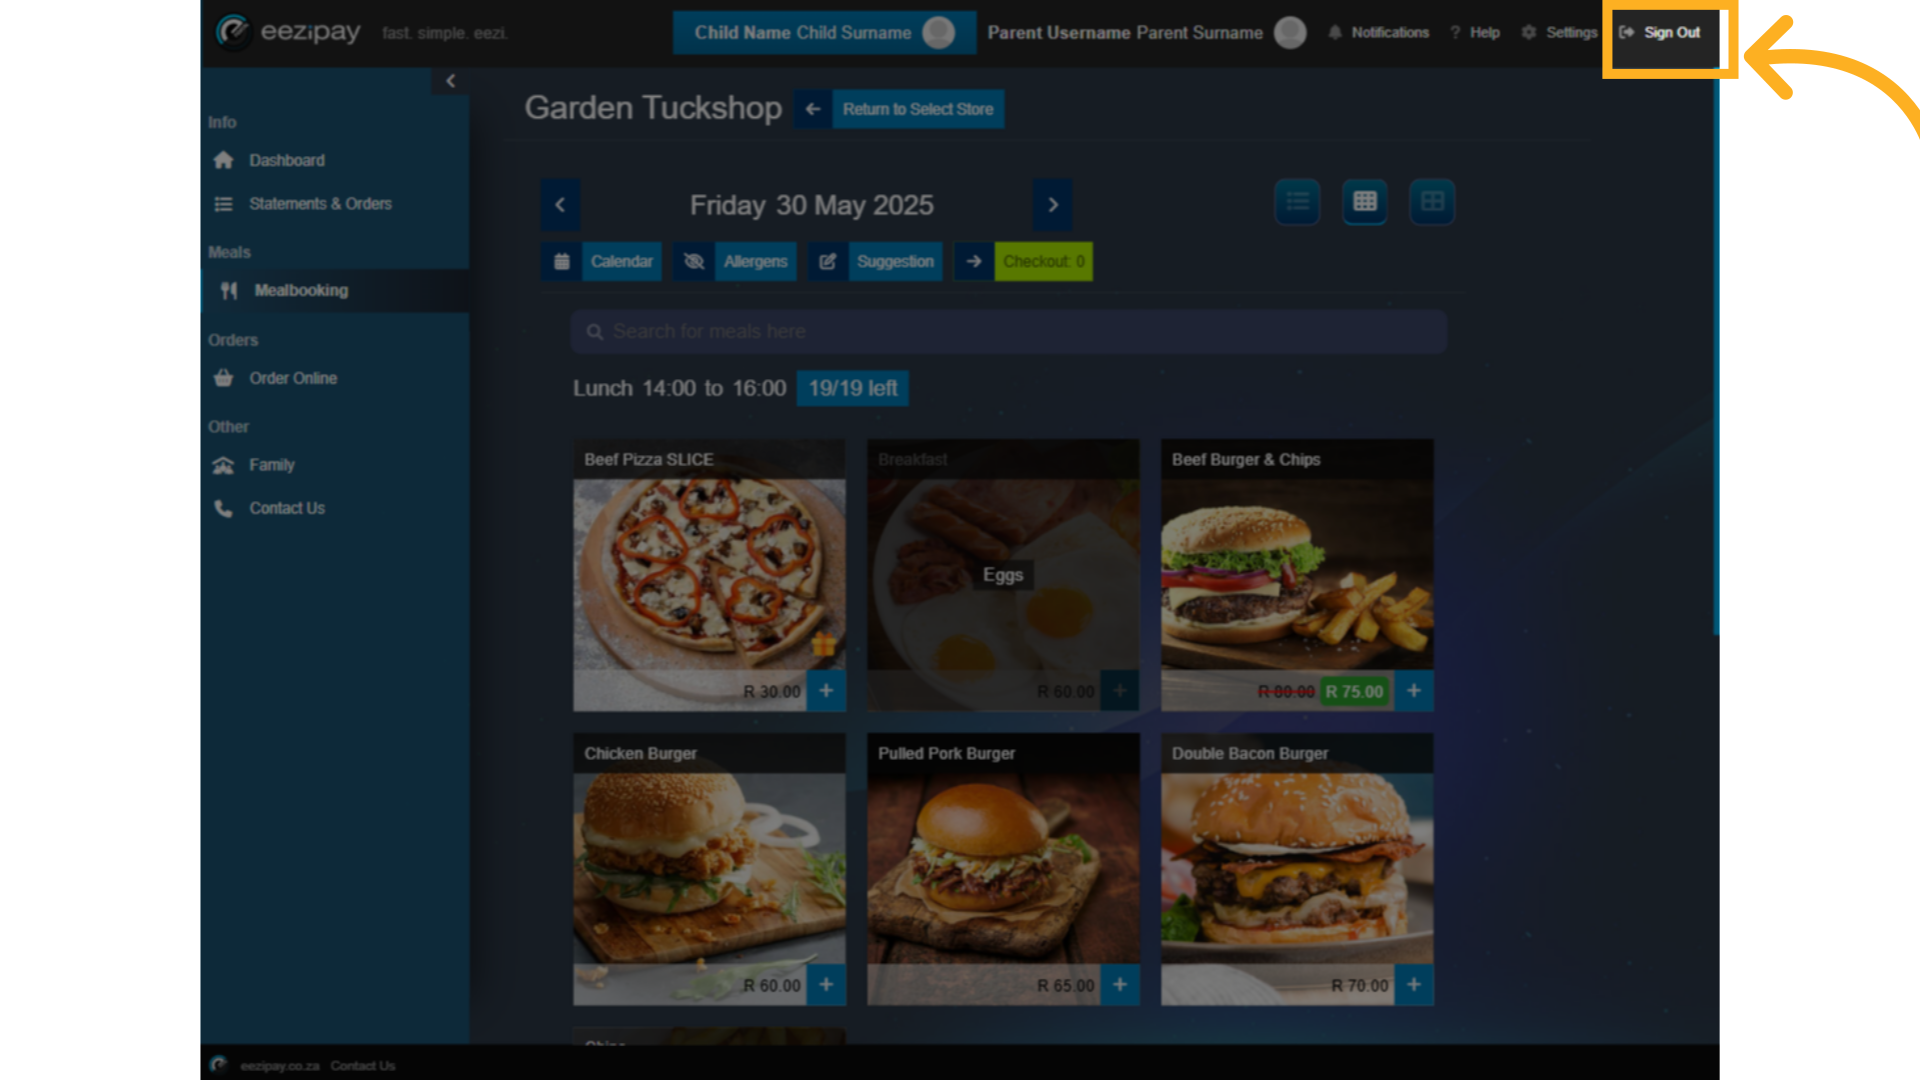
74. Sign out of the platform
To sign out of the entire platform, simply click on Sign Out again while in your parent account.

75. How to View Statements and Orders
How to View Statements and Orders

76. Statements and orders menu
Click on Statements & Orders in the left menu bar. The top menu bar shows three options, including the full Eezipay statement, order history, and meal orders. The Eezipay statement will show by default, and shows all transactions in your account, both incoming and outgoing.
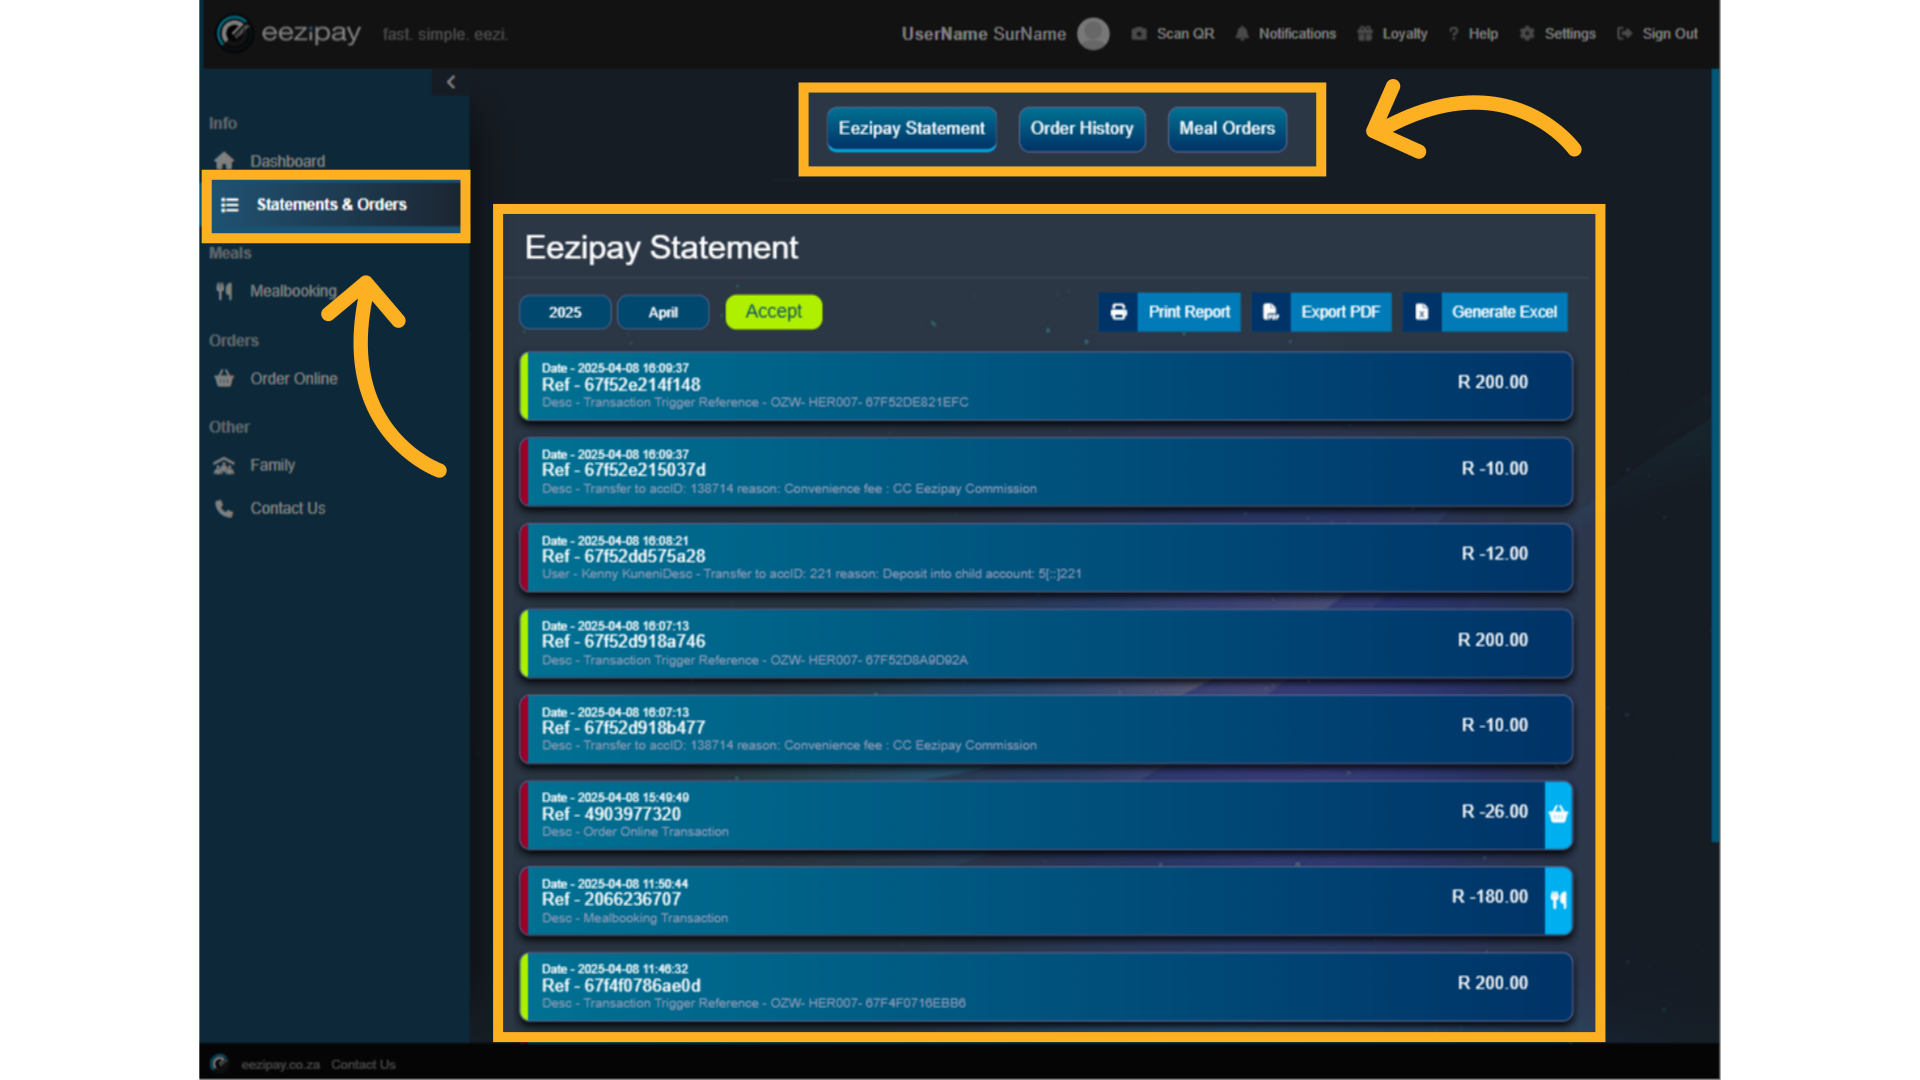
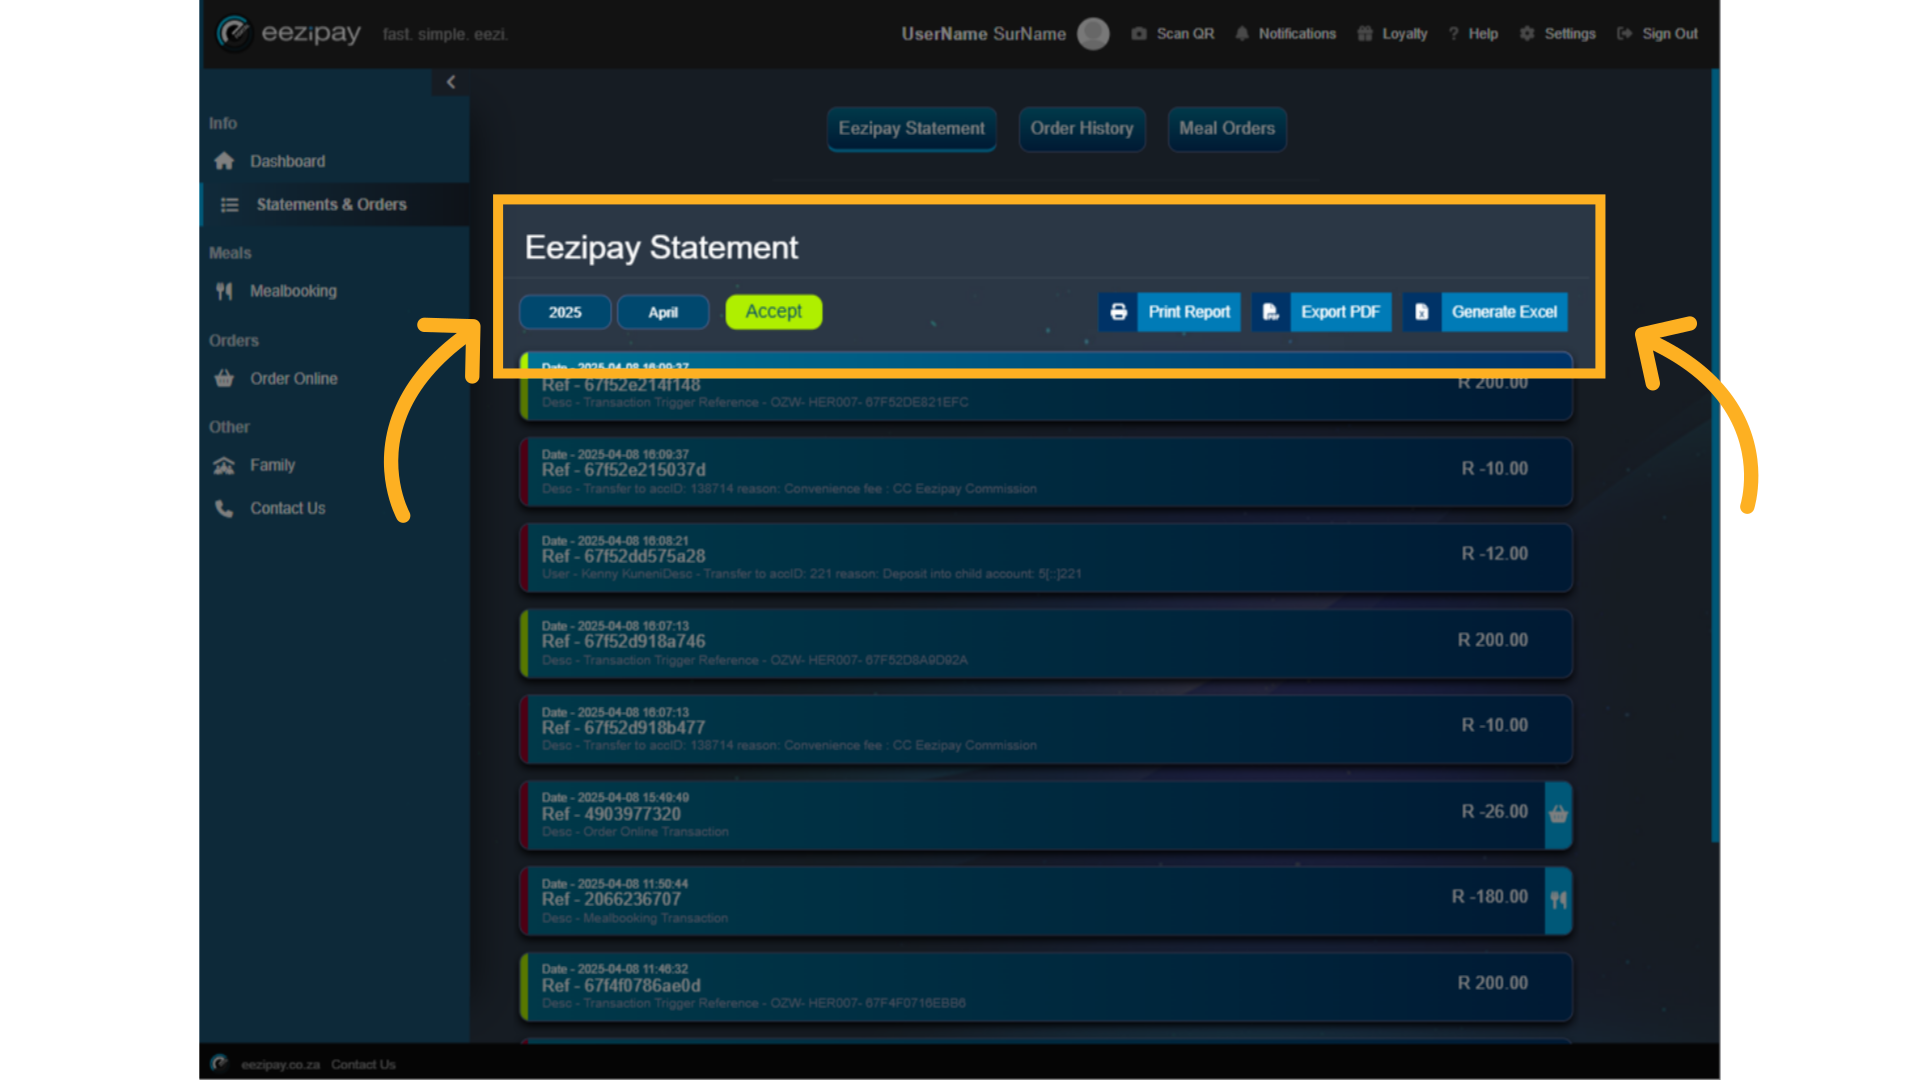
77. Statements and orders filtering
On the left you can filter by year and month, and on the right you can print or export a report, or generate an excel report for download.
78. Order online report
To view all online order transactions, simply click on the Order History button in the top menu. You can also filter these by month and year and download or print a report.
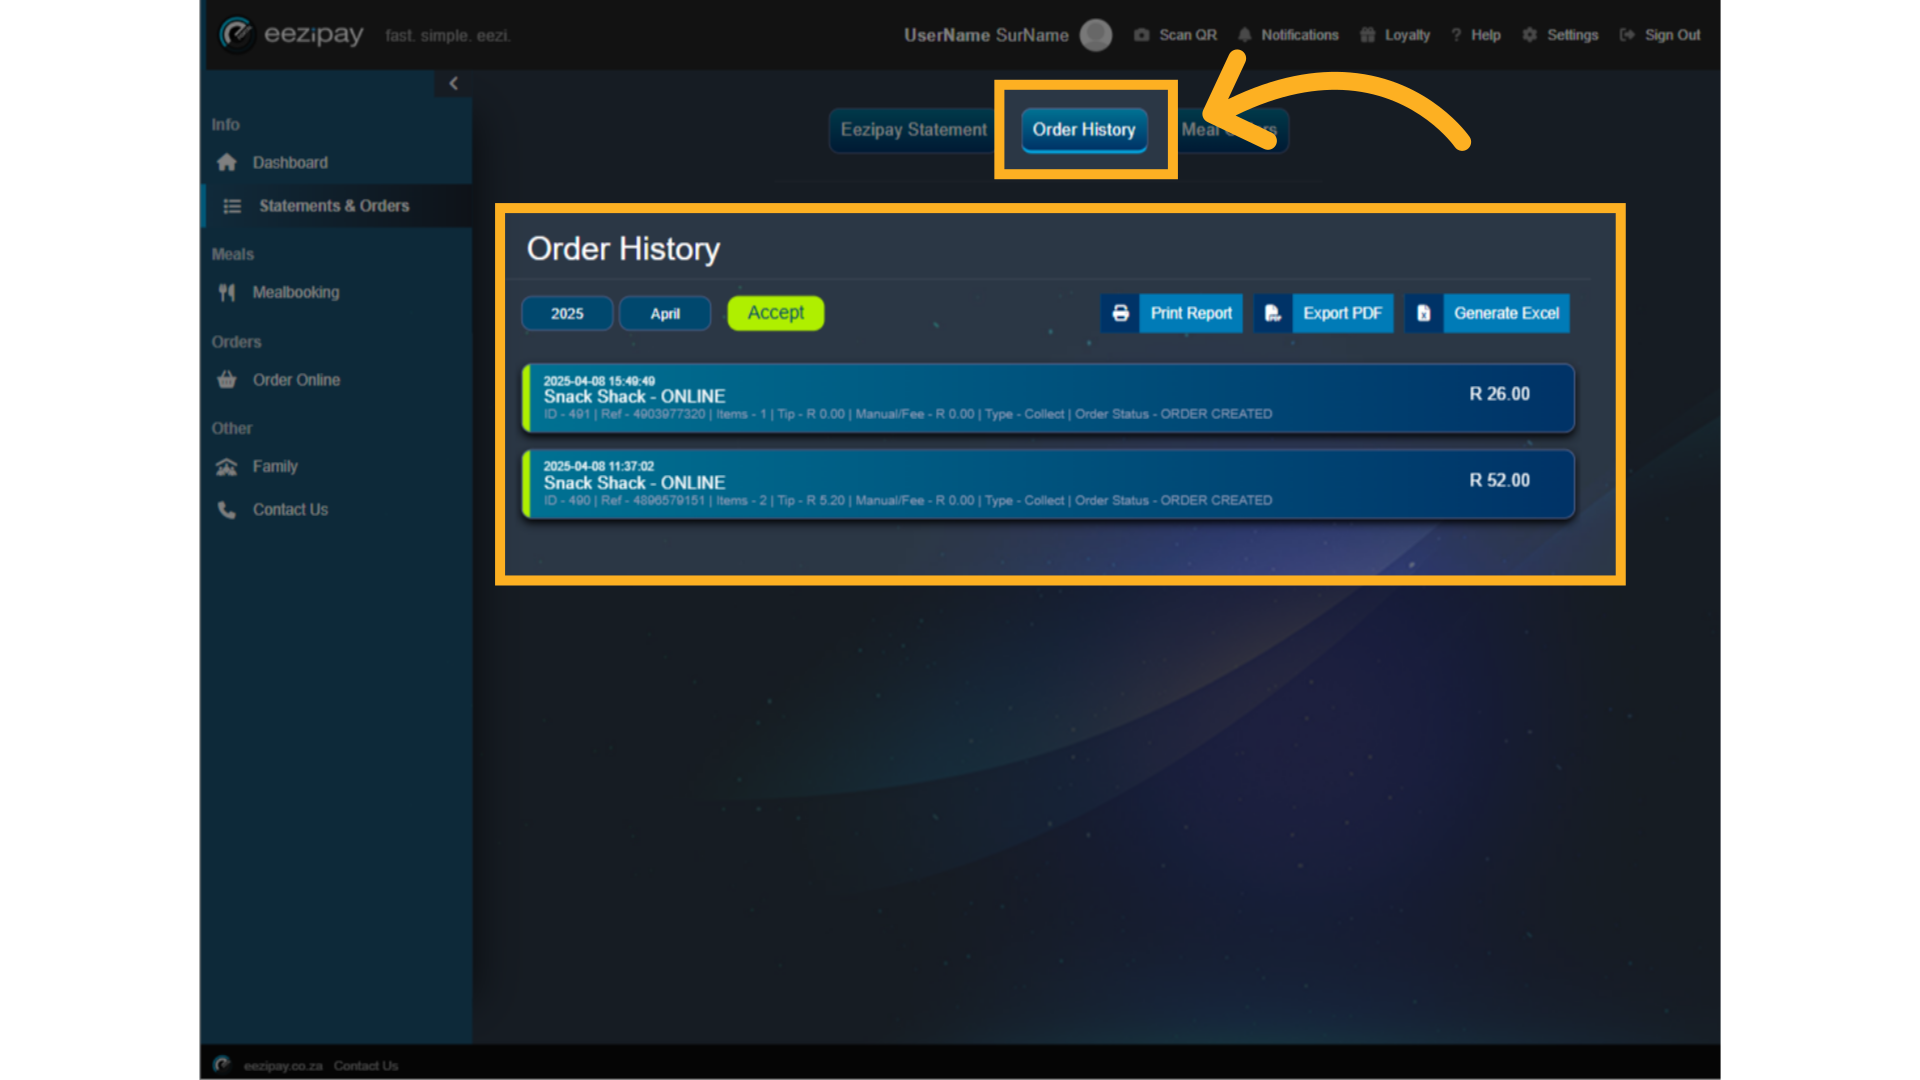
79. Meal order transactions
The same applies to meal order transactions.
80. How to Navigate User Settings
How to Navigate User Settings.
81. User Settings
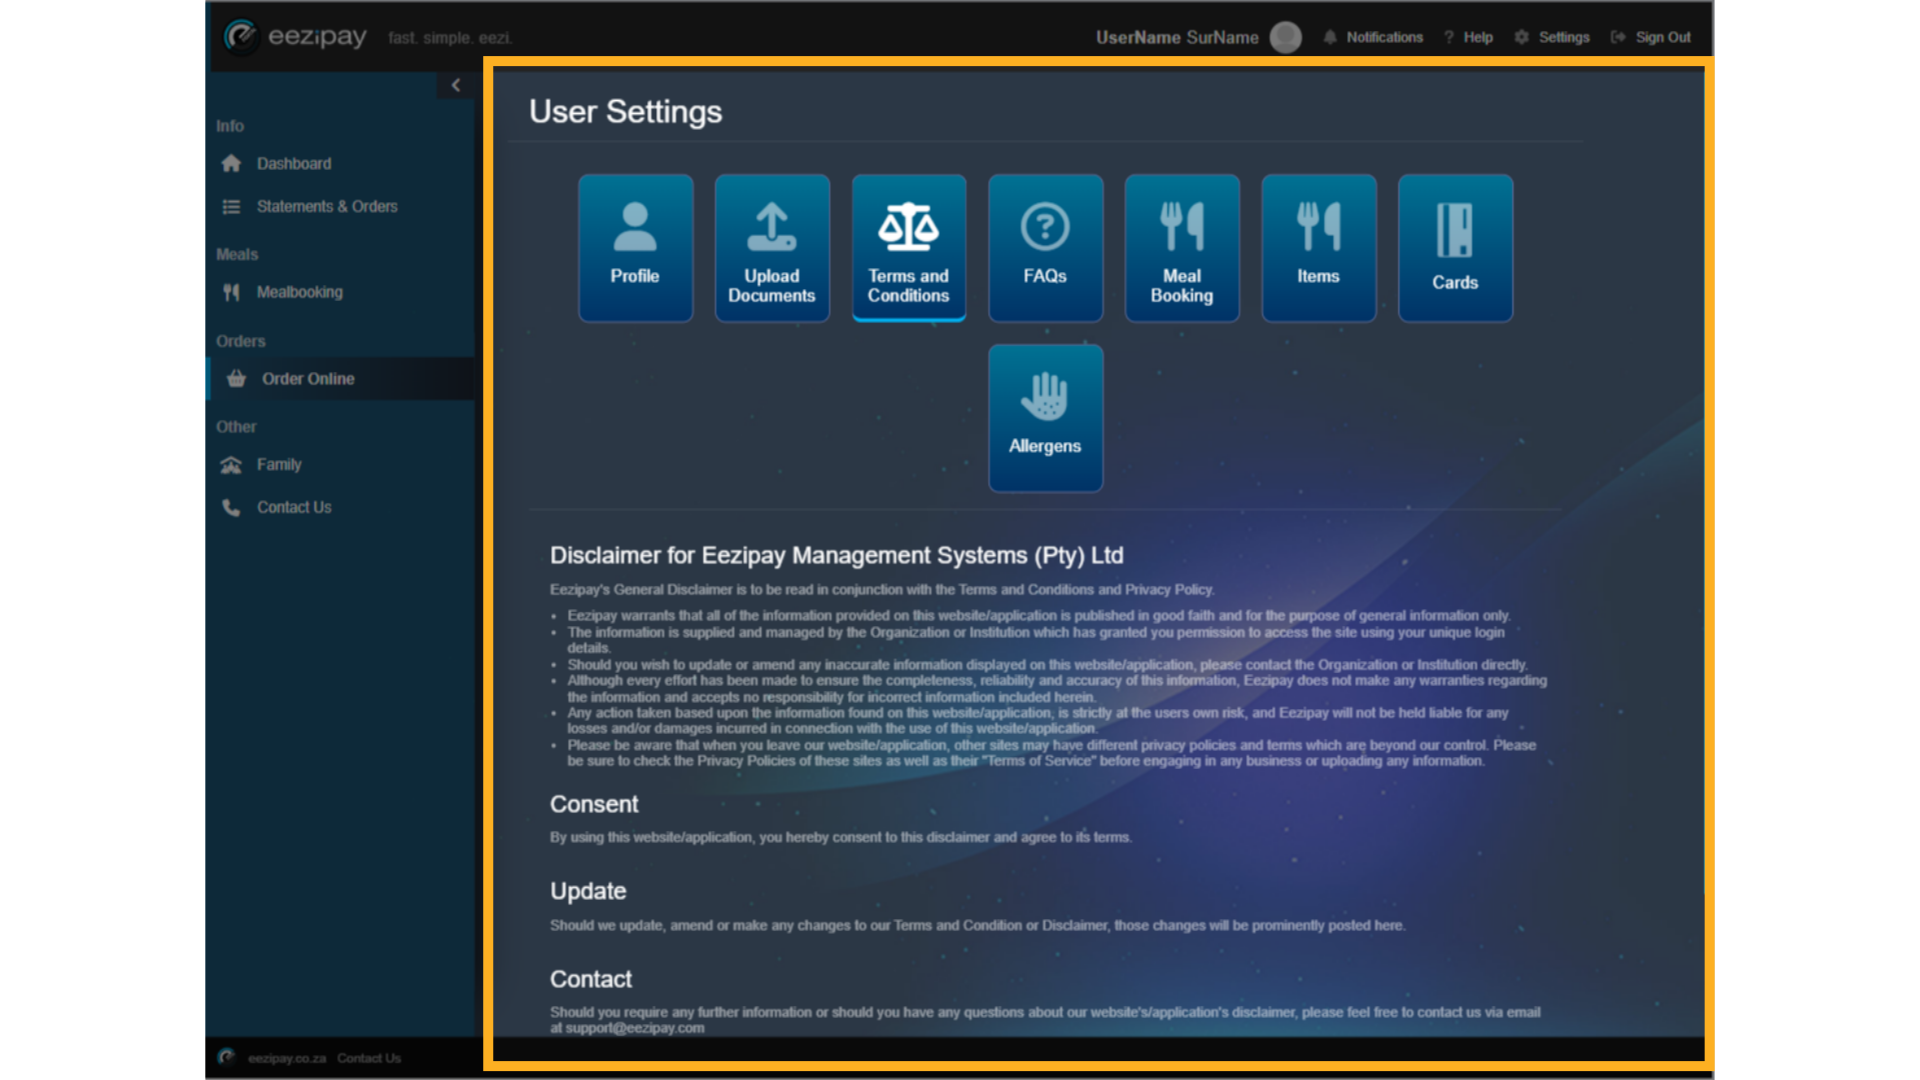
To navigate to User Settings click on the Settings cog wheel located on the right-hand corner of the Portal. Here you can update your Profile, Upload Documents, view our Terms and Conditions, see the FAQs, and make changes to settings for Meal Booking, Items, Cards, and Allergens.
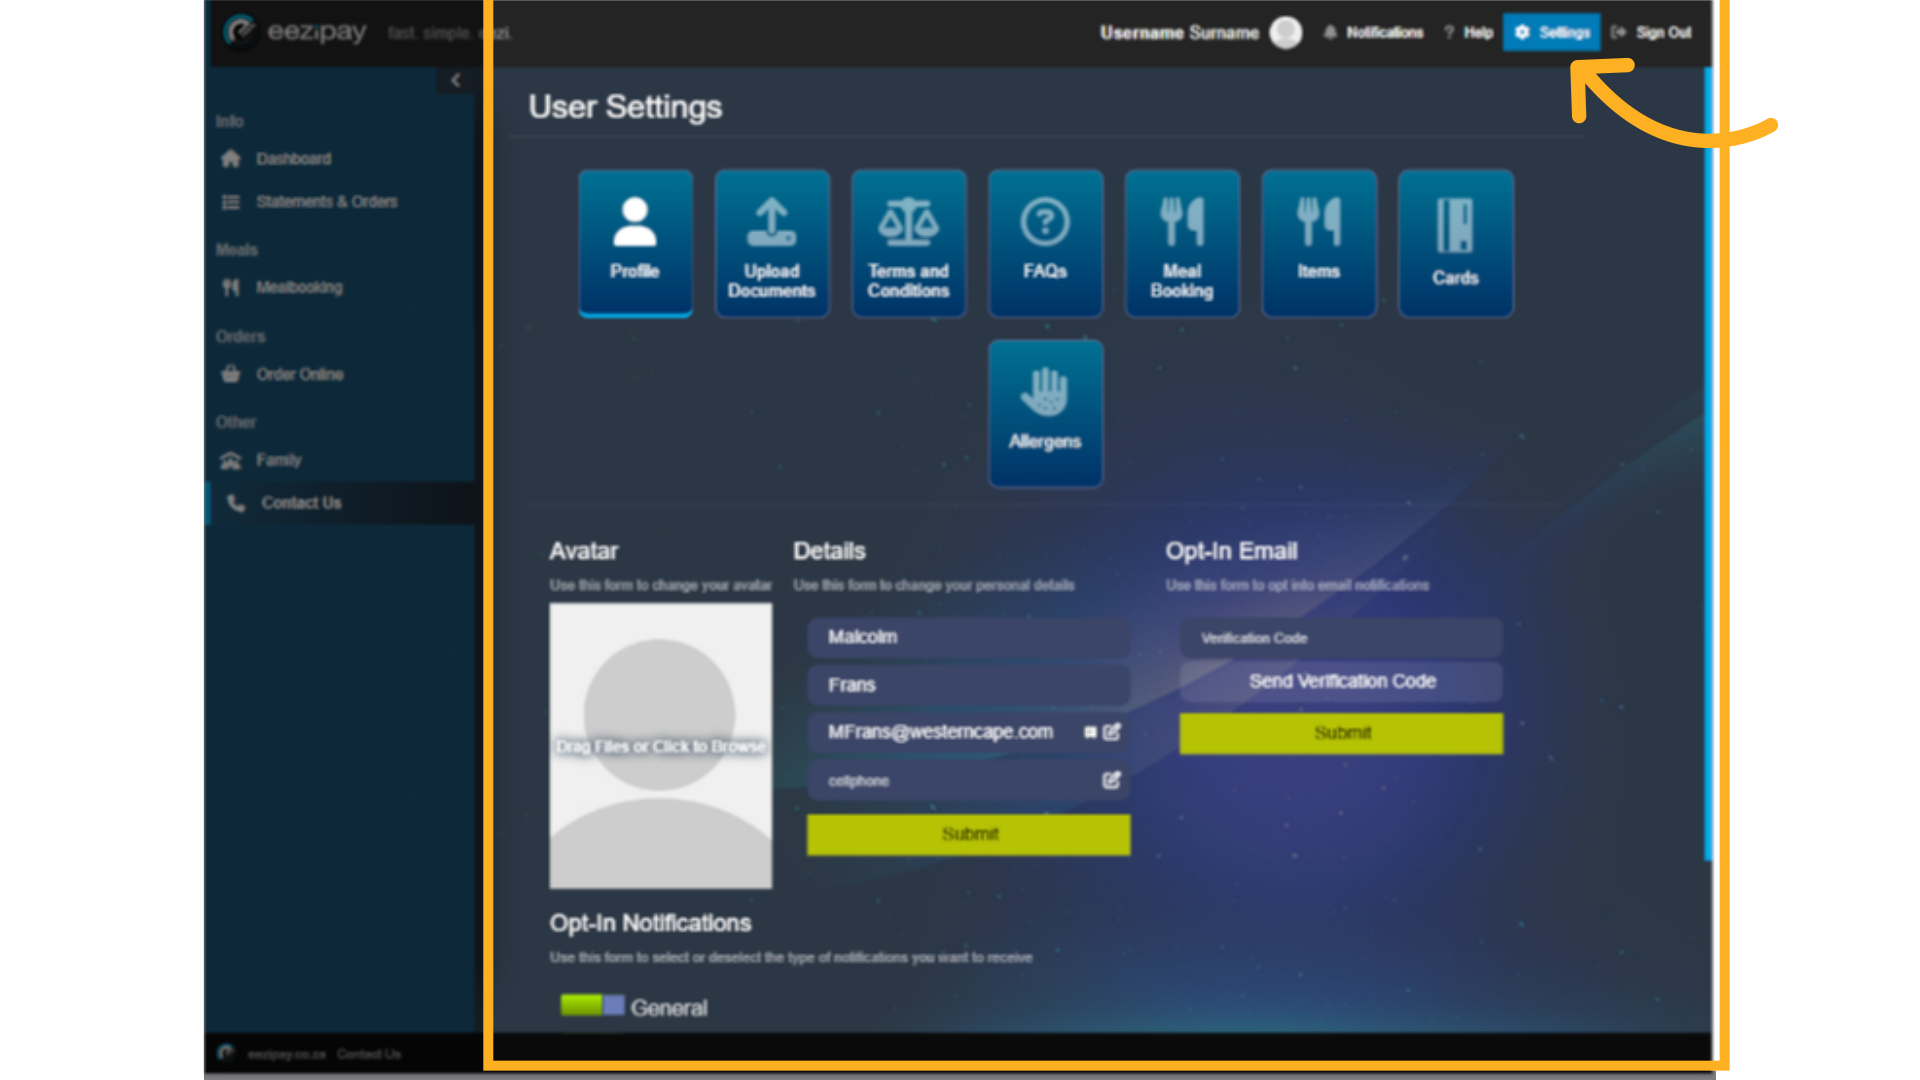
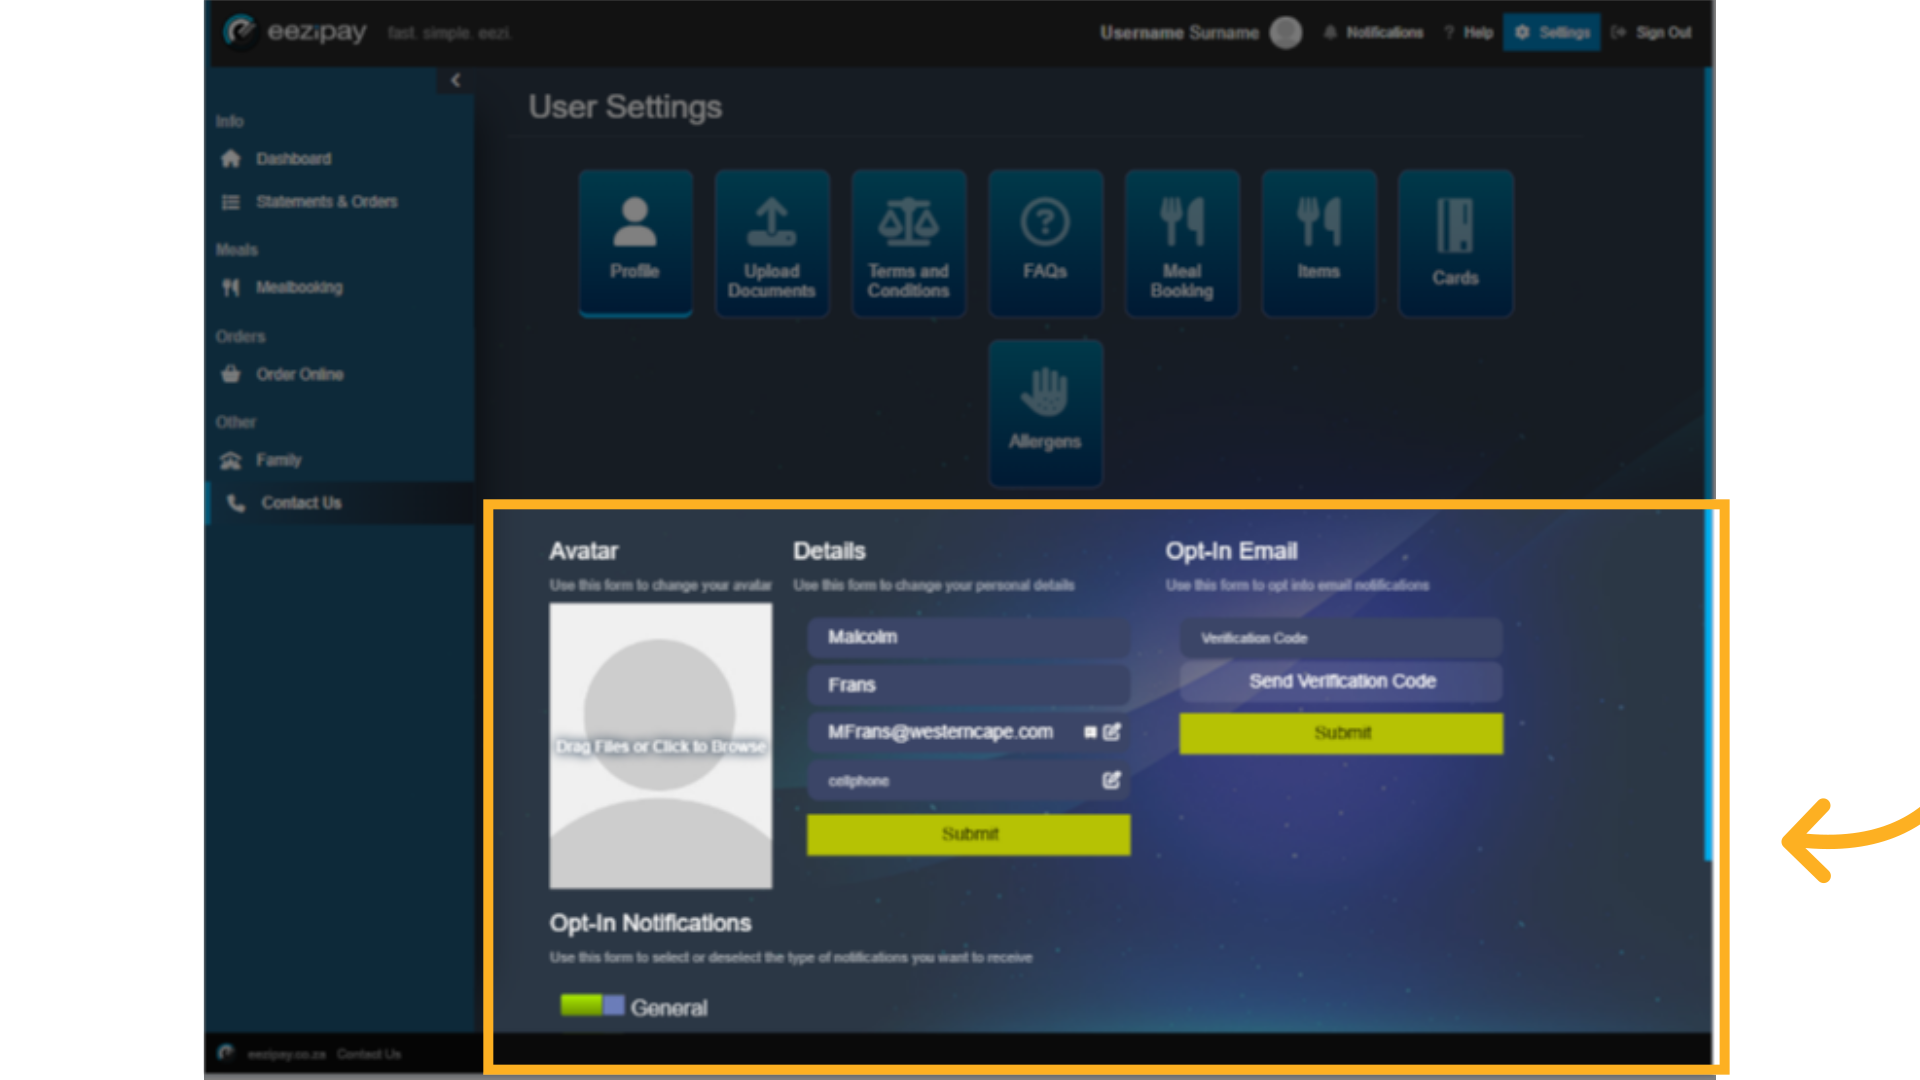
82. Profile
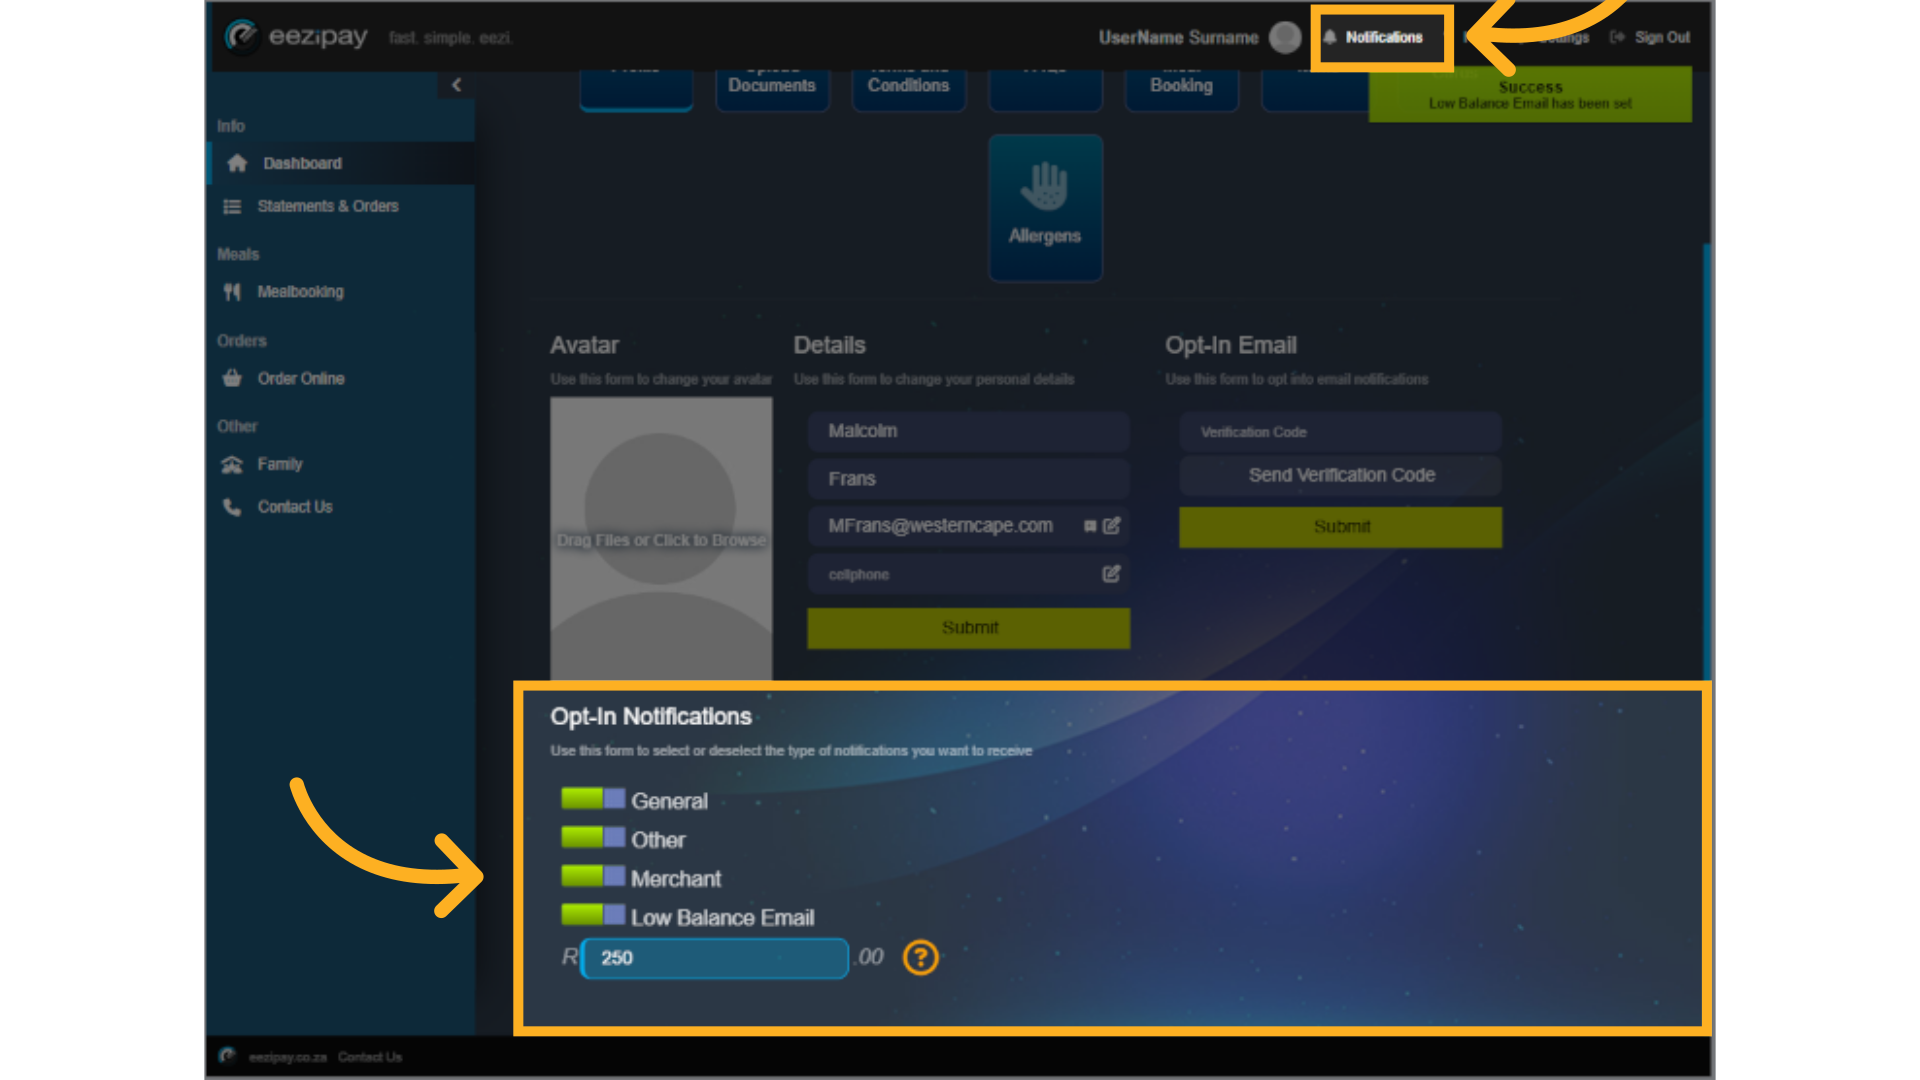
On the Profile settings page, you can upload your profile picture, update your contact details, verify your email, and setup your opt-in notifications.
83. Notifications
Notifications are part of the user profile settings, but can also be accessed by clicking on the Notifications button at the top right-hand corner of the application. To Opt-in or Opt-out of receiving Notifications, simply click on the toggles you wish to opt into. Please note that some schools may have mandatory notifications set. To enable a Low Balance Email notification, toggle on the notification and then insert the amount in rands. Once your account reaches this balance, you will be sent a notification to remind you to top up.
84. Upload Documents
On the "Upload Documents" page, you can upload images of your ID Card, proof of address, and any other documents. To upload a document, simply click on the graphic placeholder or drag and drop your file into the space.

85. Terms & Conditions
Eezipay’s Terms and Conditions can be viewed by clicking on the Terms and Conditions button.
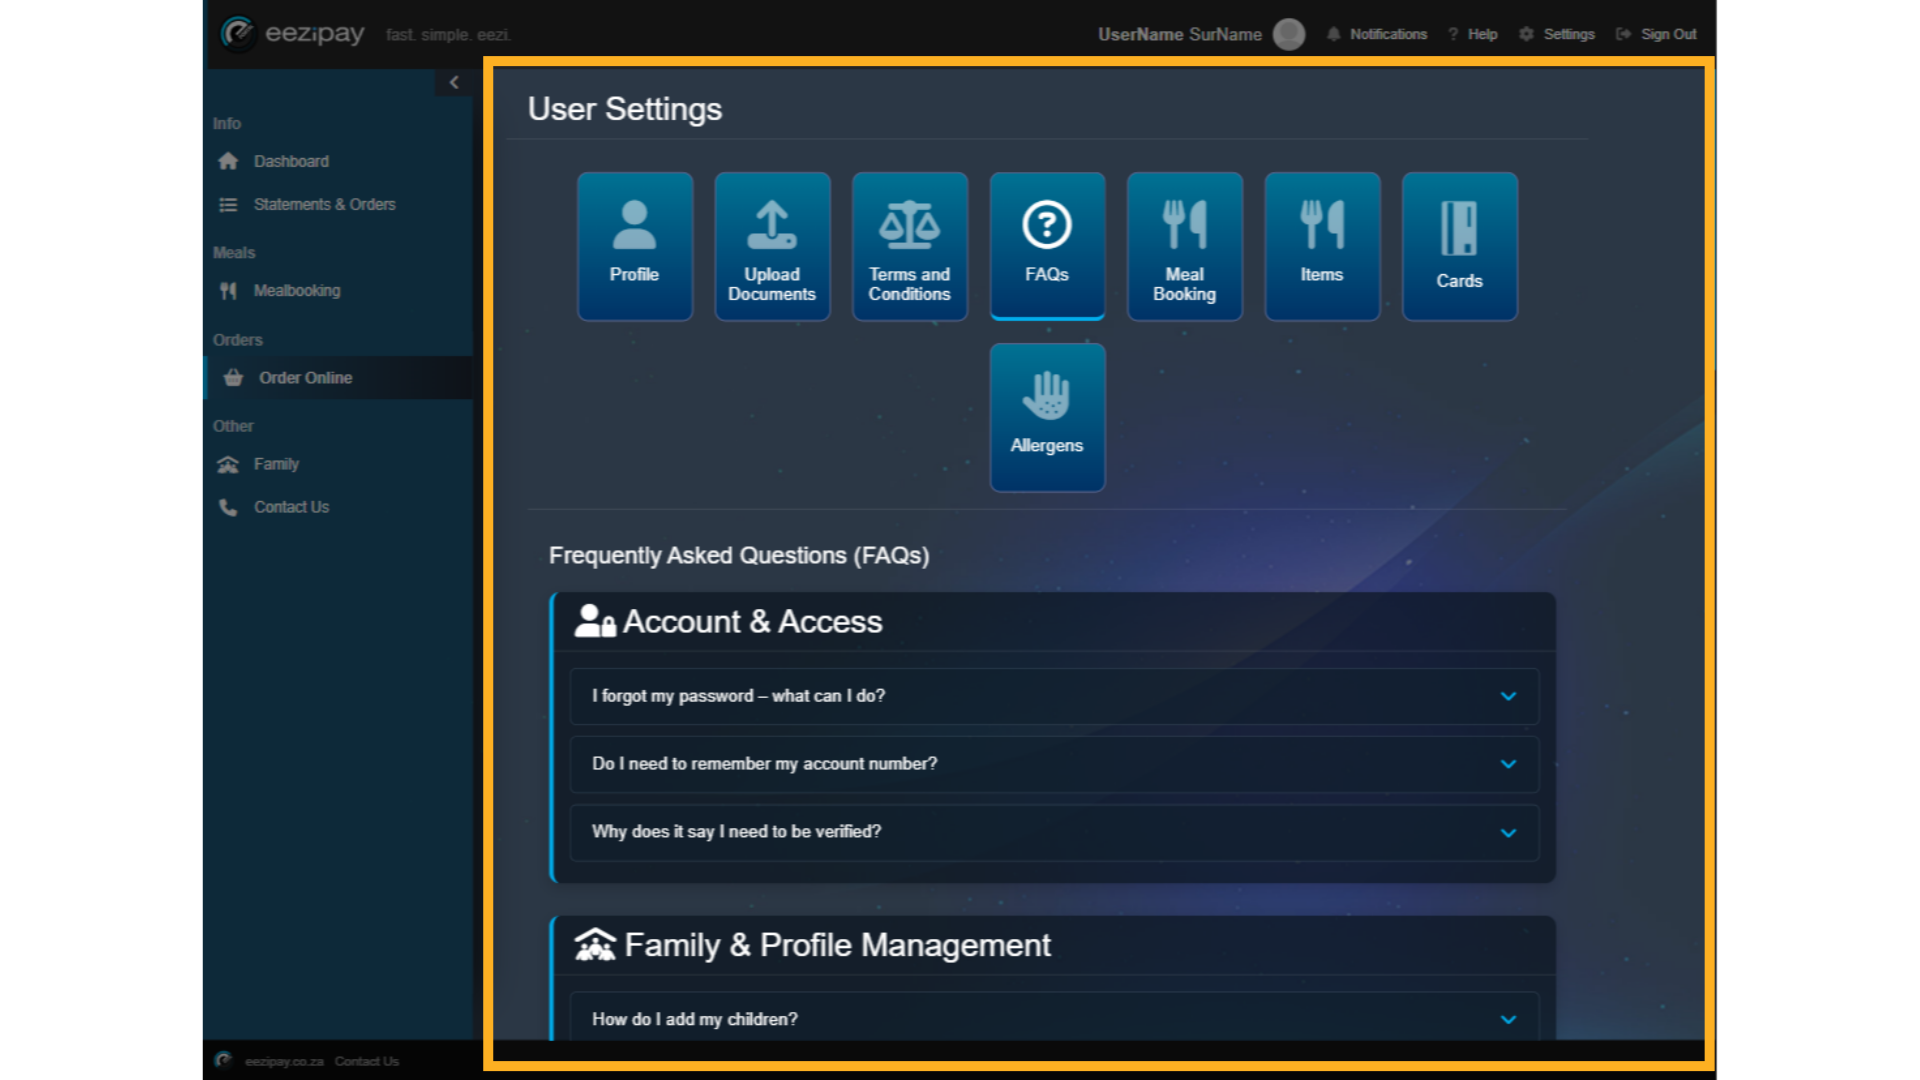
86. FAQs
And the FAQs by clicking on the FAQs button.
87. MealBooking Settings
On the Meal Booking settings page you can manage the reviews you have made relating to meal bookings.

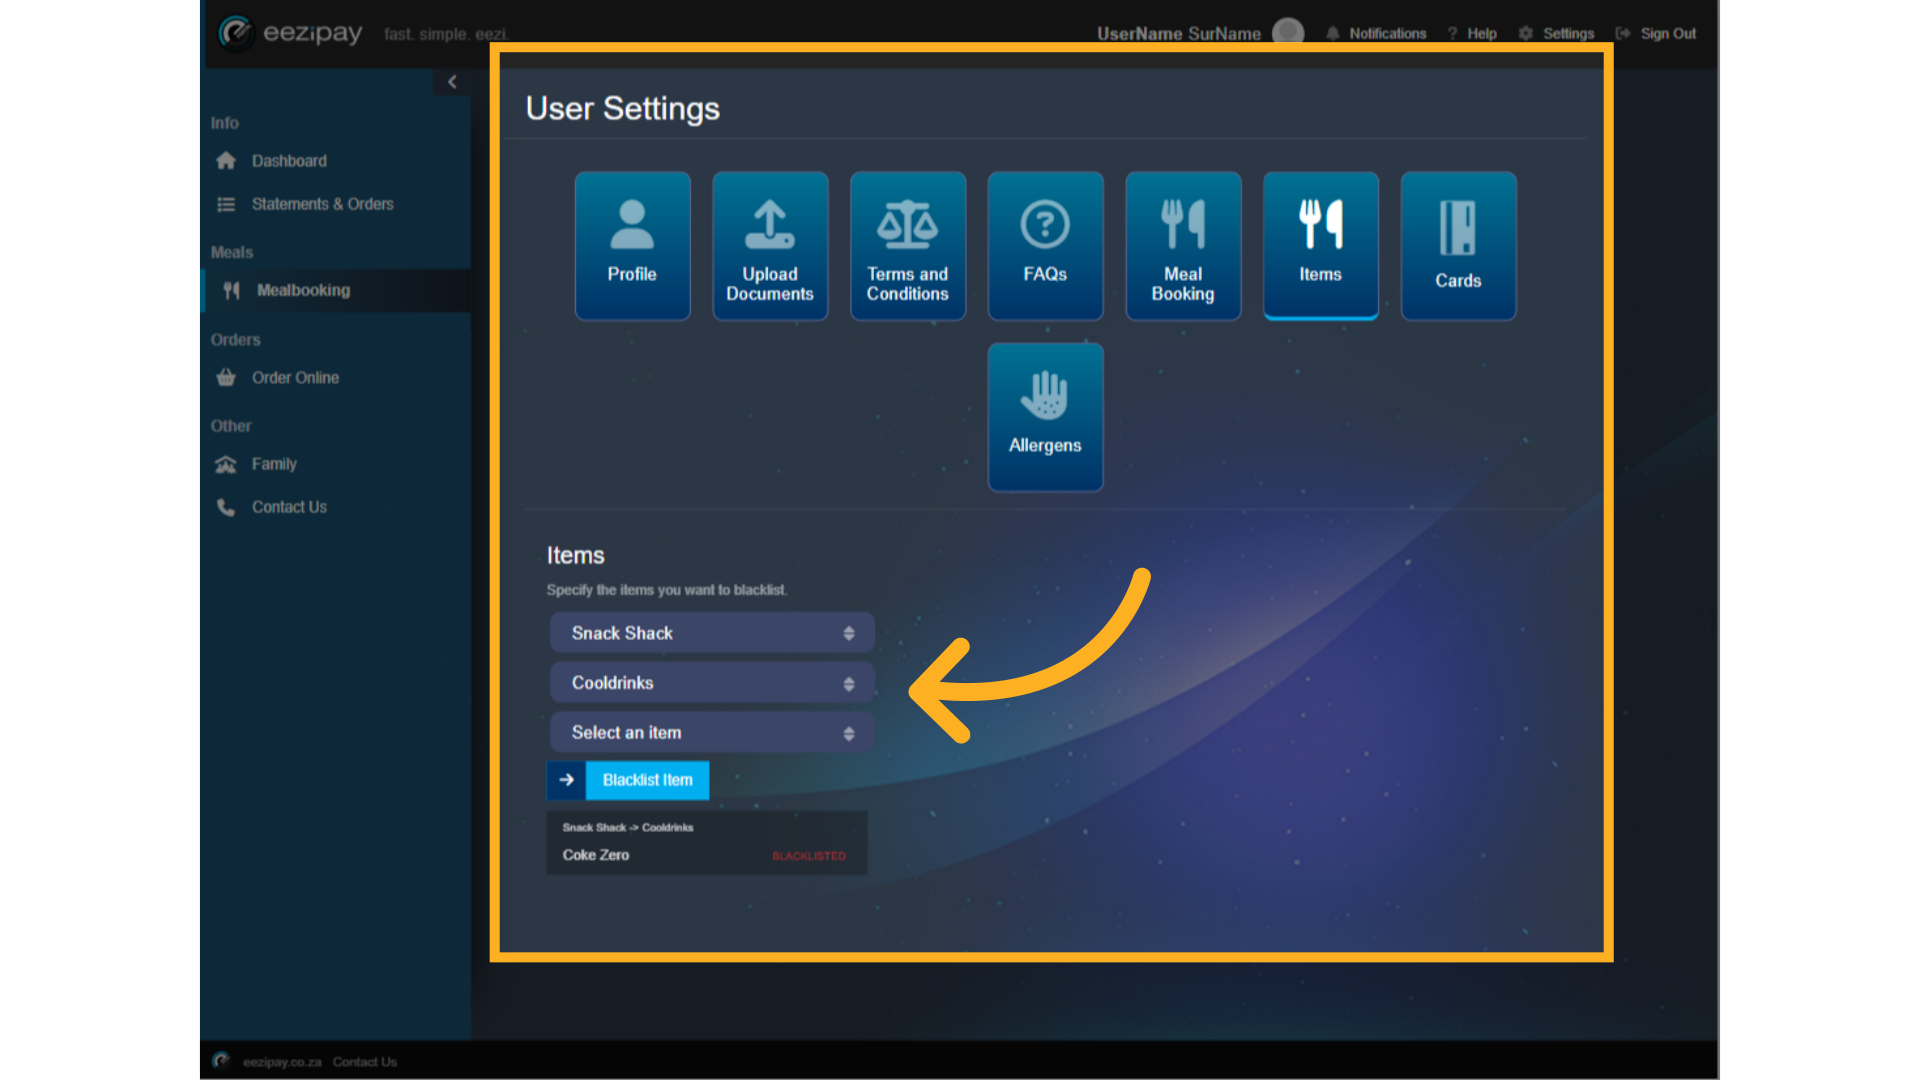
88. Items for Blacklisting
In the items settings page you can select which items are blacklisted. Once blacklisted, items will not be purchasable from any store. Select The Store, Select the category, Select The Item, and Click on the Blacklist Item button. Once completed the system will blacklist the item and the system will display it as such.
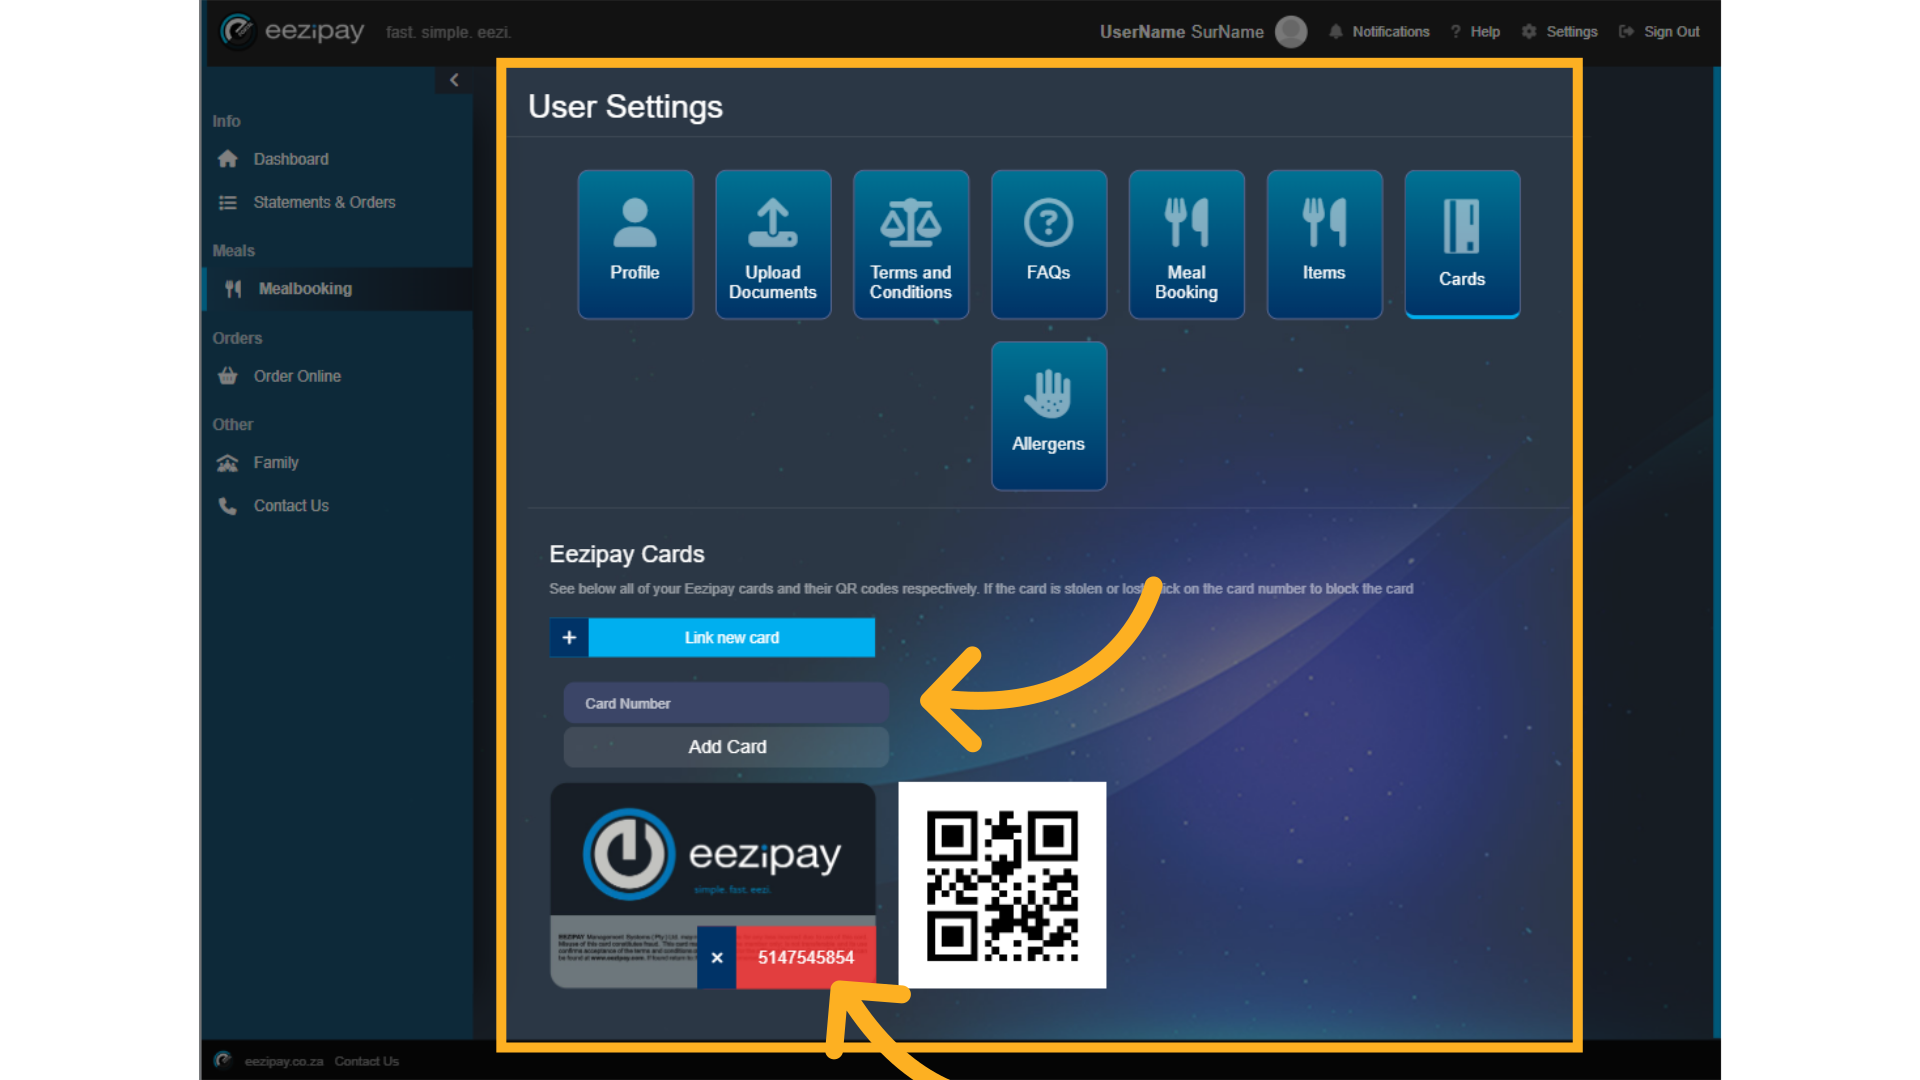
89. Cards
You can manage your cards by clicking on the Cards button in the settings area. You can cancel cards by clicking on the red area on the card. You can also link new cards by first clicking on the Link New Card button, then inserting the card number in the space provided, and finally clicking on Add Card. Please Note this is the Family Account card. Children's cards can be added under the family tab or by logging in as a Child.
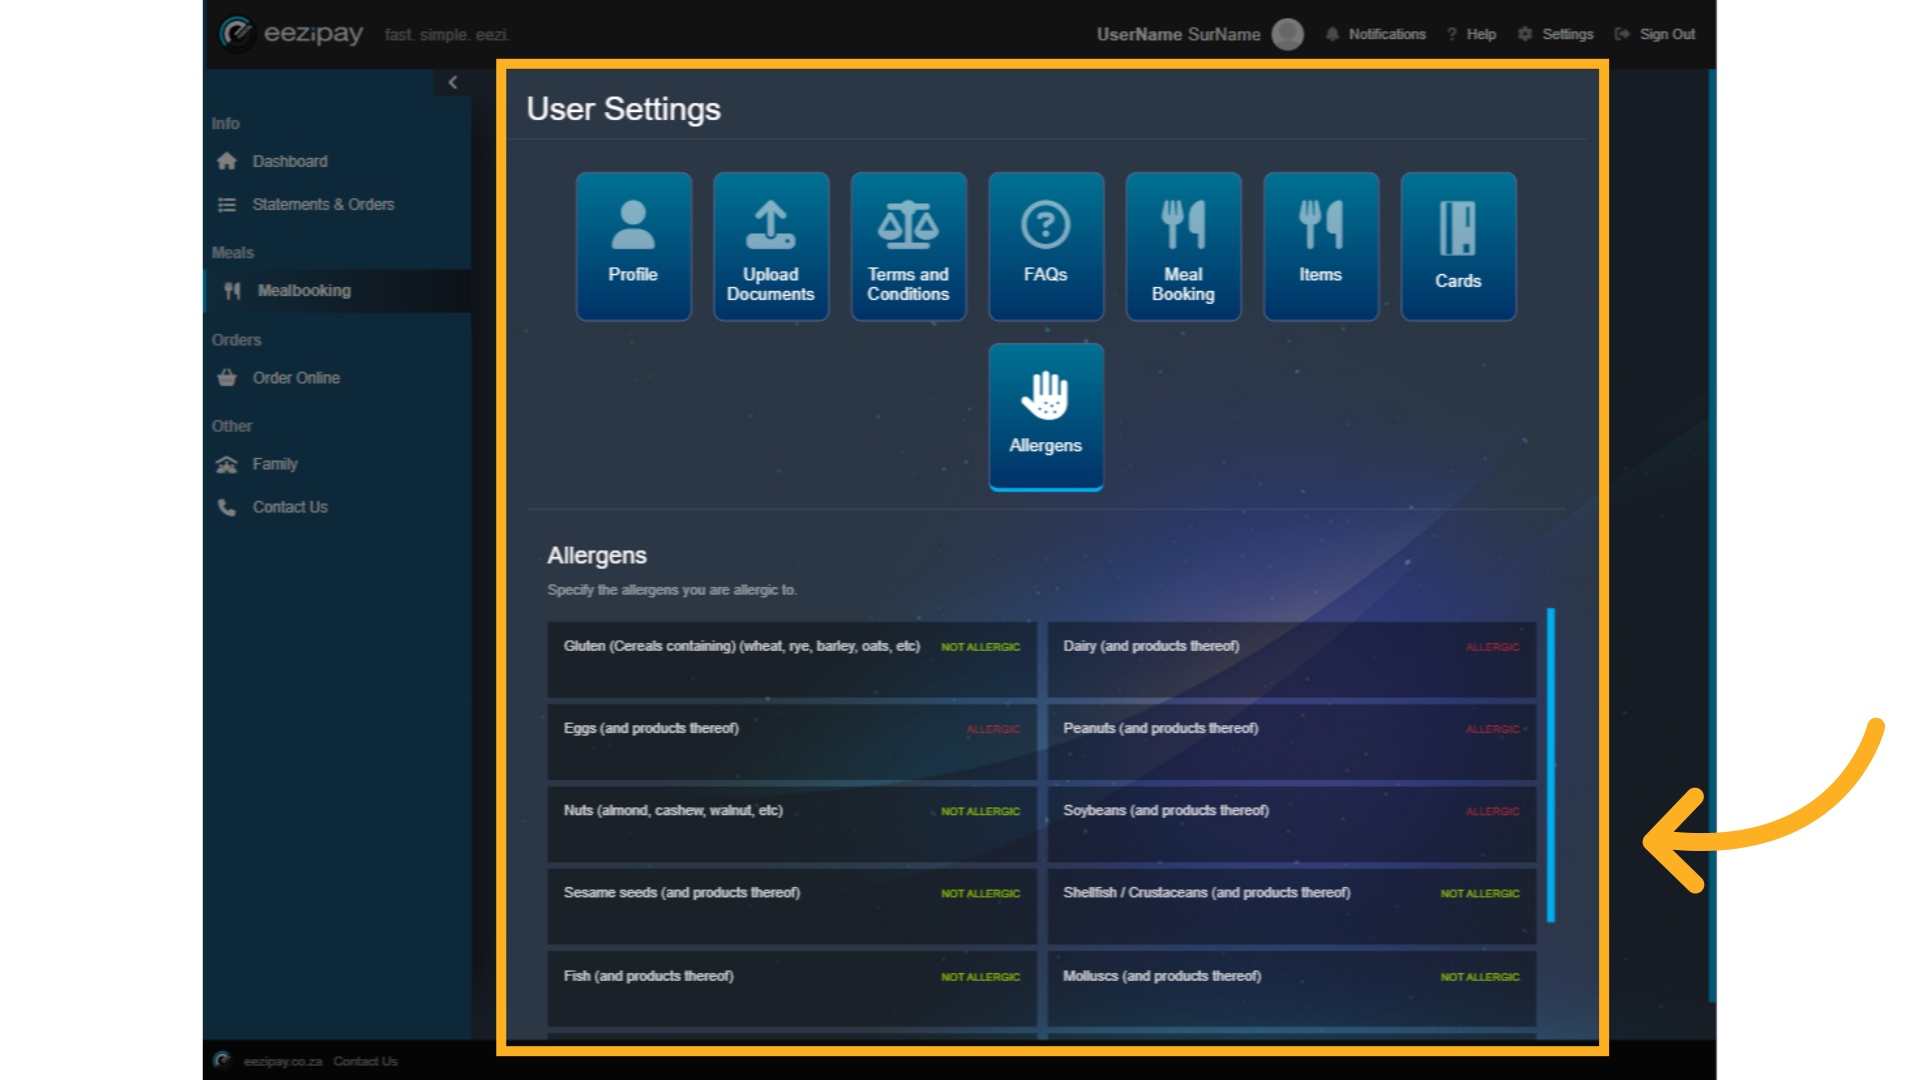
90. Manage Allergens
To manage allergens click on the Allergens button. You will see all the available allergens. To select an allergen, click on the green Not Allergic text to change it to the Red Allergic text.
91. How to Contact Eezipay
How to Contact Eezipay

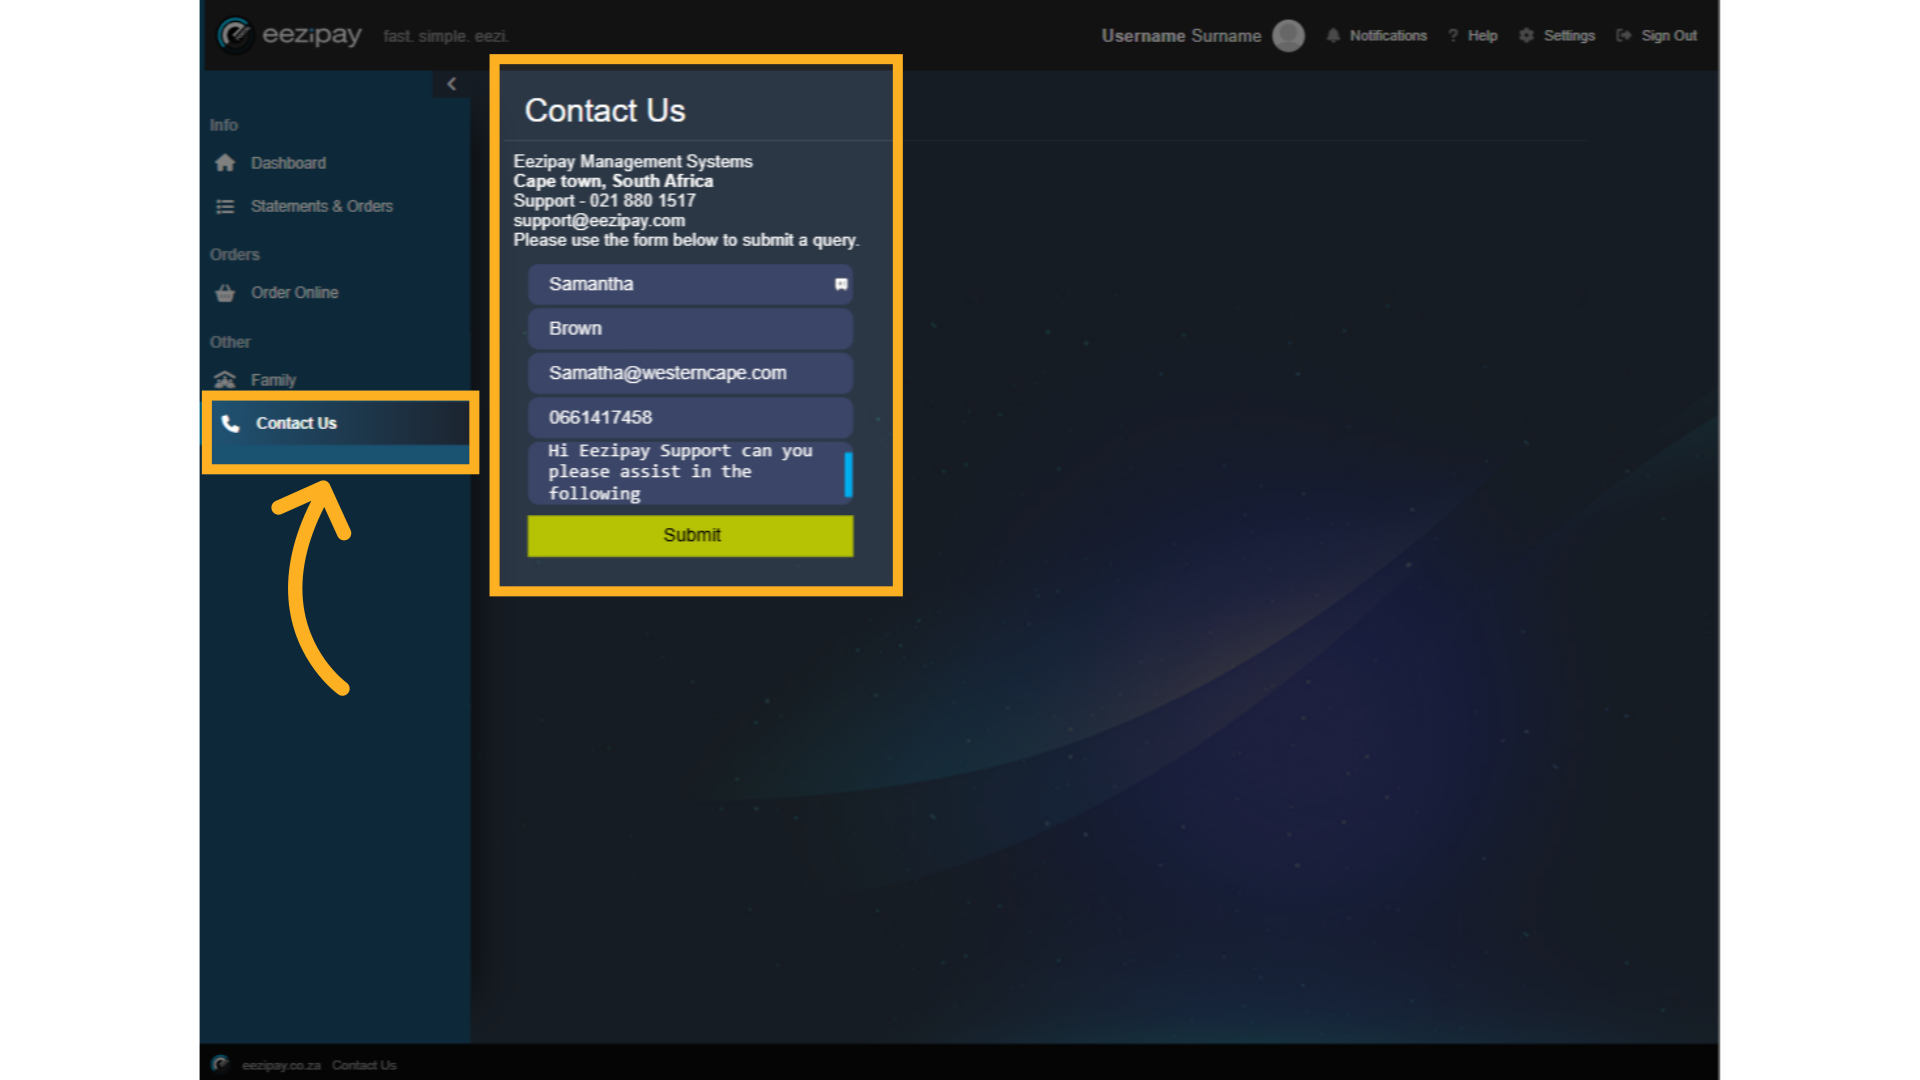
92. Contact US
Users can simply click on the Contact Us button followed by entering their name, surname, email address, cellphone number (optional) and entering their message, followed by clicking on the Submit button to initiate contact with Eezipay Support
Thank you for taking the time to watch this Parent Guide for Cashless Campus. If you have any questions or need further assistance, our support team is here to help. Simply reach out via email at support@eezipay.com. At Eezipay, we’re committed to making your cashless campus experience simple, fast, and eezi.
